8
Short Overview of the Operation
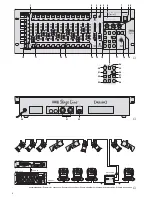
Adjusting a scene
1) Select the control channel group(s) with buttons
CTRL CHANNEL PAGE [1..12] to [85..96].
2) Adjust the fader MASTER LEVEL to maximum
value.
3) Adjust the scene with the sliding controls (last
value must be “fetched” by the fader).
4) If necessary, activate the control lever MOTION
CONTROL for coarse presetting (with STICK
CONTROL ASSIGN 1/2 and/or 7/8: the LED be-
low the corresponding sliding controls lights up).
Crossfading to another adjustment
1) Adjust the 1st scene.
2) Press button HOLD: LED HOLD/CROSSFADE
lights up.
3) Adjust the 2nd scene.
4) Adjust the crossfading time with the control C.F.
TIME.
5) Press button HOLD: the crossfading starts – or
crossfade manually.
Manual crossfading
1) Turn the control C.F. TIME to the right stop: Dis-
play: “CFTIME: manu.”, LED MANUAL CROSS-
FADE lights up.
2) Set crossfader MANUAL CROSSFADE to an end
position.
3) Move the crossfader to the other end position:
The crossfading starts running. When reaching
the other end position, the crossfading stops.
Memorizing a scene
1) Adjust the scene.
2) Select the bank with buttons
,
or button
BANK and numerical keys [0] [1] ... [2] [0].
3) Press button STORE.
4) Press the button for the scene [1] ... [12].
Calling a scene
1) Select the bank with buttons
,
or button
BANK and numerical keys [0] [1] ... [2] [0].
2) Adjust the crossfading time with control C.F.
TIME.
3) Press the scene button [1] ... [12]: crossfading
starts – or crossfade manually.
Flash buttons
Function “FLASH CHANNEL”
1) Press button FLASH MODE so many times until
the red LED FL. CH. lights up.
2) Select the control channel group(s) with buttons
CTRL CHANNEL PAGE.
3) Keep the flash button (below the sliding controls)
pressed.
Function “FLASH GROUP”
1) Press button FLASH MODE so many times until
the yellow LED FL. GRP. lights up.
2) Keep the flash button [1] ... [5] pressed.
Function “SHOW VALUE”
1) Press button FLASH MODE so many times until
the green LED SH. VAL. lights up.
2) Select the control channel group with button
CTRL CHANNEL PAGE.
3) Press the flash button: the display shows the cor-
responding channel value.
Programming a flash group
1) Keep button FLASH MODE pressed and press
button STORE: LEDs FL. CH. and FL. GRP. light
up.
2) Select the channels with buttons CTRL CHAN-
NEL PAGE and the flash buttons.
3) Press button STORE: LED FL. CH. is extin-
guished, LED FL. GRP. is still illuminated.
4) Press the flash button [1] ... [5] for the desired
group memory.
Changing a flash group
1) Press button FLASH MODE so many times until
the yellow LED FL. GRP. lights up.
2) Keep the corresponding flash button(s) [1] ... [5]
pressed and press button STORE: LEDs FL. CH.
and FL. GRP. light up.
3) Select additional channels or cancel selected
channels (with buttons CTRL CHANNEL PAGE
and the flash buttons).
4) Press button STORE: LED FL. CH. is extin-
guished, LED FL. GRP. is still illuminated.
5) Press the flash button [1] ... [5] for the desired
group memory.
Run of a scene sequence
1) Press button SEQUENCE: The green LED RUN
lights up.
2) Select the sequence number with the numerical
keys [0] [1] ... [6] [0].
Time-controlled start
1) Specify the speed with control SEQUENCER
SPEED or press button TAP SPEED twice.
2) If the selected sequence is not of type “+CFT”
(i. e. with memorized crossfading times), adjust
the crossfading time with control C.F. TIME.
3) To start, press button YES.
4) To change the direction, press button
(for-
ward) or
(backward).
Music-controlled start
1) Press button AUDIO. Display: “Audio Trig.” The
sequence starts by the audio signal of the jack
AUDIO IN or of the internal microphone.
2) Match the sensitivity with control AUDIO SENS.
3) If necessary, reduce the crossfading time with
control C.F. TIME.
4) To change the direction, press button
(back-
ward) or
(forward).
Manual start
1) If the selected sequence is not of type “+CFT”
(i. e. with memorized crossfading times), adjust
the crossfading time with control C.F. TIME.
2) Press button
(forward) or
(backward) to
advance one step in each case (with current
crossfading, the crossfading is stopped with the
first pressing, with the second pressing the next
step is called).
Holding the run (in case of time control or audio con-
trol)
1) To hold, press button HOLD.
2) To continue, press button YES or to interrupt,
press button NO.
Replacing a running sequence by another sequence
1) Press button SEQUENCE.
2) Select a new sequence number with the numeri-
cal keys [0] [1] ... [6] [0].
3) Start the new sequence with button YES, AUDIO,
or .
Stopping the run
1) Press button SEQUENCE so many times until
LED RUN is extinguished.
Programming a sequence
1) Press button SEQUENCE: The green LED RUN
lights up.
2) Press button STORE: The red LED PRG lights
up.
3) Select the sequence number with the numerical
keys [0] [1] ... [6] [0].
4) Delete the sequence already programmed with
button DELETE, if necessary, and confirm with
button YES.
5) Select the sequence type: to memorize with the
crossfading time CFT button YES, without cross-
fading time button NO.
6) Enter bank [0] [1] ... [2] [0] and scene [0] [1] ... [1]
[2] for the first step.
7) Memorize the scene with button STORE or select
another scene after pressing button NO.
8) In case of sequence type “+CFT” adjust the
crossfading time for this step with control C.F.
TIME and confirm with button STORE.
9) Enter further steps. Then stop the programming
with button SEQUENCE and change into the
sequence running mode (green LED RUN lights
up) or into the direct mode by pressing again
(green LED RUN is extinguished).
Changing the sequence
1) Press button SEQUENCE, then button STORE.
Select the sequence number with the numerical
keys.
2) Attach new steps: Press button
. Enter the
scene as under “Programming a sequence” as
from operating step 6).
3) Change the scene of a step: Select the step with
button
or
. Enter the new scene as under
“Programming a sequence” as from operating
step 6).
4) Change only the crossfading time of a step (for
sequence type “+CFT”): Select the step with but-
ton
or
. With button
go to the correspond-
ing crossfading time. Adjust the new crossfading
time with control C.F. TIME and confirm with but-
ton STORE.
5) Delete the sequence step: Select the step with
button
or
. Press button DELETE and con-
firm with button YES.
6) Insert a sequence step: Select the step before
which a new step is to be inserted (
,
). Press
button INSERT. Enter the new scene as under
“Programming a sequence” as from operating
step 6).
7) After the modifications, change with button
SEQUENCE into the sequence running mode
(green LED RUN lights up) or into the direct
mode by pressing again (green LED RUN is
extinguished).
Configuring control channels
1) Call the menu with button ESC/SETUP.
– Menu item “Output Options” to change the
DMX address assignment and inversion of
DMX values
– Menu item “Control Options” to change the
control channel characteristics:
1. Master Depend
2. Crossfade
3. Blackout function
4. Full/flash function
– Menu item “Reset All Opt’s” to reset all chang-
es made under “Output Options” and “Control
Options” to the presetting
2) Select the menu item with button NO or YES.
3) Select the parameters with button
or
.
4) Change the adjustment with button NO or YES or
numerical direct input with the numerical keys.
5) Exit the menu by (repeated) pressing of button
ESC/SETUP.
17
GB
Summary of Contents for DMX-1440
Page 53: ...53 ...

