2) Den Masterfader (27) so weit aufziehen, dass
das Mischungsverhältnis der Tonquellen optimal
eingestellt werden kann.
3) Mit den Pegelreglern der Eingangskanäle das
gewünschte Lautstärkeverhältnis der Tonquellen
untereinander einstellen. Die Tonquellen, die am
lautesten zu hören sein sollen, voll aussteuern
(siehe Kap. 5.1 „Grundeinstellung der Kanäle
1 – 4“) und die Pegel der übrigen Tonquellen ent-
sprechend reduzieren.
Wird ein Kanal nicht benutzt, sollte sein Pe-
gelregler auf Minimum gestellt werden.
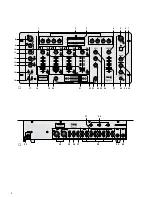
4) Mit den beiden 4fachen Equalizern (2) den Fre-
quenzgang der Signalsumme korrigieren und
Balance und Pegel des Mastersignals mit dem
Balanceregler (4) bzw. dem Masterfader (27) ein-
stellen (siehe dazu Schritte 4 – 6 des Kap. 5.3
„Überblenden zwischen zwei Kanälen“).
5.5 Echoeffekt einstellen
Die Effektsektion des Geräts bietet die Möglichkeit,
dem Signal jeder angeschlossenen Tonquelle einen
Echoeffekt hinzuzumischen. Der Echoeffekt wird
über eine digitale Verzögerungsschaltung erzeugt:
Das Signal wird gespeichert und dann verzögert
dem Originalsignal zugemischt. Die Echofunktion
kann für jeden der Eingangskanäle getrennt ein-
und ausgeschaltet werden.
1) Zum Aktivieren der Echo-Funktion für einen Ein-
gangskanal die Taste ECHO (17 bzw. 22) des
jeweiligen Kanals drücken. Bei gedrückter Taste
leuchtet die darüber liegende LED.
2) Mit dem Regler LEVEL (24) die Effektintensität
einstellen: Je weiter der Regler nach rechts auf-
gedreht wird, desto höher ist der Anteil des Ef-
fektsignals.
3) Mit den Reglern REPEAT (26) und TIME (25) den
gewünschten Klang des Echoeffekts einstellen:
Regler REPEAT für die Anzahl der Echos:
Je weiter der Regler nach rechts aufgedreht wird,
desto häufiger wird das Signalecho wiederholt.
Regler TIME für die Echogeschwindigkeit:
Je weiter der Regler nach rechts aufgedreht wird,
desto höher ist die Echogeschwindigkeit. Bei nie-
drig eingestellter Geschwindigkeit sind die Echos
einzeln wahrnehmbar, bei hoher Geschwindig-
keit verschmelzen die Echos zu einem hallarti-
gen Nachklang.
5.6 Vorhören über einen Kopfhörer
Über die Vorhörfunktion (PFL = Pre Fader Listening)
ist es möglich, jeden der Eingangskanäle 1 – 4 über
einen an der Buchse PHONES (28) angeschlosse-
nen Kopfhörer abzuhören, auch wenn der jeweilige
Kanal ausgeblendet ist. Dadurch kann z. B. auf einer
CD der gewünschte Titel ausgewählt oder der rich-
tige Zeitpunkt zum Einblenden einer Tonquelle
abgepasst werden.
Wahlweise ist es auch möglich, das laufende Mu-
sikprogramm vor dem Masterfader (27) abzuhören.
1) Zum Abhören eines Eingangskanals vor dem Ka-
nalfader die entsprechende Taste PFL (19) drü-
cken (LED darüber leuchtet) und den Regler MIX
(29) ganz nach links drehen (Position „PFL“).
Zum Abhören des laufenden Musikprogramms
vor dem Masterfader den Regler MIX ganz nach
rechts drehen (Position „PROG.“).
2) Mit dem Pegelregler (30) für den Kopfhörer die
gewünschte Kopfhörerlautstärke einstellen.
5.7 Abhören des Musikprogramms über eine
Monitoranlage
Es besteht die Möglichkeit, das laufende Musikpro-
gramm vor dem Masterfader (27) über eine an den
Buchsen BOOTH (36) angeschlossene Monitoran-
lage abzuhören. Den Pegel für die Monitoranlage
mit dem Monitorregler (7) einstellen.
6
Technische Daten
Eingänge
2 x Mic, mono: . . . . . . . . . . 1,5 mV
3 x Phono, stereo: . . . . . . . 3 mV
5 x Line, stereo: . . . . . . . . 150 mV
Ausgänge
2 x Master, stereo: . . . . . . 1 V
1 x Booth, stereo: . . . . . . . 1 V
1 x Record, stereo: . . . . . . 330 mV
1 x Kopfhörer, stereo: . . . .
≥
8
Ω
Allgemeine Daten
Frequenzbereich: . . . . . . . 20 – 20 000 Hz
Klirrfaktor: . . . . . . . . . . . . . 0,05 %
Störabstand: . . . . . . . . . . . > 50 dB
4fache Klangregelung
für die Signalsumme: . . . . ±15 dB/40 Hz, 320 Hz,
3 kHz, 10 kHz
2fache Klangregelung
für den DJ Mic-Kanal: . . . . ±15 dB/50 Hz, 10 kHz
Talkover (automatisch): . . . -12 dB
Anschluss für Pultleuchte: . 12 V/5 W; 4-pol. XLR
Einsatztemperatur: . . . . . . 0 – 40 °C
Stromversorgung: . . . . . . . 230 V~/50 Hz
Leistungsaufnahme: . . . . . 12 VA
Abmessungen: . . . . . . . . . 482 x 110 x 222 mm,
5 HE
Gewicht: . . . . . . . . . . . . . . 4 kg
Änderungen vorbehalten.
2) Advance the master fader (27) to such an extent
that the mixing ratio of the audio sources can be
adjusted in an optimum way.
3) With the level controls of the input channels, ad-
just the desired volume ratio of the audio sources
to one another. Control the audio sources to be
heard at the highest volume to an optimum level
(see chapter 5.1 “Basic adjustment of channels 1
to 4”) and reduce the levels of the other audio
sources accordingly.
If a channel is not used, its level control should
be set to minimum.
4) With the two 4-band equalizers (2) correct the fre-
quency response of the master signal, then adjust
the balance and the level of the master signal with
the balance control (4) or the master fader (27).
[For this purpose see steps 4 to 6 of chapter 5.3
“Crossfading between two channels”.]
5.5 Adjusting the echo effect
The effect section of the unit allows to add an echo
effect to the signal of each connected audio source.
The echo effect is produced via a digital delay circuit:
The signal is stored and then added, with delay, to
the original signal. The echo function can be switched
on and off separately for each of the input channels.
1) For activating the echo function for an input chan-
nel, press the button ECHO (17 or 22) of the cor-
responding channel. When the button is pressed,
the LED above it lights up.
2) With the control LEVEL (24), adjust the effect
intensity: The further the control is turned to the
right, the larger the share of the effect signal.
3) With the controls REPEAT (26) and TIME (25),
adjust the desired sound of the echo effect:
Control REPEAT for the number of echoes:
The further the control is turned to the right, the
more frequently the signal echo is repeated.
Control TIME for the echo rate:
The further the control is turned to the right, the
higher the echo rate. If the rate is low, individual
echoes are audible; if the rate is high, the echoes
merge into a multiple-echo reverberation.
5.6 Prefader listening via headphones
Prefader listening to each of the input channels 1 to
4 is possible via headphones connected to the jack
PHONES (28), even if the corresponding channel is
faded out. This allows e. g. to select the desired title
on a CD or to time the right moment for fading in an
audio source.
Optionally, it is also possible to monitor the cur-
rent music programme ahead of the master fader
(27).
1) For monitoring an input channel ahead of the
channel fader, press the corresponding button
PFL (19) [LED above the button lights up] and
turn the control MIX (29) to the left stop (position
“PFL”).
For monitoring the current music programme
ahead of the master fader, turn the control MIX to
the right stop (position “PROG.”).
2) Adjust the desired headphone volume with the
level control (30) for the headphones.
5.7 Monitoring the music programme via a
monitoring system
It is possible to monitor the current music pro-
gramme ahead of the master fader (27) via a moni-
toring system connected to the jacks BOOTH (36).
Adjust the level for the monitoring system with the
monitor control (7).
6
Specifications
Inputs
2 x mic, mono: . . . . . . . . . . 1.5 mV
3 x phono, stereo: . . . . . . . 3 mV
5 x line, stereo: . . . . . . . . . 150 mV
Outputs
2 x master, stereo: . . . . . . 1 V
1 x booth, stereo: . . . . . . . 1 V
1 x record, stereo: . . . . . . . 330 mV
1 x headphones, stereo: . .
≥
8
Ω
General information
Frequency range: . . . . . . . 20 – 20,000 Hz
THD: . . . . . . . . . . . . . . . . . 0.05 %
S/N ratio: . . . . . . . . . . . . . > 50 dB
4-band equalizer for
the master signal: . . . . . . . ±15 dB/40 Hz, 320 Hz,
3 kHz, 10 kHz
2-band equalizer for
the DJ mic channel: . . . . . ±15 dB/50 Hz, 10 kHz
Talkover (automatic): . . . . . -12 dB
Connection for
console light: . . . . . . . . . . . 12 V/5 W; 4-pole XLR
Ambient temperature: . . . . 0 – 40 °C
Power supply: . . . . . . . . . . 230 V~/50 Hz
Power consumption: . . . . . 12 VA
Dimensions: . . . . . . . . . . . 482 x 110 x 222 mm,
5 RS
Weight: . . . . . . . . . . . . . . . 4 kg
Subject to technical change.
7
GB
D
A
CH
Diese Bedienungsanleitung ist urheberrechtlich für MONACOR
®
INTERNATIONAL GmbH & Co. KG
geschützt. Eine Reproduktion für eigene kommerzielle Zwecke – auch auszugsweise – ist untersagt.
All rights reserved by MONACOR
®
INTERNATIONAL GmbH & Co. KG. No part of this instruction manual
may be reproduced in any form or by any means for any commercial use.


