10
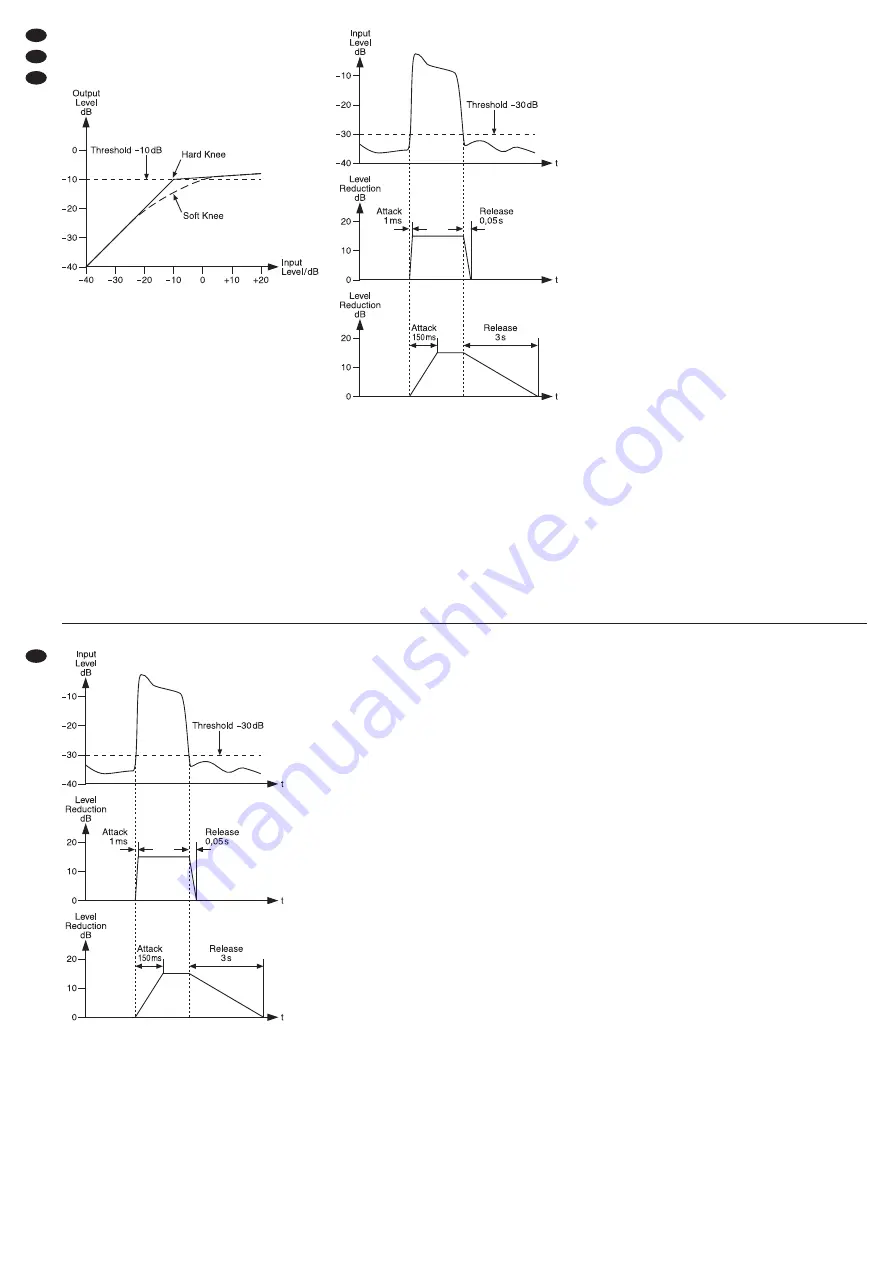
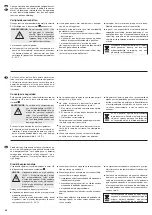
Controls ATTACK and RELEASE
Hints concerning adjustment:
a. When processing voices, a relatively long attack
time will be required so that the voice will not lose
in power. In this case, high level peaks will only
occur after long vowels. By contrast, set the con-
trol RELEASE to a short time. Thus, the begin-
ning of the next syllable will not be attenuated.
b. Short attack times will be required for percussion
instruments as the highest volume will occur at
the start of a percussion.
c. For bass compression, adjust longer attack and
release times. If these times are too short, distor-
tions will result.
d. Longer release times will be required for instru-
ments played in a very dynamic way, such as
electric guitars. A short release time would
smooth out tremolo variations. To compress the
stereo master of a mixer, also adjust a longer
release time; otherwise the level of the signal will
be decreased and immediately increased again
in case of a volume peak. A “pumping effect” will
result.
e. The optimum attack and release times largely
depend on the type of application and will require
both intuition and experience. Different settings
should be tested.
6.4 Adjusting the limiter
Independent of the expander and the compressor,
the limiter will monitor the output level and limit the
signal to a maximum value adjusted. Thus, it will be
possible, e. g. to protect audio recordings and power
amplifiers against overload and speakers against
damage. Short upper deviations from the level
adjusted will be radically limited; in case of longer
deviations, the level of the entire signal will be
reduced.
Adjust the maximum admissible output level with
the control THRESHOLD (24). In case of limiting, the
LED LIMITER (9) will light up. In addition, the reduc-
tion of the level will be shown by the indication GAIN
REDUCTION (8).
If the LED LIMITER lights up frequently, the level
should be generally reduced a little with the control
OUTPUT GAIN (22) or a higher compression should
be adjusted.
6.5 SIDECHAIN FILTER
When the button SC FILTER is pressed, the control
signal for signal processing will pass a high-pass fil-
ter. This will reduce a “pumping effect” which may
occur in bass-accented music where the bass notes
cause a pulsed compression of the entire signal.
6.6 Sidechain applications
A sidechain is the circuit of the control signal. Usu-
ally the control signal will directly be derived from the
audio signal and will affect the output level, depend-
ing on the values adjusted for the expander, the
compressor and the limiter.
This control signal may additionally be processed
externally before it monitors the dynamics of the
audio signal or an external signal may be used for
control. Examples of application can be found below.
6.6.1 Frequency-dependent dynamics
de-esser, expander/gate
To suppress sibilance with voice recordings, insert
an equalizer via the jacks SIDECHAIN SEND (33)
and RETURN (34) [
chapter 5.3].
1) Engage the button SC EXT (5) so that the signal
processed externally will take control.
2) Adjust the equalizer as a band-pass filter in such
a way that only frequencies in the range 6 – 8 kHz
will pass through.
To check the control signal acoustically, press
the button SC MONITOR (14) to switch it to the
output.
Thus, the compressor will operate as a “de-esser” to
attenuate sibilant sound.
In the same way, the expander/gate section can
be controlled via a band-pass filter matched to the
corresponding instrument, e. g. to improve channel
separation when several microphones are used.
GB
CH
A
D
und somit unauffälliger wird, die Taste SOFT (7)
hineindrücken. Die Abbildung 9 veranschaulicht den
Unterschied zwischen weichem und hartem Einsatz-
punkt.
weicher/harter Einsatzpunkt bei
Threshold = -10 dB, Ratio = 10 : 1
6.3.4 Attack- und Release-Zeit, AUTO-Taste
Die Reaktionszeiten beim Überschreiten und Unter-
schreiten des Schwellwertes können eingestellt wer-
den. Ist die Taste MANUAL/AUTO (19) gedrückt,
werden diese Zeiten automatisch anhand des
Audiosignals bestimmt. Die Regler ATTACK (18)
und RELEASE (20) sind dann ohne Funktion.
Wird mit der automatischen Einstellung nicht das
gewünschte Ergebnis erzielt, die Taste MANUAL/
AUTO (19) ausrasten und mit dem Regler ATTACK
(18) die Ansprechzeit des Kompressors einstellen
sowie mit dem Regler RELEASE (20) die Rückstell-
zeit. Die Abbildung 10 verdeutlicht den Einfluss der
beiden Regler auf die Signalreduktion.
Regler ATTACK und RELEASE
Einstelltipps:
a. Bei der Bearbeitung von Stimmen ist eine relativ
lange Attack-Zeit notwendig, damit die Stimme
nicht an Kraft verliert. Hohe Pegelspitzen treten
hier erst nach längeren Vokalen auf. Den Regler
RELEASE dagegen auf eine kurze Zeit einstel-
len. So wird der Anfang der nächsten Silbe nicht
gedämpft.
b. Kurze Attack-Zeiten werden bei Schlaginstru-
menten benötigt, weil die größte Lautstärke am
Anfang eines Schlags auftritt.
c. Bei der Kompression von Bässen längere Attack-
und Release-Zeiten einstellen. Zu kurze Zeiten
führen hier zu Verzerrungen.
d. Längere Release-Zeiten sind bei sehr dynamisch
gespielten Instrumenten erforderlich, z. B. bei E-
Gitarren. Eine kurze Release-Zeit würde Tre-
molo-Schwankungen glätten. Zum Komprimieren
der Stereo-Summe eines Mischpultes ebenfalls
eine längere Release-Zeit einstellen, sonst wird
das Signal bei einer Lautstärkespitze herunter-
und sofort wieder heraufgeregelt. Ein „Pump-
effekt“ entsteht.
e. Die optimale Attack- und Release-Zeit ist stark
anwendungsabhängig. Fingerspitzengefühl und
Erfahrung sind hier erforderlich. Verschiedene
Einstellungen sollten ausprobiert werden.
6.4 Limiter einstellen
Unabhängig von Expander und Kompressor über-
wacht der Limiter den Ausgangspegel und begrenzt
das Signal auf einen eingestellten Maximalwert.
Dadurch können z. B. Tonaufnahmen und Endstu-
fen vor Übersteuerungen bewahrt und Lautsprecher
vor Beschädigung geschützt werden. Dabei werden
kurze Überschreitungen des eingestellten Pegels
radikal begrenzt, bei länger dauernden Überschrei-
tungen wird das gesamte Signal im Pegel reduziert.
Mit dem Regler THRESHOLD (24) den maximal
zulässigen Ausgangspegel einstellen. Findet eine
Begrenzung statt, leuchtet die LED LIMITER (9).
Zusätzlich wird die Reduzierung des Pegels mit der
Anzeige GAIN REDUCTION (8) dargestellt.
Leuchtet die LED LIMITER häufig auf, sollte der
Pegel mit dem Regler OUTPUT GAIN (22) generell
etwas gesenkt oder eine höhere Kompression ein-
gestellt werden.
6.5 SIDECHAIN FILTER
Ist die Taste SC FILTER gedrückt, durchläuft das
Steuersignal für die Signalbearbeitung ein Hoch-


