Bitte klappen Sie die Seite 3 heraus. Sie sehen
dann immer die beschriebenen Bedienelemente
und Anschlüsse.
Inhalt
1
Übersicht der Bedienelemente und
Anschlüsse . . . . . . . . . . . . . . . . . . . . . . . . . 4
1.1 Steuereinheit . . . . . . . . . . . . . . . . . . . . . . . . 4
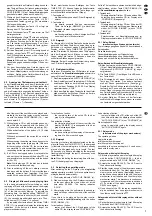
1.2 Laufwerkeinheit Frontseite . . . . . . . . . . . . . . 5
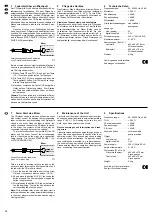
1.3 Laufwerkeinheit Rückseite . . . . . . . . . . . . . . 5
2
Hinweise für den sicheren Gebrauch . . . . 5
3
Einsatzmöglichkeiten . . . . . . . . . . . . . . . . . 6
4
Gerät aufstellen und anschließen . . . . . . . 6
5
Bedienung . . . . . . . . . . . . . . . . . . . . . . . . . . 6
5.1 CD abspielen . . . . . . . . . . . . . . . . . . . . . . . . 6
5.2 Anzeige der Titelnummer und Laufzeit . . . . . 7
5.2.1 Bargraph . . . . . . . . . . . . . . . . . . . . . . . . . . 7
5.3 Betriebsart wählen . . . . . . . . . . . . . . . . . . . . 7
5.3.1 Relay-Betrieb
(wechselseitiges Starten der Laufwerke) . . 7
5.4 Anspielen eines Titels . . . . . . . . . . . . . . . . . . 8
5.5 Schneller Vor- und Rücklauf . . . . . . . . . . . . . 8
5.6 Genaues Anfahren einer bestimmten Stelle . 8
5.7 Rücksprung zu einer zuvor bestimmten
Stelle . . . . . . . . . . . . . . . . . . . . . . . . . . . . . . . 8
5.8 Endlosschleife abspielen . . . . . . . . . . . . . . . 8
5.9 Geschwindigkeit und Tonhöhe verändern . . 9
5.10 Takt zwischen zwei Musikstücken angleichen 9
6
Klangeffekte aktivieren . . . . . . . . . . . . . . . 9
7
Faderstart über ein Mischpult . . . . . . . . . 10
8
Pflege des Gerätes . . . . . . . . . . . . . . . . . . 10
9
Technische Daten . . . . . . . . . . . . . . . . . . . 10
1
Übersicht der Bedienelemente und
Anschlüsse
1.1
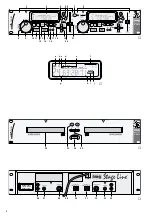
Steuereinheit (Abb. 1)
Im folgenden Text werden die Bedienelemente des
Laufwerks 1 erklärt. Die Bedienelemente des Lauf-
werks 2 sind vollkommen identisch.
1 Bedienfeld für Laufwerk 1
2 Bedienfeld für Laufwerk 2
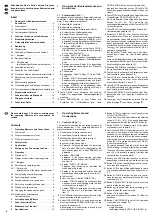
3 Multifunktionsdisplay (Details siehe Abb. 2)
a Symbol für den Wiedergabemodus
b Symbol für den Pausenmodus
c Bargraph; gibt durch seine Länge die Restzeit
von einem Titel an [Anzeige „REMAIN“ (j) ein-
geblendet] oder die bereits gespielte Zeit eines
Titels (Anzeige „REMAIN“ ausgeblendet)
d Anzeige „CONTINUE“:
ist eingeblendet, wenn mit der Taste CONT./
SINGLE (16) die Wiederholfunktion aktiviert
wurde, siehe Position 16
e Anzeige „AUTO CUE SINGLE“:
ist nach dem Einschalten eingeblendet und
signalisiert die Betriebsart Einzeltitelwieder-
gabe
f Anzeige der mit dem Regler (21) eingestellten
prozentualen Abweichung von der Standard-
geschwindigkeit
g Titelnummer
h Zeitanzeige; siehe Position 17 (Taste TIME/
STOP)
i Anzeige „LOOP“; ist eingeblendet, wenn eine
Endlosschleife gespeichert wurde und blinkt,
wenn sie abgespielt wird (siehe Kapitel 5.8)
j Anzeige „REMAIN“; ist eingeblendet, wenn
die Restzeit eines Titels oder einer CD ange-
zeigt wird, siehe auch Position 17
4 Taste ON/OFF zum Aktivieren der mit dem
Regler (21) eingestellten Geschwindigkeitsab-
weichung
5 Taste OPEN/CLOSE
zum Öffnen und
Schließen der CD-Schublade [wie Taste
OPEN/CLOSE (23) an der Laufwerkeinheit];
während des Abspielens einer CD ist die CD-
Schublade gegen unbeabsichtigtes Öffnen ver-
riegelt
6 Taste PITCH zum Einstellen des Regelbereiches
für den Regler PITCH CONTROL (21);
die LEDs über der Taste zeigen den gewählten
Bereich an (4 %, 8 %, 16 %), wenn die Ge-
schwindigkeitseinstellung mit der Taste ON/OFF
(4) aktiviert wurde
7 Taste RELAY zum wechselseitigen Starten der
Laufwerke (siehe Kapitel 5.3.1)
8 Drehknopf SEARCH zum exakten Anfahren
einer bestimmten Stelle im Pausenmodus. Bei
eingeschalteter Pause wird auf der CD so lange
und so schnell vor- oder zurückgefahren, wie der
Knopf gedreht wird. Nach dem Drehen wird die
momentane Stelle so lange wiederholt, bis die
Taste
(14) gedrückt oder die Taste CUE (11)
zweimal angetippt wird.
Bei laufender CD kann durch Vor- und Zurück-
drehen des Knopfs ein „Leier“-Effekt erzeugt
werden.
Wurde ein Klangeffekt mit dem Steuerhebel (19)
eingeschaltet, läßt sich der Effekt mit dem Dreh-
knopf verändern (siehe Kapitel 6).
9 Drehring SCAN für den schnellen Vor- und Rück-
lauf je nach Drehrichtung des Rings
10 Taste A zum Bestimmen des Startpunktes einer
Endlosschleife (siehe Kapitel 5.8)
11 Taste CUE zum Anspielen eines Titels und für
den Rücksprung zu einer zuvor bestimmten
Stelle (siehe Kapitel 5.4 bzw. 5.7)
12 Taste B/LOOP zum Bestimmen des Endpunktes
einer Endlosschleife und gleichzeitigem Starten
der Schleife (siehe Kapitel 5.8)
13 Taste RELOOP/EXIT zum Beenden einer End-
losschleife und zum erneuten Abspielen der
Schleife
14 Taste
zum Umschalten zwischen Wieder-
gabe (Anzeige
) und Pause (Anzeige
)
Please unfold page 3. Then you can always see
the operating elements and connections de-
scribed.
Contents
1
Operating Elements and Connections . . . 4
1.1 Control unit . . . . . . . . . . . . . . . . . . . . . . . . . . 4
1.2 Player mechanism unit, front . . . . . . . . . . . . 5
1.3 Player mechanism unit, rear . . . . . . . . . . . . . 5
2
Safety Notes . . . . . . . . . . . . . . . . . . . . . . . . 5
3
Applications . . . . . . . . . . . . . . . . . . . . . . . . 6
4
Setting up and Connecting the Unit . . . . . 6
5
Operation . . . . . . . . . . . . . . . . . . . . . . . . . . . 6
5.1 Playing a CD . . . . . . . . . . . . . . . . . . . . . . . . . 6
5.2 Display of title number and playing time . . . . 7
5.2.1 Bargraph . . . . . . . . . . . . . . . . . . . . . . . . . . 7
5.3 Selecting the operating mode . . . . . . . . . . . . 7
5.3.1 Relay mode
(alternate start of the player mechanisms) 7
5.4 Short playing of a title beginning . . . . . . . . . 8
5.5 Fast forward and reverse . . . . . . . . . . . . . . . 8
5.6 Precise selection of a certain spot . . . . . . . . 8
5.7 Return to a previously defined spot . . . . . . . 8
5.8 Playing a continuous loop . . . . . . . . . . . . . . . 8
5.9 Changing the speed and the pitch . . . . . . . . 9
5.10 Matching the beat between
two music pieces . . . . . . . . . . . . . . . . . . . . . 9
6
Activating Sound Effects . . . . . . . . . . . . . . 9
7
Fader Start via a Mixer . . . . . . . . . . . . . . . 10
8
Maintenance of the Unit . . . . . . . . . . . . . . 10
9
Specifications . . . . . . . . . . . . . . . . . . . . . . 10
1
Operating Elements and
Connections
1.1
Control unit (fig. 1)
The text below explains the operating elements of
player mechanism 1. The operating elements of
player mechanism 2 are identical.
1 Control panel for player mechanism 1
2 Control panel for player mechanism 2
3 Multifunction display (for details see fig. 2)
a symbol for the replay mode
b symbol for the pause mode
c bargraph; its length indicates the remaining
time of a title [“REMAIN” (j) displayed] or the
time already played of a title (“REMAIN” not
displayed)
d display “CONTINUE”:
displayed if the repeat function has been
activated with the button CONT./SINGLE (16),
see item 16
e display “AUTO CUE SINGLE”:
displayed after switching on; indicates the
mode single title replay
f display of the percentage deviation from the
standard speed adjusted with the control (21)
g title number
h time; see item 17 (button TIME/STOP)
i display “LOOP”; displayed if a continuous loop
has been memorized, flashing while the loop
is replayed (see chapter 5.8)
j display “REMAIN”; displayed if the remaining
time of a title or a CD is indicated; also see
item 17
4 ON/OFF button to activate the deviation from the
speed adjusted with the control (21)
5 Button OPEN/CLOSE
to open and close the
disk tray [like button OPEN/CLOSE (23) on the
player mechanism unit];
while playing a CD, the disk tray is locked to pre-
vent unintentional opening
6 Button PITCH to adjust the control range for the
PITCH CONTROL (21);
the LEDs above the button indicate the selected
range (4 %, 8 %, 16 %) if the speed adjustment
has been activated with the ON/OFF button (4)
7 Button RELAY for alternate start of the player
mechanisms (see chapter 5.3.1)
8 Control knob SEARCH to precisely select a cer-
tain spot in the pause mode. With the pause
switched on, the unit advances and reverses so
long and so fast on the CD as the button is turned.
After turning, the current spot is repeated until the
button (14) is
pressed or the button CUE (11)
is shortly pressed twice.
By turning back and forth the control knob with
the CD playing, “drawling” effects can be created.
If a sound effect was switched on with the control
lever (19), it is possible to modify the effect with
the control knob (see chapter 6).
9 Rotary ring SCAN for fast advance or reverse
depending on the direction of rotation of the ring
10 Button A to define the starting point of a contin-
uous loop (see chapter 5.8)
11 Button CUE to play a title beginning and to return
to a previously defined spot (see chapter 5.4 or
5.7)
12 Button B/LOOP to define the end of a contin-
uous loop and to simultaneously start the loop
(see chapter 5.8)
13 Button RELOOP/EXIT to end a continuous loop
and to replay the loop again
14 Button
to switch from replay (display
) to
pause (display ) and vice versa
15 10 to select titles;
with each actuation of the button, 10 titles are
advanced
16 Button CONT./SINGLE to select the operating
mode (also see chapter 5.3)
basic adjustment:
single title replay;
the display shows “AUTO CUE SINGLE” (e)
4
GB
D
A
CH


