●
Das Gerät ist nur zur Verwendung in Räumen
geeignet.
●
Nehmen Sie das Gerät nicht in Betrieb bzw. zie-
hen Sie sofort den Netzstecker, wenn:
1. sichtbare Schäden am Gerät oder an der Netz-
anschlußleitung vorhanden sind,
2. nach einem Sturz oder ähnlichem der Verdacht
auf einen Defekt besteht,
3. Funktionsstörungen auftreten.
Geben Sie das Gerät in jedem Fall zur Reparatur
in eine Fachwerkstatt.
●
Eine beschädigte Netzanschlußleitung darf nur
durch den Hersteller oder eine autorisierte Fach-
werkstatt ersetzt werden.
●
Ziehen Sie den Netzstecker nie an der Zuleitung
aus der Steckdose.
●
Wird das Gerät zweckentfremdet, falsch bedient
oder nicht fachgerecht repariert, kann für eventu-
elle Schäden keine Haftung übernommen werden.
●
Soll das Gerät endgültig aus dem Betrieb genom-
men werden, übergeben Sie es zur Entsorgung
einem örtlichen Recyclingbetrieb.
3
Einsatzmöglichkeiten
Der Dual-CD-Spieler CD-350DJ/SI mit zwei Lauf-
werken ist speziell für den professionellen DJ-
Bereich konzipiert. Viele Funktionsmöglichkeiten
sind genau auf diesen Einsatzbereich abgestimmt,
z. B. nahtlose Wiedergabe einer Endlosschleife oder
Aktivierung von Klangeffekten.
Auf dem CD-Spieler können Audio-CDs und
selbstgebrannte CDs (Audio CD-R) abgespielt wer-
den. Wiederbeschreibbare CDs (CD-RW) lassen
sich nicht abspielen.
Der CD-Spieler ist mit einem Anti-Schock-Spei-
cher für 6 Sekunden ausgestattet, in dem vor der
Wiedergabe die Musik eingelesen wird. Bei einer
Störung der CD-Abtastung durch Stöße oder Vibra-
tion wird die Musik aus dem Speicher gelesen. So
werden Tonunterbrechungen umgangen. Das Anti-
Schock-System kann jedoch keine anhaltenden
Stöße oder Vibrationen ausgleichen und nicht kor-
rekt arbeiten, solange der Speicher noch nicht kom-
plett eingelesen ist.
4
Gerät aufstellen und anschließen
Die Steuer- und die Laufwerkeinheit sind für die
Montage in ein Rack (482 mm/19") vorgesehen,
können aber auch als freistehende Tischgeräte ver-
wendet werden. Die Laufwerkeinheit muß auf jeden
Fall waagerecht betrieben werden, während die
Steuereinheit beliebig, z. B. auch geneigt, eingebaut
werden kann. Für den Einbau in ein Rack werden für
die Steuereinheit und die Laufwerkeinheit je 2 HE
benötigt (HE = Höheneinheit = 44,45 mm).
Vor dem Anschluß bzw. vor dem Verändern von An-
schlüssen den CD-Spieler und die anzuschließen-
den Geräte ausschalten.
1) Die Steuereinheit und die Laufwerkeinheit mit
den beiden beiliegenden Anschlußkabeln verbin-
den:
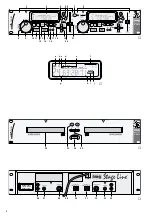
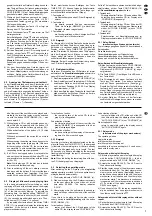
Die Buchse (30) an die Steuereinheit Buchse RE-
MOTE CONTROL / CONNECT TO MAIN UNIT 2
anschließen und
die Buchse (31) an die Steuereinheit Buchse RE-
MOTE CONTROL / CONNECT TO MAIN UNIT 1.
Dabei jeweils das Kabelende mit der Entstör-
drossel (kleines Kästchen) in die entsprechende
Buchse (30, 31) der Laufwerkeinheit stecken.
2) Sind an Ihrem Mischpult oder Verstärker Digital-
eingänge vorhanden, diese an die Digitalaus-
gänge DIGITAL OUT (27 und 33) anschließen.
Bei Geräten ohne Digitaleingang die Stereo-
Ausgänge LINE OUT (26 und 34) – linker Kanal L
und rechter Kanal R – über Cinch-Kabel mit den
CD-Spieler-Eingängen am Mischpult oder am Ver-
stärker verbinden.
3) Die Laufwerke des CD-Spielers können über ein
Mischpult mit Kontaktsteuerung gestartet bzw.
auf Pause geschaltet werden. Zum Anschluß der
Steuerverbindung siehe Kapitel 7.
4) Zuletzt den Netzstecker des Anschlußkabels (29)
in eine Steckdose (230 V~/50 Hz) stecken.
5
Bedienung
Im folgenden Text wird die Bedienung des Lauf-
werks 1 beschrieben. Die Bedienung des Lauf-
werks 2 ist vollkommen identisch.
5.1
CD abspielen
1) Mit dem Ein-/Ausschalter POWER (24) den CD-
Spieler einschalten. Die Betriebsanzeige (25)
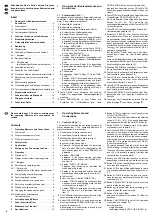
leuchtet, und auf dem Display (3) erscheinen
nacheinander folgende Anzeigen:
„load“
(laden)
„close“
(schließen)
„read“
(lesen)
„no disc“ (keine CD) – wenn keine CD eingelegt ist
2) Mit der Taste
(5 oder 23) die CD-Schublade
(22) öffnen. Im Display erscheint „OPEN“ (offen).
3) Eine CD mit der Beschriftung nach oben einle-
gen, und die CD-Schublade mit der Taste
schließen. Bei korrekt eingelegter CD gibt das
Display nach kurzer Zeit die Gesamttitelanzahl
(g) und die Gesamtspieldauer (h) der CD an und
anschließend die Spieldauer (h) des ersten Titels.
[Soll nach dem Einlegen der CD sofort der
erste Titel starten, die CD-Schublade mit der
Taste (14)
schließen.]
4) Zum Starten mit dem ersten Titel die Taste
(14) drücken (falls die CD-Schublade mit der
Taste
geschlossen wurde). Solange die CD
abgespielt wird, zeigt das Display das Symbol
(a). Soll mit einem anderen Titel gestartet wer-
den, zuerst ggf. die Taste +10 (15) und dann die
Taste
oder
(18) so oft drücken, bis die
gewünschte Titelnummer im Display erscheint.
Danach den Titel mit der Taste
starten.
5) Das Abspielen kann jederzeit mit der Taste
unterbrochen werden. Im Display erscheint das
Pausensymbol
(b), und die Taste
blinkt.
Zum Weiterlaufen der CD die Taste
noch ein-
mal drücken.
6) Nach dem Einschalten steht das Gerät immer
auf Einzeltitelwiedergabe; das Display zeigt
„AUTO CUE SINGLE“ (e). Ist ein Titel zu Ende
●
A damaged mains cable must be replaced by the
manufacturer or skilled personnel only.
●
Never pull the mains cable to disconnect the
mains plug from the socket.
●
If the unit is used for other purposes than originally
intended, if it is not correctly operated or not re-
paired in an expert way, no liability for any damage
will be accepted.
●
If the unit is to be put out of operation definitively,
take it to a local recycling plant for disposal.
●
Important for U. K. Customers!
The wires in this mains lead are coloured in
accordance with the following code:
blue = neutral
brown = live
As the colours of the wires in the mains lead of this
appliance may not correspond with the coloured
markings identifying the terminals in your plug,
proceed as follows:
1. The wire which is coloured blue must be con-
nected to the terminal in the plug which is
marked with the letter N or coloured black.
2. The wire which is coloured brown must be con-
nected to the terminal which is marked with the
letter L or coloured red.
3
Applications
The dual CD player CD-350DJ/SI with two player
mechanisms has been specially designed for pro-
fessional DJ applications. Many functional features
have exactly been matched to this range of applica-
tion, e. g. seamless replay of a continuous loop or
activation of sound effects.
The CD player allows replay of audio CDs and
CDs which you have burnt yourself (audio CD-R). It
is not possible to replay rewriteable CDs (CD-RW).
The CD player is provided with an anti-shock
memory for 6 seconds where the music is read in
before it is replayed. If the CD sampling is disturbed
by shocks or vibrations, the music is read from the
memory. Thus, sound interruptions are prevented.
However, the anti-shock system is not able to com-
pensate permanent shocks or vibrations and to oper-
ate correctly as long as the memory has not been
read in completely.
4
Setting up and Connecting the Unit
The control unit and the player mechanism unit are
designed for installation into a rack (482 mm/19"),
however, they can also be used as table top units. In
any case, the player mechanism unit must be oper-
ated in a horizontal position while it is possible to
install the control unit as desired, e. g. also in an in-
clined position. For rack installation, 2 RS each are
required for the control unit and for the player
mechanism unit (RS = rack space = 44.45 mm).
Prior to making or changing any connections, switch
off the CD player and the units to be connected.
1) Connect the control unit and the player mecha-
nism unit to the two supplied cables:
Connect the jack (30) to the jack REMOTE CON-
TROL/CONNECT TO MAIN UNIT 2 on the con-
trol unit and
connect the jack (31) to the jack REMOTE CON-
TROL/CONNECT TO MAIN UNIT 1 on the con-
trol unit. Take care that the cable ends equipped
with the anti-interference choke (small box) are
connected to the corresponding jacks (30, 31) on
the player mechanism unit.
2) In case of digital inputs existing on the mixer or
amplifier, connect them to the digital outputs
DIGITAL OUT (27 and 33).
In case of units without digital input, connect
the stereo outputs LINE OUT (26 and 34) – left
channel L and right channel R – via cables with
phono connectors to the inputs for the CD player
on the mixer or amplifier.
3) The player mechanisms of the CD player can be
started or set to pause via a mixer with contact
control. For making the control connection see
chapter 7.
4) Finally connect the mains plug of the connection
cable (29) to a mains socket (230 V~/50 Hz).
5
Operation
The text below explains the operating elements of
player mechanism 1. The operating elements of
player mechanism 2 are identical.
5.1
Playing a CD
1) Switch on the CD player with the POWER switch
(24). The power LED (25) lights up and the follow-
ing information is indicated successively on the
display (3):
“load”
“close”
“read”
“nodisc” – if no CD has been inserted
2) Open the disk tray (22) with the button
(5 or
23). The display shows “OPEN”.
3) Insert a CD with the lettering facing upwards, and
close the disk tray with the button . With the CD
correctly inserted, after a short time, the display
shows the total number of titles (g) and the total
playing time (h) of the CD, then the playing time
of the first title (h).
[If the first title is to start as soon as the CD
has been inserted, close the disk tray with the
button (14).]
4) To start the first title, press the button
(14) (if
the disk tray was closed with the button ). As
long as the CD is played, the display shows the
symbol
(a). If another title is to be started, first
press the 10 (15), if necessary, and then
the button
or
(18) so many times until the
desired title number is displayed. Then start the
title with the button
.
5) The CD replay can be interrupted at any time with
the button
. The display shows the pause
symbol
(b), and the button
starts flashing.
To continue the CD, press the button
once
again.
6) After switching on, the unit is always on single
title replay; the display shows “AUTO CUE
SINGLE “ (e). After playing a title to the end, the
unit is set to pause at the beginning of the next
6
GB
D
A
CH


