11
English
24
Control THRESHOLD for the limiter; to
adjust the maximum level to which the
signal is to be limited
25
Button DUAL MONO / CH A MASTER for
coupling the two channels
button not pressed:
both channels will operate inde-
pendently
button pressed:
the adjustments in channel A will also
be effective for channel B (stereo mode)
1.3 Rear panel
26
Mains jack for connection to a mains
socket (230 V/ 50 Hz) via the mains cable
provided
27
Support for the mains fuse
Always replace a burnt-out fuse by one
of the same type .
28
Outputs, XLR jacks
29
Outputs, 6 .3 mm jacks
30
Selector 4 dBu / −10 dBV for inter-
nal level matching
position “+4 dBu”:
for line levels in studio applications
(+4 dBu = 1 .23 V)
position “−10 dBV”:
for line levels in home recording appli-
cations (−10 dBV = 316 mV)
31
Inputs, XLR jacks
32
Inputs, 6 .3 mm jacks
33
Outputs SIDECHAIN SEND for external
processing of the control signal (e . g .
equalizer for frequency-dependent com-
pression), 6 .3 mm jacks
34
Inputs SIDECHAIN RETURN for returning
the control signal processed externally or
for control by external signals, 6 .3 mm
jacks
2 Safety Notes
This unit corresponds to all required directives
of the EU and is therefore marked with .
WARNING
The unit uses dangerous mains
voltage . Leave servicing to
skilled personnel only; inexpert
handling may result in electric
shock .
•
The unit is suitable for indoor use only . Pro-
tect it against dripping water and splash
water, high air humidity and heat (admis-
sible ambient temperature range 0 – 40 °C) .
•
Do not place any vessel filled with liquid on
the unit, e . g . a drinking glass .
•
Do not operate the unit and immediately
disconnect the mains plug from the socket
1 . if the unit or the mains cable is visibly
damaged,
2 . if a defect might have occurred after the
unit was dropped or suffered a similar
accident,
3 . if malfunctions occur .
In any case the unit must be repaired by
skilled personnel .
•
Never pull the mains cable to disconnect
the mains plug from the socket, always
seize the plug .
•
For cleaning only use a dry, soft cloth; never
use water or chemicals .
•
No guarantee claims for the unit and no li-
ability for any resulting personal damage or
material damage will be accepted if the unit
is used for other purposes than originally
intended, if it is not correctly connected
or operated, or if it is not repaired in an
expert way .
If the unit is to be put out of oper-
ation definitively, take it to a local
recycling plant for a disposal which
is not harmful to the environment .
3 Applications
The compressor/ limiter with expander/gate
is designed for professional applications on
stage and in the studio . The unit offers ex-
tensive features for processing the dynamics
of an audio signal .
The
expander / gate section
will reduce the
level below an adjustable threshold and will
allow to expand the dynamics of an audio
signal and to suppress noise of low volume .
As an effect, the fade-out of an instrument
can be reduced .
The
compressor
will reduce the dynamics
and attenuate the level above an adjustable
threshold . This is required when the dynamics
of the audio signal is higher than that allowed
by the recording system or amplifier system .
It will also be possible to reduce differences
in level (e . g . in case of varying microphone
distances or between the different strings of
a bass guitar) or to attenuate signal peaks
in order to allow a higher gain setting and
thus to obtain a higher average volume . As
an effect, a compressor can be used to mod-
ify the fade-in and fade-out behaviour of an
instrument .
The
limiter
is used for quickly limiting the
signal to a level adjusted . This will protect
audio recordings and power amplifiers against
overload and speakers against damage .
For specific applications, e . g . as a de-
esser or ducker, it will be possible to externally
process the control signal derived from the
audio signal via the sidechain connections
or to feed in an external signal for dynamic
control .
The unit is equipped with two identical
channels operating independently; however,
they may be coupled for the stereo mode .
4 Setting Up
The compressor is provided for installation
into a rack (482 mm /19”); however, it can also
be used as a table top unit . For rack instal-
lation, 1 rack space (= 44 .5 mm) is required .
5 Connecting the Unit
Switch off the compressor and all other audio
units before making or changing any con-
nections .
5.1 Inserting the compressor into
the channel of a mixer
For most applications, the compressor is
inserted into an input channel, into a sub-
group or into the main way of a mixer (insert
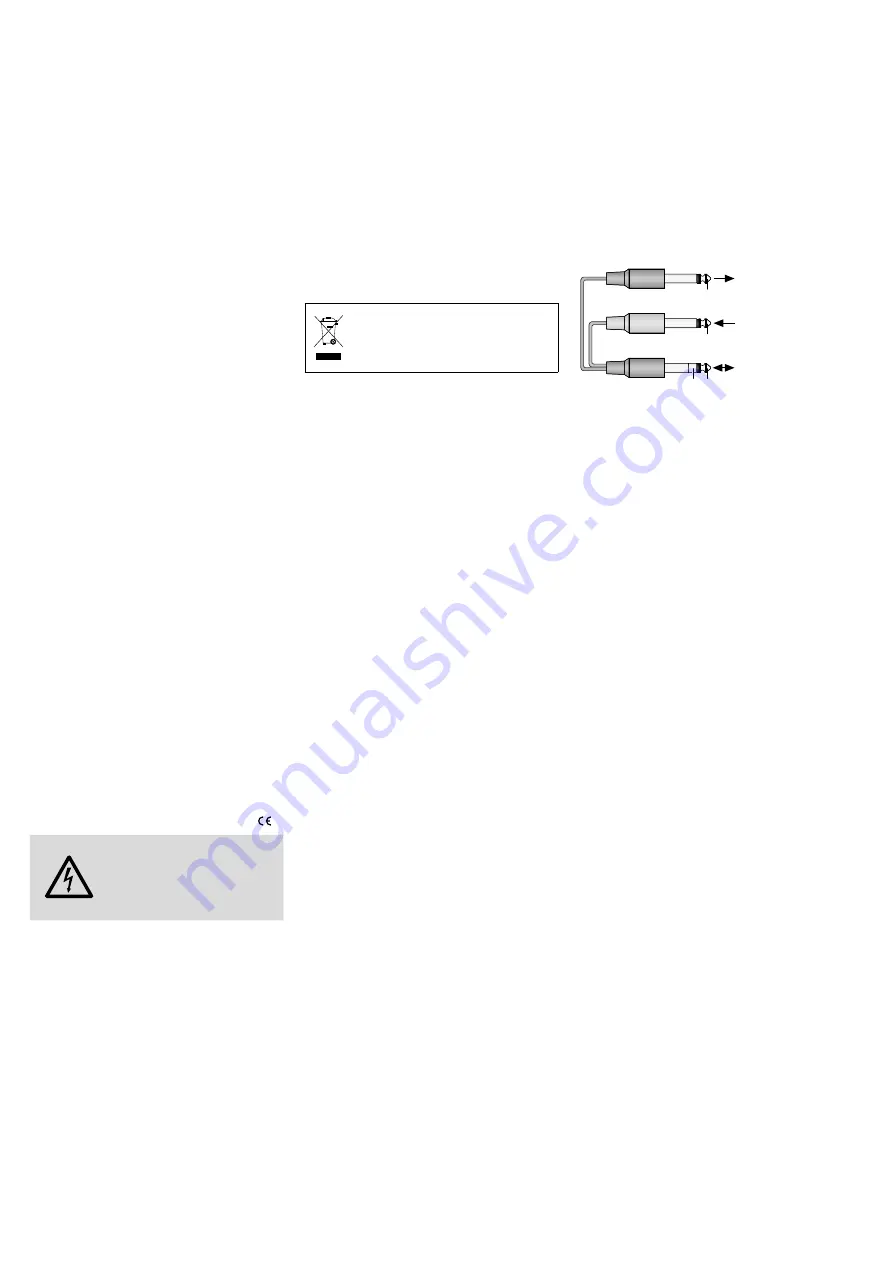
connection) . For this purpose, a Y-cable with
6 .3 mm plug (e . g . MCA-202) will be required
for each channel .
SEND
SEND
RETURN
RETURN
MCL-204
INPUT
MCL-204
OUTPUT
MISCHPULT
INSERT
Fig. 4
Y-cable MCA-202 for connection INSERT
Make the connection for channel A and chan-
nel B separately:
1) Connect the black 3-pole plug of the
Y-cable to the insert jack of the mixer .
2) Connect the black 2-pole plug to the jack
INPUT (32) of the compressor .
3) Connect the red 2-pole plug to the jack
OUTPUT (29) of the compressor .
Attention:
The signals at the insert jack of
the mixer may also be directly opposed to
fig . 4: tip = RETURN and ring = SEND . In this
case, the two 2-pole plugs on the compressor
must be exchanged: black plug = OUTPUT
and red plug = INPUT .
Instead of the 6 .3 mm jacks, the XLR jacks
(28, 31) may be connected . However, due
to the unbalanced signals of the insert jacks,
Pin 1 and Pin 3 of the XLR plugs should be
connected in this case .
5.2 Inserting the compressor
between two audio units
The compressor can also directly be inserted
between two audio units (e . g . CD player
and PA amplifier) . The output level of the
signal source must be at line level, i . e . when
connecting a microphone, for example, a
microphone preamplifier must be connected
ahead . Inputs and outputs of the compressor
are available as XLR jacks and 6 .3 mm jacks .
The contacts of the 6 .3 mm jacks are directly
connected to the contacts of the correspond-
ing XLR jack .
The jacks are designed for balanced sig-
nals; however, it will also be possible to con-
nect sources with unbalanced signals . For this
purpose, the connection for the line inputs
can be made via 2-pole 6 .3 mm plugs; for the
XLR inputs, an adapter with the XLR contacts
1 and 3 bridged will be required .
1) Connect the output of the left channel of
the signal source (e . g . CD player) to one
of the jacks INPUT (31 or 32) of channel A


