13
English
1) Set the button BYPASS / COMP (23) to
COMP (engage it) . The button will light
up; thus, the signal processing will be
activated .
2) Adjust the threshold of the expander with
the control THRESHOLD (12) . First turn the
control to the left stop (position OFF) . The
expander will be without effect and all sig-
nals will be audible . Slowly turn the control
clockwise until the expander will only allow
the wanted signal (instrument or voice) to
pass through and will suppress noise in
pauses between the wanted signal . The
LEDs (4) will indicate if the level of the
input signal is below (−) or above (+) the
threshold adjusted .
3) Adjust the expansion ratio, i . e . the degree
of attenuation below the threshold with
the control RATIO (13) . The present atten-
uation of the output level is shown on the
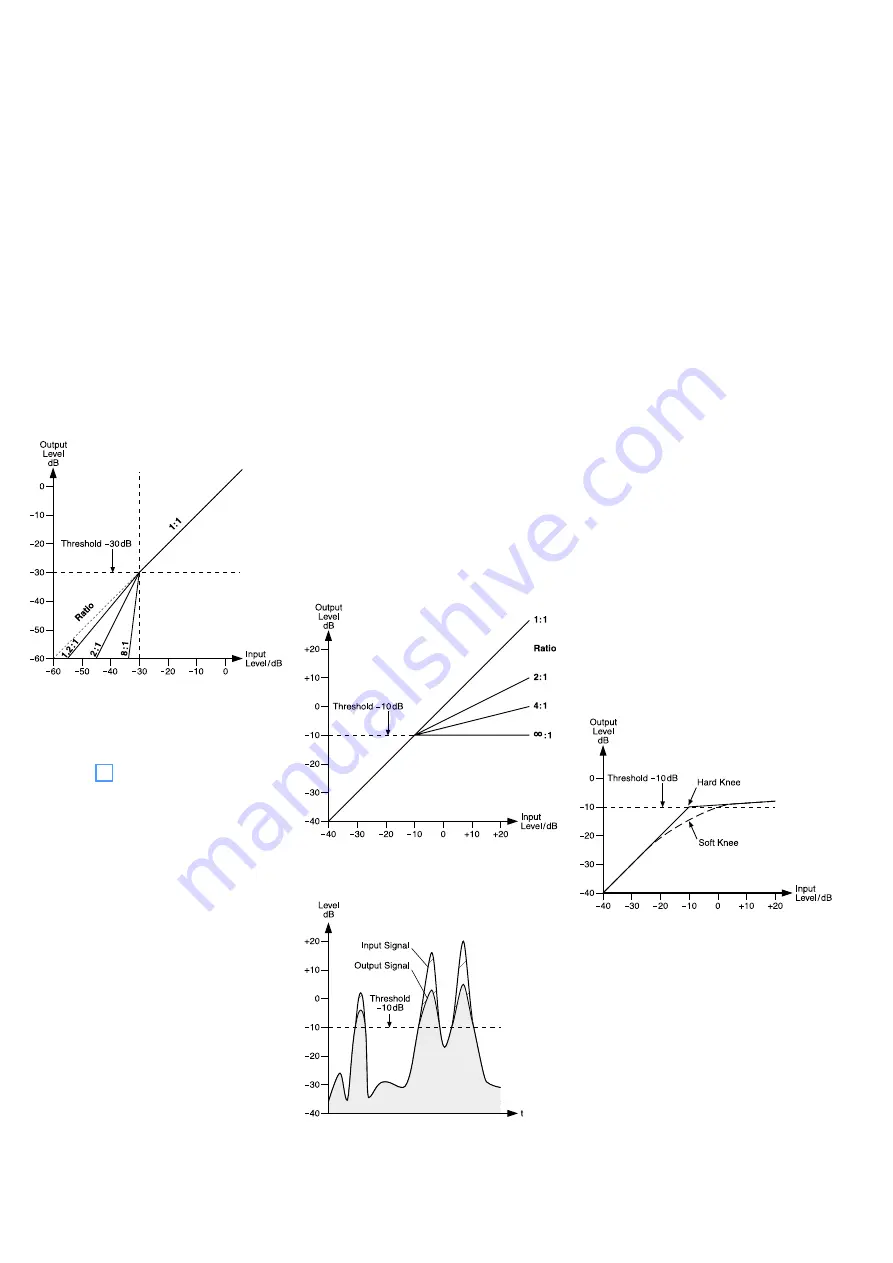
LED chains GAIN REDUCTION (8) . Figure 6
shows the output level as a function of the
input level at a threshold of −30 dB and
different expansion ratios .
Fig. 6
Control characteristic of an expander
at a threshold of −30 dB
Note:
If the level of the noise is just below the level of
the wanted signal (e . g . for percussion microphones),
the gate will also be opened by the noise . To prevent
this, insert an equalizer via the sidechain connections
(
☞
chapter 5 .3) . Set the equalizer to the typical
frequency range of the wanted signal (e . g . funda-
mental pitch of the drum) . Thus, it will be easier to
suppress noise of other frequencies .
6.3 Adjusting the compressor
6.3.1 Threshold and ratio
Adjust the threshold of the compressor with
the control THRESHOLD (15) and the com-
pression ratio with the control RATIO (17) .
Position “1”:
no compression
Position “4”:
The ratio is 4 : 1; an input level modification
of 8 dB above the threshold will result in an
output level modification of 2 dB .
Position “∞”:
The compressor will operate as a signal
limiter; the output signal will roughly be
limited to the value adjusted with the con-
trol THRESHOLD (15) .
The VU-meter is useful for adjusting the
threshold and the ratio . In order to be able
to read the output level on the LED VU-meter
(10, 11), the button OUT/ IN (21) must not
be pressed . The indication GAIN REDUCTION
(8) will indicate the level reduction when the
threshold is exceeded .
Figure 7 shows the output level as a func-
tion of the input level at a threshold of −10 dB
and different compression ratios .
Figure 8 shows an input signal and the re-
sulting output signal at a threshold of −10 dB
and a compression ratio of 2 : 1 . Below the
threshold, the signal will remain unchanged;
above it, it will be compressed by a factor
of 2 .
Fig. 7
Control characteristics for the compressor at
a threshold of −10 dB
Fig. 8
Input signal and output signal at
threshold = −10 dB and ratio = 2 : 1
Hints concerning adjustment:
a . The higher the threshold and the lower
the compression ratio, the more natural
the dynamics .
b . The output signal will be compressed
to the highest extent when the control
THRESHOLD (15) is set to −40 dB and the
control RATIO (17) to ∞ . A high compres-
sion is required, for example, to extend the
fade-out of an instrument (sustain exten-
sion) or to obtain a constant volume with
background music .
c . With vocal microphones, the control
THRESHOLD (15) is usually set to a lower
value to obtain a compression of the
complete signal . With instrument micro-
phones, the control THRESHOLD (15) is
usually set to a higher value to compress
the signal peaks only .
6.3.2 Output level
Due to the dynamic compression, the output
volume will be reduced . This reduction can
be compensated with the control OUTPUT
GAIN (22) .
For comparing the input level and the
output level, switch over the VU-meter (10,
11) accordingly with the button OUT/ IN (21) .
Match the output level of the compressor to
the input level of the following unit with the
control OUTPUT GAIN .
6.3.3 Soft / hard knee
When the button SOFT (7) is not pressed,
the compression from the threshold will be
abrupt . With greater changes in level, the
sound will be quite unnatural . However, it
may be an intentional effect . For a soft and
smooth start of the compression, engage the
button SOFT (7) . Figure 9 shows the differ-
ence between a soft knee and a hard knee .
Fig. 9
Soft / hard knee at threshold = −10 dB,
ratio = 10 : 1
6.3.4 Attack and release times, AUTO button
The attack and release times when the value
exceeds the threshold or falls below the
threshold are adjustable . When the button
MANUAL /AUTO (19) is pressed, these times
will be automatically defined by the audio
signal . In this case, the controls ATTACK (18)
and RELEASE (20) will have no function .
If the desired result is not obtained with
the automatic setting, disengage the button
MANUAL /AUTO (19) and adjust the attack
time of the compressor with the control


