background image

21

INS

TALLER

US

ER

MAINTEN

AN

CE TECHNI

CI

AN

2

  USE AND MAINTENANCE 

INSTRUCTIONS

2.1  CLEANING AND MAINTENANCE.

Warning: 

to preserve the boiler’s integrity and 

keep the safety features, performance and relia-

bility, which distinguish it, unchanged over time, 

you must at least execute maintenance operations 

on a yearly basis in compliance with what is stated 

in the relative point at “annual check and main-

tenance of the appliance”. Annual maintenance 

is essential to validate the conventional warranty 

of Immergas. We recommend stipulating a yearly 

cleaning and maintenance contract with your 

zone Immergas Authorised After-sales Service.

2.2  AERATION AND VENTILATION OF 

THE INSTALLATION ROOMS.

Consult the "Aeration and ventilation of instal-

lation rooms" chapter contained herein and, in 

any case, always refer to the provisions set forth 

by standards and all legislation in force.

2.3  GENERAL WARNINGS.

Use of the boiler by unskilled persons or children 

is strictly prohibited.

For safety purposes, check that the concentric 

air intake/flue exhaust terminal (if fitted), is 

not blocked.

If temporary shutdown of the boiler is required, 

proceed as follows:

a)  drain the heating system if anti-freeze is not 

used;

b)  shut-off all electrical, water and gas supplies.

N.B.:

 in the case of maintenance interventions 

on the boiler that lead to the closure of one or 

both system cut-off cocks, the boiler must be off.

In the case of work or maintenance to structures 

located in the vicinity of ducting or devices for 

flue extraction and relative accessories, switch off 

the appliance and on completion of operations 

ensure that a qualified technician checks efficien-

cy of the ducting or other devices.

Never clean the appliance or connected parts 

with easily flammable substances.

Never leave containers or flammable substances 

in the same environment as the appliance.
• 

Attenzione:

 the use of components involving 

use of electrical power requires some funda-

mental rules to be observed:

  -  do not touch the appliance with wet or moist 

parts of the body; do not touch when bare-

foot;

  - do not pull electric cables;
  - the appliance power cable must not be re-

placed by the user;

  - in the event of damage to the cable, switch 

off the appliance and contact exclusively 

qualified staff for replacement;

  -  if the appliance is not to be used for a certain 

period, disconnect the main power switch.

Summary of Contents for VICTRIX PRO 35 1 I

Page 1: ...VICTRIX PRO 35 55 1 I IE Instruction and warning book 1 038715ENG...

Page 2: ......

Page 3: ...technical information for installing Immergas boilers As for the other issues related to boiler installation e g safety in the work site environment protection injury prevention it is necessary to co...

Page 4: ...entilation of the installation rooms 21 2 3 General warnings 21 2 4 Control panel 22 2 5 Using the boiler 22 2 6 Troubleshooting 24 2 7 Info menu 26 2 8 Boiler shutdown 26 2 9 Restoring central heatin...

Page 5: ...hey only ensure adequate support if inserted correctly according to technical standards in walls made of solid or semi hollow brick or block In the case of walls made from hollow brick or block partit...

Page 6: ...ating 1 5 ANTI FREEZE PROTECTION Minimum temperature 5 C The boiler comes standard with an anti freeze function that ac tivates the pump and burner when the system water temperature in the boiler fall...

Page 7: ...ty The appliance has been de signed to operate with combustible gas free of impurities otherwise it is advisable to fit special filters upstream of the appliance to restore the purity of the fuel Stor...

Page 8: ...s specified by current safety standards Attention Immergas S p A declines any respon sibility for damage or physical injury caused by failure to connect the boiler to an efficient earth system or fail...

Page 9: ...uster via 2 wires Thermoregulation electrical connection Fig 1 4 Thermoregulation electrical connections must be carried out on the boiler terminal board eliminating jumper X40 Thermostat or On Off en...

Page 10: ...ealed chamber and fan assisted The boiler leaves the factory with B23 configuration to change the configuration of the boiler to type C sealed chamber and fan assisted disassemble the 80 adapter the b...

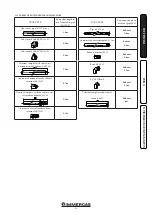
Page 11: ...t 1 3 m Terminal complete with vertical exhaust 80 Exhaust m 3 DUCT TYPE Equivalent length in m of concentric pipe 80 125 Concentric pipe 80 125 m 1 1 0 m Concentric bend 90 80 125 1 9 m Concentric be...

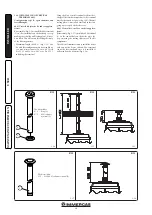
Page 12: ...eft side or front outlet For installation with frontal outlet one must use the fixing plate and a concentric bend coupling in order to ensure sufficient space to carry out the tests required by law up...

Page 13: ...ix it to the lid using the previously disassembled sheet steel plate 3 Installation of the fake aluminium tile replace the tiles with the aluminium sheet 5 shaping it to ensure that rainwater runs off...

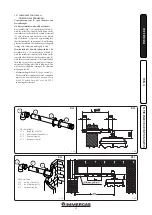
Page 14: ...L Fig 1 15 The kit with this configuration can be extended up to a max measurement of 24 0 m with Victrix Pro 35 1 I and 30 0 m with Victrix Pro 55 1 I including the terminal Using the 80 vertical te...

Page 15: ...4 wall sealing plate has been fitted This will ensure sealing and joining of the elements making up the kit Horizontal kit 80 with exhaust in flue Kit assembly Fig 1 21 install the 80 bend 1 with the...

Page 16: ...nd in current technical regulations in particular the declaration of conformity must be compiled at the end of work and on commissioning of the ducted system The instructions in the project or technic...

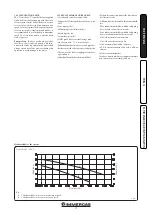
Page 17: ...boiler operation in the case of new systems single pipe and module it is recommended to use the pump at maximum speed The circulation pump is already fitted with a capacitor Pump release If after a p...

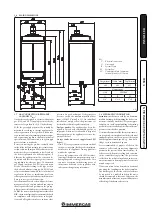
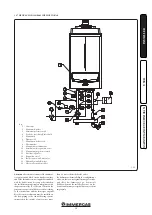
Page 18: ...le cover 11 Igniter 12 Ignition electrode 13 Flue probe 14 Condensing module air vent valve 15 Fumes hood 16 Sample points air A flue gas F 17 Heat exchanger safety thermal fuse 18 Manual air vent val...

Page 19: ...d block circuit breaker switches andofthethermometer notsuppliedasstandard with the boiler must be set up as described in the installation instructions in compliance with theprovisionsofthe R collecti...

Page 20: ...ng circuit pump CMI 1 13 Zone 2 central heating circuit pump CMI 2 14 Zone 3 direct circuit pump CD 15 Storage tank unit feeding pump 16 Zone 1 safety thermostat CMI 1 17 Zone 2 safety thermostat CMI...

Page 21: ...orary shutdown of the boiler is required proceed as follows a drain the heating system if anti freeze is not used b shut off all electrical water and gas supplies N B in the case of maintenance interv...

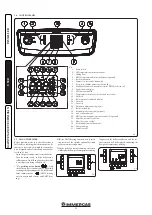
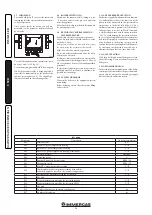
Page 22: ...ies 24 Pump running 25 Summer mode 2 5 USING THE BOILER Before ignition make sure that the system is full of water checking that the manometer 5 indicates a base value at which the system has been des...

Page 23: ...maintain the previous setting 2 4 2 5 Stand by mode by pressing buttons A and C at the same time it is possible to place the boiler in stand by In this mode the boiler is considered powered on but not...

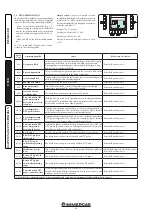
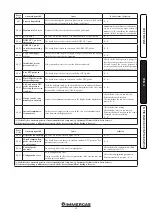
Page 24: ...NTC probe temperature The error may be caused by a poor thermal probe contact or a system with excessive thermal inertia Press the Reset button 1 0A17 Poor thermal return NTC probe contact During boi...

Page 25: ...th the boiler in stand by the board detects an anomalous difference between the NTC probe flow and return temperatures The error may be caused by a failure in one of the two probes 2 1 0E98 Simple cas...

Page 26: ...s that are drained frequently filling must be carried out with suitably treated water to eliminate hardness that can cause lime scale 2 12 CASE CLEANING Use damp cloths and neutral detergent to clean...

Page 27: ...fans check that the intake and or exhaust terminals are not blocked ensure activation of all adjustment devices seal the gas flow rate regulation devices if settings are modified check sealing effici...

Page 28: ...ostat can be used instead of B2 set P29 17 E4 Safety thermostat E5 Heat exchanger safety thermostat manual reset E13 Safety thermofuse G2 Igniter M1 Boiler circulator pump M20 Fan M30 Three way valve...

Page 29: ...D inlet Clean contact Max 230 Vac 1 A Key B1 System flow probe NTC B2 Domestic hot water probe NTC B4 External probe M2 Plant CH pump M30 3 way valve Note probe B1 B2 B4 Connection cable diameter 3 7...

Page 30: ...fibre panel replace the cover gasket of the manifold and reset the thermostat by pressing the specific button check that the exchanger safety thermostat has not intervened If it has check the integri...

Page 31: ...er s modulation ratio It defines the boiler s modulation ratio Do not modify 0 100 10 P13 Boiler power Used to calculate the boiler power in the event of simple cascade 0 255 kW 35 kW 35 55 kW 50 P14...

Page 32: ...asurement This defines the unit of measure on the display whether metric or Imperial 0 127 C kW 128 256 F kBTu h 0 P32 Set Resc Min Limits the minimum value of the heating set The parameter takes prio...

Page 33: ...8 Off Setregulator To increase the CO2 value turn the adjustment screw 3 in a clockwise direction and vice versa to decrease it Calibration of maximum CO2 When you finish the minimum CO2 adjustment tu...

Page 34: ...be must be connected to terminals S1 and S2 and parameter P38 must be set up whereas the pump must be connected to termi nals C and D If there is a DHW circuit it can be connected via an external 3 wa...

Page 35: ...replaced at least every two years regardless of their state of wear Check that the burner is intact that it has no deformations or cuts and that it is properly fixed to the combustion chamber lid oth...

Page 36: ...to de tach it from the central hooks and then slide it downwards take the two clamping screws out 4 from the control panel with their rings 5 press the two side hooks 7 and tilt the control panel 6 re...

Page 37: ...37 3 10 1 6 8 9 9 12 12 10 11 13 13 13 13 A A Rif A 7 7 INSTALLER USER MAINTENANCE TECHNICIAN Ref A...

Page 38: ...0 30 0 25800 3 24 4520 2 38 4380 29 0 24940 3 13 4400 2 30 4260 28 0 24080 3 02 4270 2 22 4130 27 0 23220 2 92 4140 2 14 4010 26 0 22360 2 81 4010 2 06 3880 25 0 21500 2 71 3890 1 99 3760 24 0 20640 2...

Page 39: ...g h 81 82 Flue flow rate at min heat output kg h 9 9 CO2 at Q Nom Min 9 40 9 10 10 60 10 10 CO with 0 O2 at Nom Min Q Nom Min ppm 157 1 184 1 NOX at 0 of O2 at Q Nom Min mg kWh 43 17 43 21 Flue temper...

Page 40: ...loss at casing with burner On Off 80 60 C 0 44 1 10 0 30 0 90 Heat loss at flue with burner On Off 80 60 C 0 04 1 60 0 03 1 80 Central heating circuit max operating pressure bar 4 4 4 4 Central heatin...

Page 41: ...d Md Model code Sr N Serial Number CHK Check Cod PIN PIN code Type applianceconfiguration ref CENTR1749 Qnw min Minimum DHW heat input Qn min CH minimum heat input Qnw max DHW maximum heat input Qn ma...

Page 42: ......

Page 43: ......

Page 44: ...mmergas com Immergas S p A 42041 Brescello RE Italy Tel 0522 689011 Fax 0522 680617 Certified company ISO 9001 This instruction booklet is made of ecological paper Cod 1 038715ENG rev ST 002094 000 09...

Reviews: