background image


HANDLING INSTRUCTIONS


Below you will find the instructions required to profit from the  capacity. 

Before starting up you should check that: 

-  the charger plug is disconnected 
-  the power pack is correctly attached to the wheelchair 

-  the coiled speed controller cable is not jammed, e.g. at the rear wheels 

-  the wheelchair brakes are released and in safe working condition. 


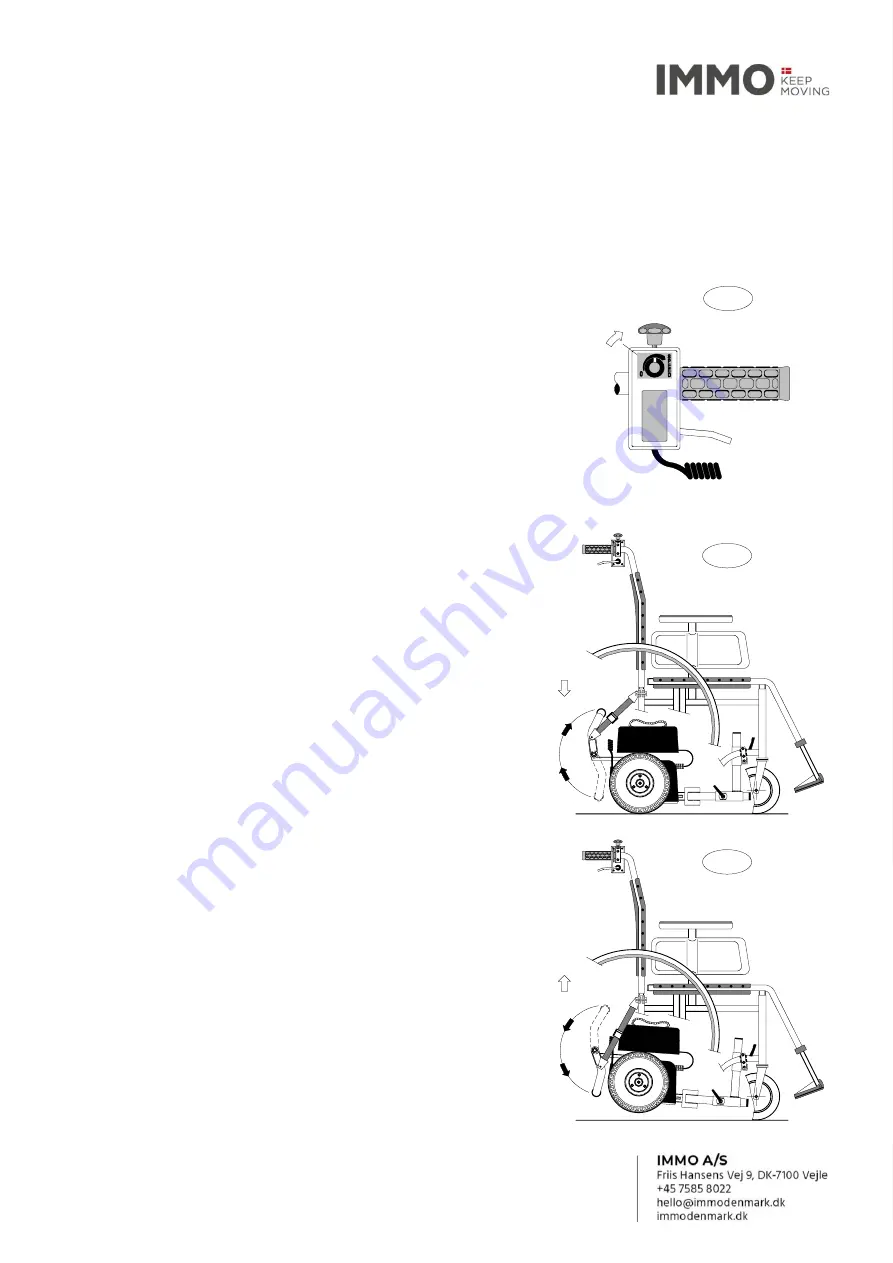
Fig. 1  on/off switch 


Turn the black switch on the side of the speed 

controller clockwise. Now the green lamp at the rear of 
the motor unit is on, indicating that power is switched 

on, and you are ready to go. 

REMEMBER always to turn off the power and lock the 

brakes before leaving the wheelchair. 


Fig. 2  engaging 


Behind the wheelchair, you will find a pedal on the 

right side of the motor unit. Pull the pedal to lower the 
 onto the ground. 

Now the power pack is on the ground and ready to 

drive the wheelchair. 


Fig. 3  declutching 


When you want to push the chair or the wheelchair 
user wants to drive the chair on their own, you step on 

the pedal and push it down. This will raise the  

from the ground and let it hang by the straps. In 

addition, when you want to cross a curb or drive 
through a deep puddle, the power pack should be 

declutched this way. 


The  should not be left declutched for longer 

periods. This will stretch the straps and stress the wheels 

and frame of the wheelchair. 

Therefore, leave it standing on the ground (fig. 2). 


fig. 2

fig. 3

fig. 1

Summary of Contents for EasyGo+

Page 1: ... specialist staff possessing a thorough knowledge of the problems associated with walking disabilities This ensures that both operation and day to day maintenance are limited to a minimum All you need to do before putting your EasyGo into operation is to make yourself familiar with the instructions specified in this manual as well as to ensure that the batteries are fully charged We wish you good ...

Page 2: ...DUCT DESCRIPTION MOTOR UNIT FRONT FITTINGS 1 Motor part 8 Front brackets 2 Battery part 9 Angled connector 3 Lifting handle 10 Traction bar SPEED CONTROLLER REAR FITTINGS 4 Finger screw 11 Strap brackets 5 On off top speed control 12 Straps 6 Coiled cable 13 Declutching pedal 7 Speed control lever 1 2 4 5 6 3 7 10 9 8 13 11 12 U B Let A S Friis H ansens V ej 9 D K 7100 V ejle tel 45 75 85 80 22 fa...

Page 3: ...and lock the brakes before leaving the wheelchair Fig 2 engaging Behind the wheelchair you will find a pedal on the right side of the motor unit Pull the pedal to lower the EasyGo onto the ground Now the power pack is on the ground and ready to drive the wheelchair Fig 3 declutching When you want to push the chair or the wheelchair user wants to drive the chair on their own you step on the pedal a...

Page 4: ...ir sockets on the pedal arm and let the straps hang down beside the power pack Go to the front of the chair release the finger screw on the traction bar and slide the pin into the tube Then pull the traction bar out of the bracket on the opposite side and lower the front end of the EasyGo Now you can push the chair forwards and leave the power pack on the ground REMEMBER to tighten the finger scre...

Page 5: ...range Later when 80 capacity is reached it will change to yellow Finally when charging is completed it turns to green 4 During the process the charger automatically adjusts how much power the battery can absorb Subsequently when it is fully charged it will maintain the charge with a very low current Therefore always keep the EasyGo connected when not in use 5 Normally it will take 5 6 hours to rec...

Page 6: ...attempt to hold back the wheelchair by force We recommend you to start by turning up the on off switch only halfway On level ground this speed will usually be adequate Later when you need more power to climb hills you should turn it up to full speed This gives you a comfortable choice to adjust to your walking speed 3 Driving downhill you ease off a bit on the throttle lever and the EasyGo will he...

Page 7: ...ng and it can be important to your supplier if you describe how it blinks e g 4 blinks pause 1 blink etc but Do never attempt to open the unit and do repairs on your own TECHNICAL DATA EasyGo 17 EasyGo 28 Article No 202014 202015 Measurements height 270 mm 330 mm width 490 mm 490 mm length 240 mm 240 mm Total weight 32 kg 44 kg motor unit 18 kg 18 kg battery 14 kg 26 kg Batteries maintenance free ...

Page 8: ...e running water and or solvents FINGER SCREWS To prevent the use of tools the EasyGo is fitted with a few finger screws The handle of these screws can however get in your way and you may want to turn them 1 pull out the handle 2 turn it into the wanted position while pulled out and 3 let it fall into place again SPARE PARTS The EasyGo has an expected average lifetime of 8 10 years but you should e...

Reviews: