background image

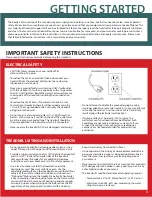
ELECTRICAL SAFETY

•  CAUTION: Never remove any cover without first 

disconnecting AC power. 

•  To reduce the risk of an electrical shock, disconnect your 

treadmill from the electrical outlet prior to any cleaning, 

lubrication or service work.

•  Never use a ground fault circuit interrupt (GFCI) wall outlet 

with this treadmill. As with any appliance with a large motor, 

the GFCI will trip often. Route the power cord away from any 

moving part of the treadmill including the transportation 

wheels.

•  To reduce the risk of burns, fire or electric shock, be sure 

to install your treadmill where it will have good access to a 

110-volt, 10-amp grounded outlet, with only the treadmill 

plugged into the circuit.  

•  Do not use an extension cord unless it’s a 14 AWG cord, or 

better – with only one (1) outlet on the end. The outlet must 

be a three-prong, grounded type. The treadmill should be 

the only appliance in the circuit to which it is connected.

•  Never operate the treadmill if it has a damaged cord or plug. 

•  Do not attempt to disable the grounding plug by using 

improper adaptors or extension cords, or in any way attempt 

to modify the cord set. A serious shock or fire hazard may 

result along with electronics malfunctions. 

•  If voltage varies by 10 percent (10%) or more, the 

performance of your treadmill may be affected. Such 

conditions are not covered under your warranty. If you 

suspect the voltage is low, contact your local power 

company or a licensed electrician for proper testing/

evaluation.

TREADMILL SITING AND INSTALLATION

  •  Do not operate treadmill on a deeply padded, plush or shag 

carpet. Damage to both carpet and the treadmill may occur.

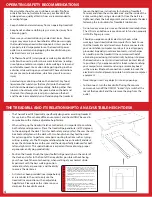
  •  Provide a minimum clearance of 1m (40”) behind the treadmill 

and 1/2m (20”) to the left and ride sides of the treadmill. 

Comply with local fire codes for any additional clearance 

instructions, and never block access to fire safety equipment.

  •  Use a level to make sure that the treadmill is perfectly 

horizontal, as most floors are slightly uneven. Use the 

adjustable leveling feet on the treadmill to ensure that all four 

corners of the unit are solidly on the floor, and no corner is 

“high sided.” Making sure the treadmill is perfectly horizontal 

is key to avoiding undue torqueing forces on the frame, which 

can cause the belt to move out of position, generate squeaks 

or scraping noises when walking on the belt, reduce the life 

expectancy of key components, and/or void the warranty. 

  •  Keep all cords away from heated surfaces.

  •  Do not operate in the vicinity of where aerosol products are 

being used or where oxygen is being administered. Sparks 

from the motor may ignite may ignite a highly gaseous 

environment.

  •  Never expose this treadmill to rain or moisture. This product is 

NOT designed for use outdoors, near a pool or spa, or in any 

other high-humidity environment.

  •  The treadmill’s specified environmental operating range is: 

•  Temperature: 50° to 95° Fahrenheit (10° to 35 °Celsius)

•  Maximum Humidity: 80% non-condensing (no water 

drops forming on surfaces)

3

GETTING STARTED

The Ready-Set-Go section of this manual will get you upright and walking in no time, but first we need to review some important 

safety information to ensure that your experience is a positive one and that your equipment always performs at peak efficiency. The 

vast majority of treadmill support calls can be attributed to a failure to properly level the treadmill or to keep it properly lubricated 

and clean. To ensure that your treadmill continues to work trouble-free for many years, and your warranty coverage remains intact, 

please pay particular attention to the instructions in this manual pertaining to installation and regular maintenance.  Please note 

that failure to follow the instructions in this manual may void your warranty.

IMPORTANT SAFETY INSTRUCTIONS 

Please read all instructions carefully before using this treadmill.

Summary of Contents for TermoTread GT

Page 1: ...OWNER S MANUAL Office Walking Treadmill by iMovR ThermoTread GT...

Page 2: ...nment not a noisy gym It is intended to work together with a stable height adjustable desk at typical walking speeds of 1 0 to 2 0 mph with a maximum speed of 2 5 mph Being that walking on a treadmill...

Page 3: ...nd never block access to fire safety equipment Use a level to make sure that the treadmill is perfectly horizontal as most floors are slightly uneven Use the adjustable leveling feet on the treadmill...

Page 4: ...r prolonged use quality athletic shoes are recommended to avoid leg fatigue Keep children and animals away from an operating treadmill Keep hands and loose clothing e g scarves ties away from all movi...

Page 5: ...the home office breaker with a high inrush type This is not considered a warranty defect This is unfortunately a condition that we as a manufacturer have no ability to control High inrush circuit bre...

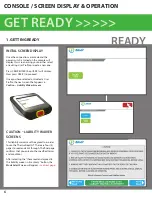
Page 6: ...ofile the next screen that appears is Caution Liability Waiver Screens CONSOLE SCREEN DISPLAY OPERATION CAUTION LIABILITY WAIVER SCREENS This liability waiver must be agreed to in order to use the The...

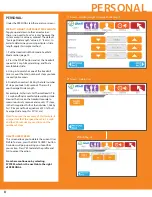
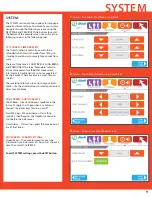
Page 7: ...Timer Presets Audio Settings and Screen Settings Press the SETTINGS button then the Work Mode screen will appear GET SET WORK MODE In WORK MODE the Walking Default setting appears Use the up and down...

Page 8: ...sult is your Average Stride Length For example Arthur sets his ThermoTread GT to 1 5 mph and finds a comfortable walking stride He uses the time on the treadmill console to measure out sixty seconds a...

Page 9: ...breaks These breaks are a great time to stretch These settings allow you to customize your timer breaks Use the arrow buttons to select your desired times for each break 2ND SCREEN AUDIO PRESETS Touch...

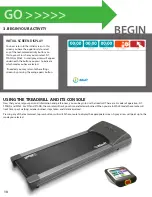
Page 10: ...the orange gears button USING THE TREADMILL AND ITS CONSOLE Now that you ve set your personal information and preferences you can begin to use the treadmill There are 3 modes of operation SIT STAND an...

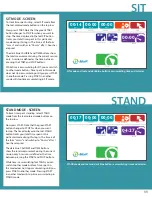
Page 11: ...00 MM SS MM SS MM SS MM SS MM SS SIT START CALORIES STAND SIT WALK 1 SETTINGS TIME EXIT TIMER 00 00 00 14 00 00 00 00 00 14 0000 MM SS MM SS MM SS MM SS MM SS SIT MODE SCREEN To track time spent sitti...

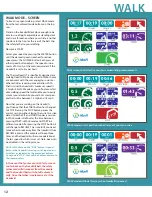
Page 12: ...the STOP button pauses the current session without losing the current session data Unlike the SIT and STAND modes a session in WALK mode is defined as the time between pressing START in WALK mode and...

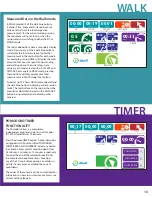
Page 13: ...d on the DISTANCE button being selected and indicating miles covered STEPS CALORIES STAND SIT WALK 1 MILES TIME DISTANCE 0 5 SPEED SLOWER FASTER TIMER 00 33 01 51 00 01 00 042 0004 SETTINGS EXIT MM SS...

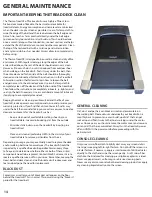
Page 14: ...ing some extra measures to create a cleaner environment for the treadmill such as Keep a clean pair of comfortable walking shoes by your treadmill desk to avoid introducing dirt from the outside Minim...

Page 15: ...osition after each turn of the bolt If the belt is too close to the left side then turn the bolt one quarter turn to the right clockwise and wait for a few minutes for the belt to adjust itself If nec...

Page 16: ...f the deck on one side of the treadmill lift up on the belt carefully and reach under with the spray bottle of lubricant 3 Aiming downward toward the deck squirt the lubricant on the deck 2 to 4 times...

Page 17: ...caused by high belt deck friction First try lubricating the treadmill belt If it continues to trip try slightly loosening the treadmill belt Refer to General Maintenance section b Interference from ot...

Page 18: ...he treadmill up carefully from the rear and lift it to about a 45 degree angle in order to enable easier rolling Please use extreme caution as the treadmill is heavy To reduce the possibility of injur...

Page 19: ...to the internet To download the most up to date software connect your USB cable to your computer and visit http www imovr com treadmill software download IMPORTANT Use this cord only while updating s...

Page 20: ...Version 1 0 7 2015 ThermoTread GT...

Reviews: