background image


IMPEX

®

 INC. 


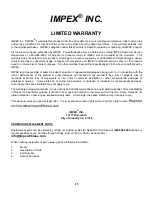
LIMITED WARRANTY 


IMPEX Inc. ("IMPEX

®

") warrants this product to be free from defects in workmanship and material, under normal use 

and service conditions, for a period of two years on the Frame from the date of purchase.   This warranty extends only 
to the original purchaser.   IMPEX's obligation under this Warranty is limited to replacing or repairing, at IMPEX's option. 
 
All returns must be pre-authorized by IMPEX.  Pre-authorization may be obtained by calling IMPEX Customer Service 
Department at 1-800-999-8899. All freights for products return to IMPEX must be prepaid by the customer.  This 
warranty does not extend to any product or damage to a product caused by or attributable to freight damage, abuse, 
misuse, improper or abnormal usage or repairs not provided by an IMPEX authorized service center or for products 
used for commercial or rental purposes.  No other warranty beyond that specifically set forth above is authorized by 
IMPEX. 
 
IMPEX is not responsible or liable for indirect, special or consequential damages arising out of or in connection with the 
use or performance of the product or other damages with respect to any economic loss, loss of property, loss of 
revenues or profits, loss of enjoyments or use, costs of removal, installation or other consequential damages or 
whatsoever natures.   Some states do not allow the exclusion or limitation of incidental or consequential damages.  
Accordingly, the above limitation may not apply to you. 
 
The warranty extended hereunder is in lieu of any and all other warranties and any implied warranties of merchantability 
or fitness for a particular purpose is limited in its scope and duration to the terms set forth herein.  Some states do not 
allow limitations on how long an implied warranty lasts.   Accordingly, the above limitation may not apply to you. 
 

This warranty gives you specific legal right.   You may also have other rights which vary from state to state. 

Register 

on-line www.impex-fitness.com


IMPEX

®

 INC. 

14777 Don Julian 

City of Industry, CA  91746 

 
ORDERING REPLACEMENT PARTS 

 
Replacement parts can be ordered by calling our Customer Service Department toll-free at 

1-800-999-8899

 during our 

regular business hours:  Monday through Friday, 9 am until 5 pm Pacific standard time. 

info@impex-fitness.com 

 
When ordering replacement part, always give the following information. 
 
1. Model 
2. 

Description of Parts 

3. Part 

Number 

4. 

Date of Purchase 


15 

Summary of Contents for BF-6731A

Page 1: ...rdware Pack Assembly Instruction Parts List Warranty Ordering Parts Model BF 6731A Retain This Manual for Reference 07 08 09 OWNER S MANUAL Deluxe Recumbent Bike BF 6731A IMPEX INC 14777 DON JULIAN RD CITY OF INDUSTRY CA 91746 Tel 800 999 8899 Fax 626 961 9966 www impex fitness com info impex fitness com ...

Page 2: ...before using the machine As a manufacturer we are committed to provide you complete customer satisfaction If you have any questions or find there are missing or damaged parts we guarantee you complete satisfaction through direct assistance from our factory To avoid unnecessary delays please call our TOLL FREE customer service number Our Customer Service Agents will provide immediate assistance to ...

Page 3: ... using the machine to exercise always do stretching exercises to properly warm up 11 Never operate the machine if the machine is not functioning properly 12 The Maximum Weight Capacity is 300 lbs 13 Read all warnings posted on the exercise bike 14 Inspect the exercise bike for worn or loose component prior to use Tighten replace any loose or wore components prior to use 15 Care should be taken in ...

Page 4: ... PLACEMENT The Warning Label shown here has been placed on the Rear Stabilizer If the label is missing or illegible please call customer service at 1 800 999 8899 for replacement Apply the label in location shown 3 ...

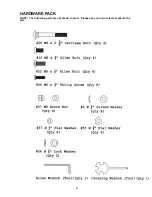
Page 5: ...HARDWARE PACK NOTE The following parts are not drawn to scale Please use your own ruler to measure the size 4 ...

Page 6: ...that two or more people assemble this machine to avoid possible injury STEP 1 See Diagram1 A Attach the Front Stabilizer 25 to the Main Frame 28 Secure it with two M8 x 2 3 8 Carriage Bolts 26 two 5 8 Curved Washers 9 and two M8 Acorn Nuts 27 DIAGRAM 1 5 ...

Page 7: ...er Computer Wire 6 from the bottom of Front Post to the Lower Computer Wire 7 from the main Fame C Connect the Upper Pulse Sensor Wire 2 from Front Post to the Lower Pulse Sensor Wire 8 D Attach the Front Post to Main Frame Secure them together with four M8 x 5 8 Allen Bolts 10 and four Ø 5 8 Curved Washers 9 DIAGRAM 2 6 ...

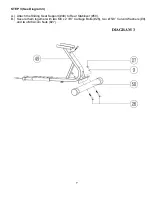
Page 8: ...TEP 3 See Diagram 3 A Attach the Sliding Seat Support 49 to Rear Stabilizer 50 B Secure them together with two M8 x 2 3 8 Carriage Bolts 26 two Ø 5 8 Curved Washers 9 and two M8 Acorn Nuts 27 DIAGRAM 3 7 ...

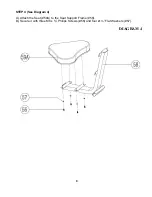
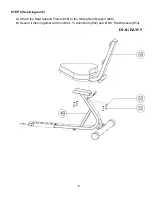
Page 9: ...STEP 4 See Diagram 4 A Attach the Seat 59A to the Seat Support Frame 58 B Secure it with three M6 x Philips Screws 56 and four Ø Flat Washers 57 DIAGRAM 4 8 ...

Page 10: ...STEP 5 See Diagram 5 A Attach the Seat Support Frame 58 to the Sliding Seat Support 49 B Secure it them together with four M8 x Allen Bolts 52 and Ø 5 8 Flat Washers 53 DIAGRAM 5 9 ...

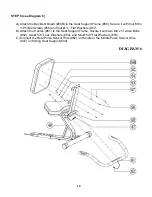
Page 11: ...ilips Screws 56 and four Ø Flat Washers 57 B Attach the Handle 61 to the Seat Support Frame Secure it with two M8 x Allen Bolts 52 two Ø 5 8 Lock Washers 54 and two Ø 5 8 Flat Washers 53 C Connect the Rear Pulse Sensor Wire 62 on Handle to the Middle Pulse Sensor Wire 47 on Sliding Seat Support 49 DIAGRAM 6 10 ...

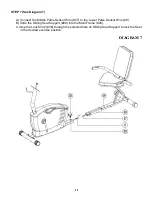
Page 12: ...lse Sensor Wire 47 to the Lower Pulse Sensor Wire 8 B Slide the Sliding Seat Support 49 into the Main Frame 28 C Use the Lock Knob 38 through the selected hole on Sliding Seat Support to lock the Seat in the desired exercise position DIAGRAM 7 11 ...

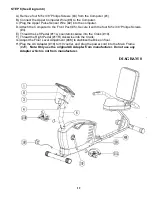
Page 13: ...it with the four M5 x 3 8 Philips Screws 4 E Thread the Left Pedal 11L counterclockwise into the Crank 19 F Thread the Right Pedal 11R clockwise into the Crank G Adjust the Floor Level Adjustment 48 to stabilize the Bike on floor H Plug the AC Adapter 18 to110v outlet and plug the power cord into the Main Frame 28 Note Only use the original AC Adapter from manufacturer Do not use any Adapter which...

Page 14: ......

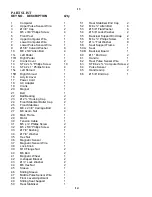
Page 15: ...E4 2 x Computer Screw 2 14 ST4 2 x 1 Philips Screw 4 64 Pulse Sensor 2 15L Left Shroud 1 65 Handle Grip 2 15R Right Shroud 1 66 Ø 5 8 End Cap 1 16 Acrylic Cover 1 17 Power Cord 1 18 AC Adapter 1 19 Crank 1 20 Magnet 1 21 Belt 1 22 Ball Bearing 2 23 Ø 2 Housing Cap 2 24 Front Stabilizer Roller Cap 2 25 Front Stabilizer 1 26 M8 x 2 3 8 Carriage Bolt 4 27 M8 Acorn Nut 4 28 Main Frame 1 29 Motor 1 30 ...

Page 16: ...ct or other damages with respect to any economic loss loss of property loss of revenues or profits loss of enjoyments or use costs of removal installation or other consequential damages or whatsoever natures Some states do not allow the exclusion or limitation of incidental or consequential damages Accordingly the above limitation may not apply to you The warranty extended hereunder is in lieu of ...

Reviews: