background image

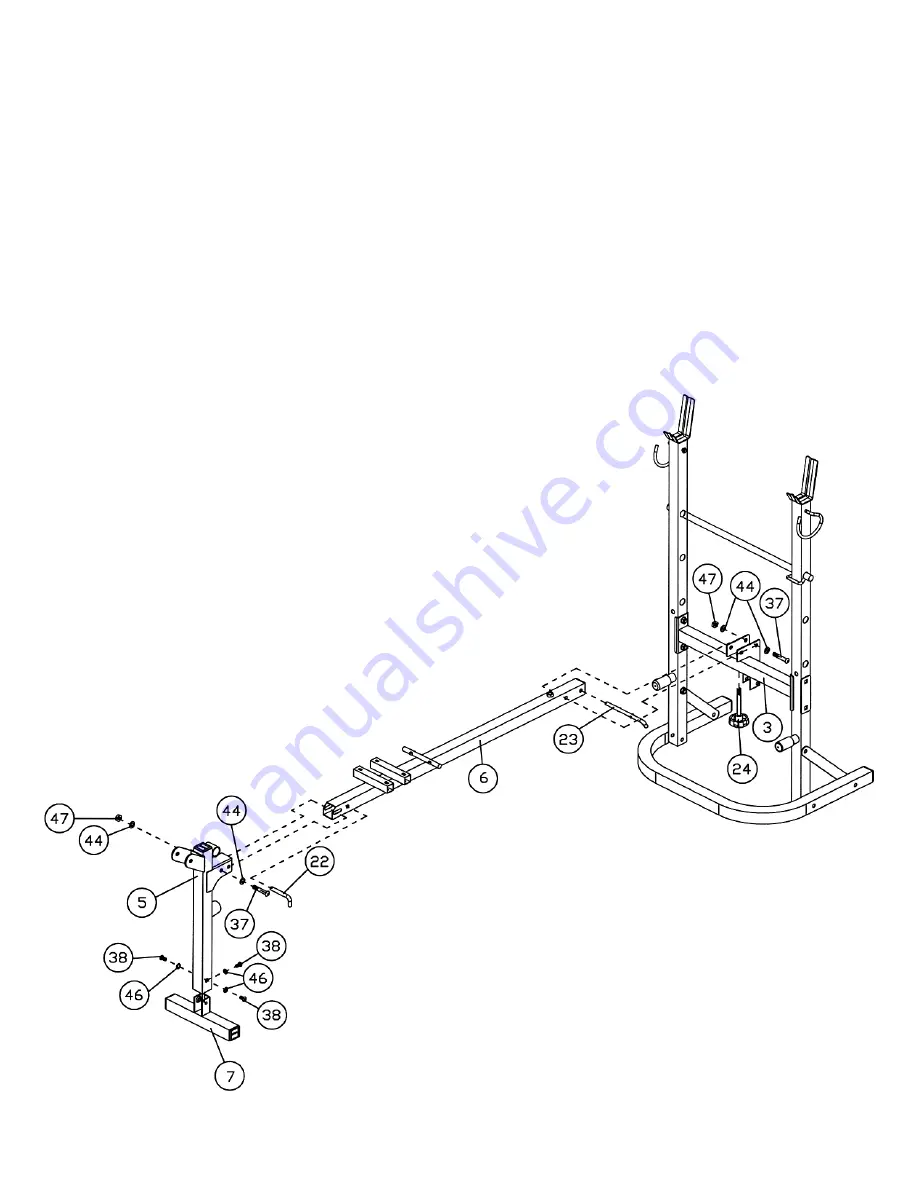
STEP 2 

(SEE DIAGRAM 2) 


A.)  Attach the Leg Developer Holder (#5) onto the Front Stabilizer (#7). Secure it with three 

M8 x 5/8” Allen Bolts (#38) and Ø 5/8” Washers (#46). 

B.)  Connect the Main Seat Support (#6) to the Leg Developer Holder. Secure the front hole 

with a M10 x 2 1/8” Allen Bolt (#37), two Ø ¾” Washers (#44), and one M10 Aircraft Nut 
(#47).  Note: Do not over tighten the Nut and Bolt. The Leg Developer Holder needs to 
pivot on this Bolt in able to fold up.  Secure the other hole with a 3 3/8” Lock Pin (#22). 

C.)  Attach the Main Seat Support to the bracket on the Cross Brace (#3). Align the second 

hole on the Main Seat Support to the rear hole on the bracket. Secure them with one M10 
x 2 1/8” Allen Bolt (#37), two Ø ¾” Washers (#44), and one M10 Aircraft Nut (#47). Note: 
Do not over tighten the Nut and Bolt. The Main Seat Support needs to pivot on this Bolt in 
able to fold up. Insert a 6” Lock Pin (#23) into the first hole on Main Seat Support. 

D.)  Thread a M10 Lock Knob (#24) from the bottom of the Cross Brace to secure the Main 

Seat Support. 

DIAGRAM 2 


Summary of Contents for MFB 400

Page 1: ...96 893 Fax 00 44 1792 796 627 www escaladesports co uk info escaladesports co uk NOTE Please read all instructions carefully before using this product Table of Contents Safety Notice Hardware Pack Ass...

Page 2: ...ustomer satisfaction If you have any questions or find there are missing or damaged parts or you require assistance assembling this product we guarantee you complete satisfaction through direct assist...

Page 3: ...robes or other clothing that could become caught in the bench Running or aerobic shoes are also required when using the bench 8 Use the bench only for its intended use as described in this manual DO N...

Page 4: ...WARNING LABEL 3...

Page 5: ...HARDWARE PACK NOTE The following parts are not drawn to scale Please use your own ruler or scale to measure the size 4...

Page 6: ...HARDWARE PACK NOTE The following parts are not drawn to scale Please use your own ruler or scale to measure the size 5...

Page 7: ...r Stabilizer Secure it with two M10 x 2 1 8 Allen Bolts 37 four Washers 44 and two M10 Aircraft Nuts 47 D Repeat Procedure B and C above to install the other side E Connect the two Rear Upright Beams...

Page 8: ...this Bolt in able to fold up Secure the other hole with a 3 3 8 Lock Pin 22 C Attach the Main Seat Support to the bracket on the Cross Brace 3 Align the second hole on the Main Seat Support to the rea...

Page 9: ...s on the Rear Upright Beam 1 Secure the Bolt with a M12 Lock Knob 29 behind the Upright Beam B Insert a Butterfly Foam Tube 14 through the holes on the Left Butterfly Push a Butterfly Large Foam Roll...

Page 10: ...e the other ends rest against the Backrest Adjustment Bar 4 B Attach the Backrest Board 18 onto the Backrest Supports Secure it with four M6 x 1 5 8 Hex Bolts 41 and Washers 45 C Place the Seat Pad 19...

Page 11: ...47 Do not over tighten the Nut and Bolt Make sure the Leg Developer is able to swivel B Insert one Foam Tube 13 halfway through the holes on the Leg Developer Holder Insert two Foam Tubes halfway thr...

Page 12: ...eveloper Holder B Loosen and remove the M10 Lock Knob 29 from the bottom of the Main Seat Support then fold up the bench to a vertical position C Insert the 6 Lock Pin 23 through the holes on the brac...

Page 13: ...12...

Page 14: ...13...

Page 15: ...oam Roll 6 21 Butterfly Large Foam Roll 2 22 3 3 8 Lock Pin 1 23 6 Lock Pin 1 24 M10 Lock Knob 1 25 Spring Clip 3 26 3 8 Leg Developer Bushing 2 27 Butterfly Bushing 4 28 1 1 8 x 2 Rubber Bumper 2 29...

Page 16: ...alade Escalade is not responsible or liable for indirect special or consequential damages arising out of or in connection with the use or performance of the product or other damages with respect to an...

Reviews: