background image


XTT300-0-0-GB-16 

January 2011 

Page 2 


Power Supply Combo (IPS910) 

NOTE: 

The Power Supply Combo includes a 3 A Switch Mode Power Supply which 
provides power for the (optional) internal unit and for charging the (optional) 
backup Battery.  As the Power Supply Combo needs no more than 1 A, you 
may power extra devices using up to 2 A continuous current from the 
provided connector block.  DO NOT exceed this 2 A limit on continuous 
current draw.  Devices with a high in-rush current demand, such as certain 
maglocks and other electromechanical devices, can momentarily draw more 
than 3 A.  The Power Supply then effectively shuts down as directed by its 
built in protection as exceeding the 3 A rating is considered a short-circuit.  
Overcome this by installing the recommended 12 V 7 Ahr Battery to help 
supplement the in-rush current such a device may draw on activation. 

Power Input 


Input Voltage  .........................  

85 V AC to 265 V AC at 50/60 Hz. 

Power Output 


Output Voltage .......................                


(Mains Power On) 

13.8 V DC ±0.3 V DC. 


Output Current ................  

2 A continuous (Power Output Terminals). 

System Battery 


Battery Type ...........................  

12 V 7 Ahr (Max) Sealed Lead Acid Battery.  


Length ....................................  

151 mm (6 in) (Max). 


Width ......................................  

65 mm (3 in) (Max). 


Height .....................................  

99 mm (4 in) (Max) including the terminals. 


Charge Voltage ......................   

13.8 V DC. 

The following specifications are common to all models of the ImproX TT: 

Relays 


Relay Output ..........................  

2 Independent, single-pole, double-throw 
(SPDT) Relays, each with NO, COM and NC 
contacts. 


Relay Contact Ratings ...........  

3 A at 24 V DC or 125 V AC. 
1.5 A at 220 V AC. 

Digital Inputs 


Type  ......................................  

4 Dry-contact Digital Inputs. 


Protection Range ...................  

+50 V to -50 V continuous, 
+80 V to -80 V surge. 


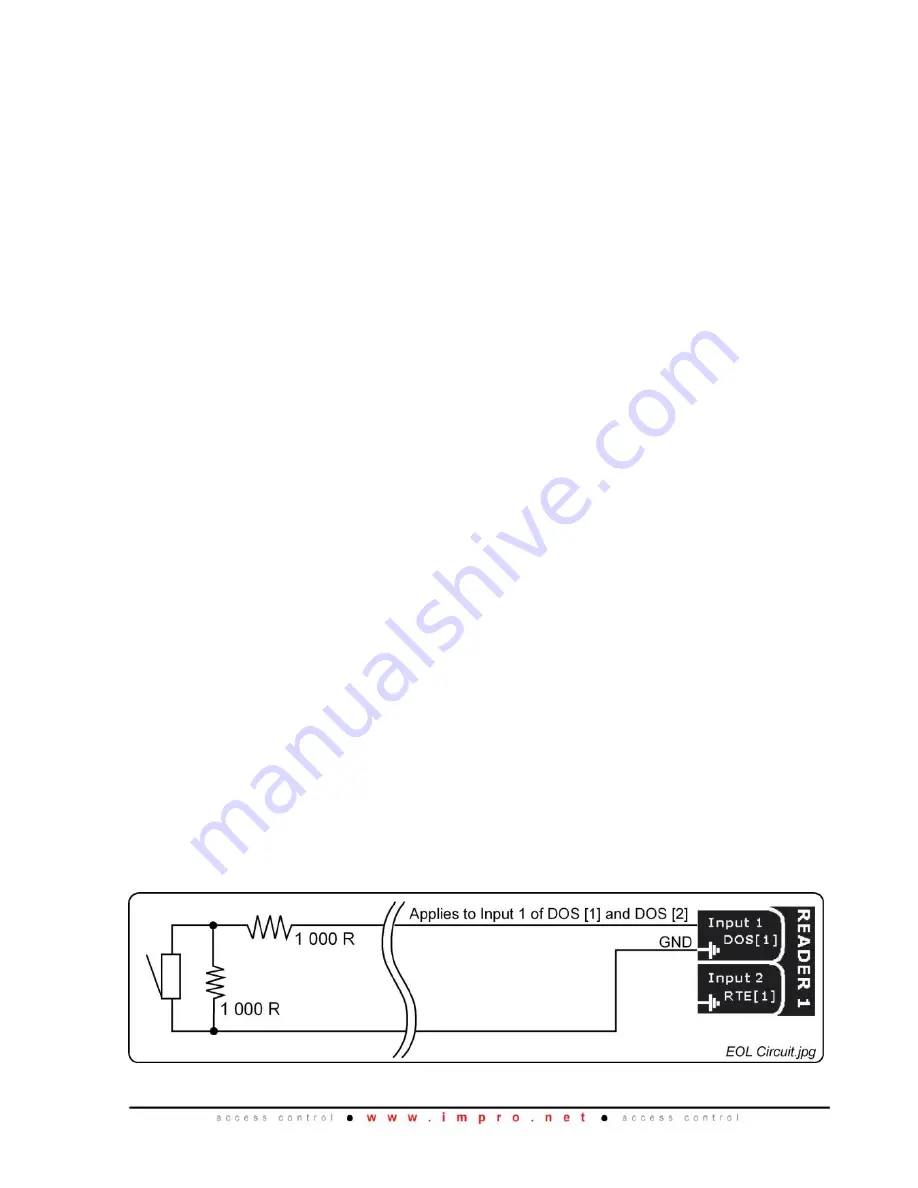
Figure 1:  End of Line (EOL) Sensing Circuit 

Summary of Contents for IMPROX TT

Page 1: ...nment Open Frame Construction XTT900 Designed to work in an indoor dry environment The Terminal is not sealed against water Aluminium Extruded Cabinet XTT910 Designed to work in an indoor dry environm...

Page 2: ...ort circuit Overcome this by installing the recommended 12 V 7 Ahr Battery to help supplement the in rush current such a device may draw on activation Power Input Input Voltage 85 V AC to 265 V AC at...

Page 3: ...ashing Green LED Outgoing RS485 Data Flashing Red LED Digital Inputs 1 4 Continuous Green on detected contact closure Relays 1 and 2 Continuous Red on activation of the Relay INSTALLATION INFORMATION...

Page 4: ...lines or multiple star connections may cause communication problems Placing a Jumper Link across the jumper TR1 in the LAST UNIT AT THE END OF THE CABLE RUN should solve the problem See Figure 6 for...

Page 5: ...into the Cabinet with the Battery Terminals in an upwards position 4 Connect the Red Battery Terminal Lead to the Positive Battery Terminal 5 Connect the Black Battery Terminal Lead to the Negative Ba...

Page 6: ...the two End Plates Swivel the screwdriver until the Top Cover makes a click sound 4 Insert the screwdriver in the gap on the side of the ImproX TT between the Top Cover and the Base Swivel the screwdr...

Page 7: ...nuary 2011 Page 7 Use the supplied Connection Leads for the low voltage connections to the Power Supply Combo Using the supplied Quick Click Glands or Gland Breakouts neatly lead the wires out of the...

Page 8: ...XTT300 0 0 GB 16 January 2011 Page 8 ELECTRICAL CONNECTIONS Power Supply Combo IPS910 Layout Figure 5 Layout Diagram Power Supply Combo...

Page 9: ...0 0 GB 16 January 2011 Page 9 Connecting the ImproX TT Terminal Figure 6 shows a detailed electrical connection diagram for the ImproX TT Terminal Figure 6 Typical ImproX TT Terminal Electrical Conne...

Page 10: ...AT RISK OF ELECTRICAL SHOCK CAUTION DO NOT exceed the Input Voltage specified Wiring the Mains Input Power Cord WARNING DO NOT TOUCH ANY PART OF THE CIRCUIT ONCE YOU VE APPLIED POWER TO THE POWER SUPP...

Page 11: ...Slow blow 5 mm x 20 mm Table 1 Fuse Ratings NOTE Because of the delicacy of the replacement procedure we recommend you contact your distributor before trying to replace the Power Supply Fuse Replacin...

Page 12: ...he ImproX TT will then reveal only one Fixed Address In all other arrangements the Terminal reveals two Fixed Addresses Address Allocation IXP220 IXP300 and IXP400 Systems IXP Software Suites allocate...

Page 13: ...XTT300 0 0 GB 16 January 2011 Page 13 USER NOTES...

Page 14: ...XTT300 0 0 GB 16 January 2011 Page 14 USER NOTES...

Page 15: ...XTT300 0 0 GB 16 January 2011 Page 15 USER NOTES...

Page 16: ...T Twin Antenna Terminal XTT900 1 0 GB 05 XTT910 1 0 GB 03 IPS910 1 0 GB 02 and XTT911 0 0 NN 00 The last two digits of the Impro stock code indicate the issue status of the product XTT300 0 0 GB 16 Is...

Reviews: