background image


CERTIFICATE OF WARRANTY


This  certificate  of  warranty  should  be  produced  for  servicing  under  the 
terms of the warranty.


CONDITIONS OF WARRANTY


1)Within one year from the date of purchase, if any component(s)  is found to be 
defective  due to faulty  workmanship  or  defective  material  made, repairs will be 
executed  free  of charge  and defective part will be replaced.


Parts  repaired  or  replaced  are  under  warranty  throughout  the  remainder  of 
the  original  warranty  period  only.  Repairs  under  warranty  may  also  be  carried 
only by authorized  service centres or the authorized  local cable operator.


2)This  warranty  does  not  cover  any  form  of  damage  resulting  from  accident, 
misuse,  application  of    incorrect    voltage    or    any    use    contrary    to    the  
operating  instruction  supplied  along  with  the equipment.


3)  NO    responsibility    will    be    accepted    for    damage    arising    out    of  
unauthorized   modification   or alterations  of any nature  made  to the Digital  Set 
Top Box.


4) NO  claims  will  be  accepted  for  damage  incurred  during  transit  of Digital  Set 
Top Box.


5)  This  warranty  is  not  valid  if  the  serial  number  of  the  Digital  Set  Top  Box 
has  been  deleted, defaced or altered.


6)  This  certificate  of  warranty  should  accompany  the  Digital  Set  Top  Box  if 
service  under  warranty  period  is  required  to  be  carried  out  at  the  authorized 
service centres.


7) The STB conforms functionally  to the appropriate  BIS standards.


17 

Summary of Contents for DVB-C8080MER

Page 1: ...COMPACT DIGITAL RECEIVER OPERATION MANUAL DVB C8080MER COMPACT DIGITAL RECEIVER...

Page 2: ...iber we present the Compact Digital Receiver CDR your gateway to a whole new world of high quality pictures and sounds on your television The CDR also comes with an in built electronic program guide a...

Page 3: ...CONTROL 8 OPERATION SCOPE OF THE REMOTE CONTROL 8 USEFUL TIPS 8 CONNECTION 9 THE FIRST TIME USING THIS RECEIVER 10 CHANNEL MANAGER 11 GENERAL SETTINGS 12 LIST MANAGER 14 SOFTWARE UPGRADE 15 SPECIFICAT...

Page 4: ...hen unused for long periods of time 15 Refer all servicing to qualified service personnel Servicing is required when the apparatus has been damaged in any way such as power supply cord or plug is dama...

Page 5: ...t menu go back 6 Open the lid to insert a smartcard 7 Status indicator remote sensor displaying panel REAR PANEL 1 Plughole power cord 2 Terminal audio signal output R 3 Terminal audio signal output L...

Page 6: ...FAV Display FAV LIST available on the STB MUTE Mute the audio or resume audio playback 0 9 In Menu for inputting the value In Non menu for channel selection MENU Menu entry EPG Non menu enters EPG int...

Page 7: ...functional keys in certain situation PRECAUTIONS ABOUT BATTERIES Improper use of batteries may cause corrosion or fluid leakage Please observe the following instructions for the safe use of batteries...

Page 8: ...e while installing the batteries match the polarities on the battery and the corresponding polarity indicated on the remote controller 3 Close the lid PREPARATION OF REMOTE CONTROL OPERATION SCOPE OF...

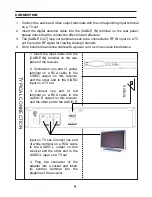
Page 9: ...L output on this receiver and the other end to the AUDIO L input on a TV set 4 Plug the connector of the adapter into a socket and insert its another terminal into the plughole of the receiver CONNECT...

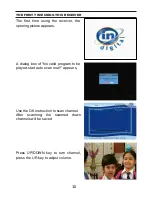
Page 10: ...the opening picture appears A dialog box of No valid program to be played start auto scan now appears Use the OK instruction to scan channel After scanning the scanned down channels will be saved Pre...

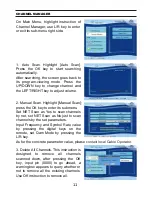
Page 11: ...ss the OK key to enter its submenu Set NET Scan as Yes to scan channels by net set NET Scan as No just to scan channels by the set parameters Input Frequency and Symbol Rate value by pressing the digi...

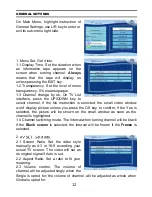
Page 12: ...ll video window won t display picture unless you press the OK key to confirm if the Yes is selected the picture will be shown on the small window as soon as the channel is highlighted 1 4 Channel swit...

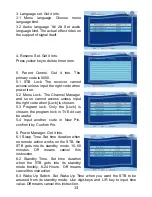
Page 13: ...code when Lock is chosen 5 3 Program lock Only the Lock is chosen the program lock in TV Edit can be useful 5 4 Input another code in New Pin confirm it by Confirm Pin 6 Power Manager Get it into 6 1...

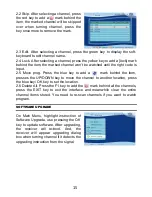
Page 14: ...ppercase lowercase Num letters symbols New Rewrite Find Look for channel name 2 Channel Edit Get it into 2 1 FAV Press the FAV key to enter Fav interface Press the L R key to alternate a FAV group FAV...

Page 15: ...ss the blue key to add a mark behind the item presses the UP DOWN key to move the channel to another location press the blue key OK key to set the location 2 6 Delete All Press the F1 key to add the m...

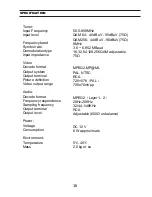
Page 16: ...format Frequency respondence Sampling frequency Output terminal Output level Power Voltage Consumption Environment Temperature Mass 50 5 858MHz QAM 64 40dBuV 90dBuV 75 QAM256 44dBuV 90dBuV 75 8MHz 3...

Page 17: ...2 This warranty does not cover any form of damage resulting from accident misuse application of incorrect voltage or any use contrary to the operating instruction supplied along with the equipment 3 N...

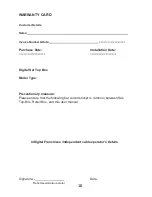
Page 18: ...ation Date Digital Set Top Box Model Type Precautionary measure Please ensure that the following bar coded sticker is common between Set Top Box Retail Box and this user manual InDigital Franchisee in...

Page 19: ......

Reviews: