background image


-

 2 -


PREFACE 

Thank you for choosing In Win IW-RS316-02M. This manual is written for system technicians who are 

responsible for installation, troubleshooting, managing, and repairing this server chassis. This 

document provides the overview of all the features of the chassis, a list of accessories or other 

components you may need to finish the installation, troubleshooting methods, and instructions of 

adding and removing components on the In Win IW- RS316-02M. For the latest version of this manual, 

you may visit In Win’s server website to download the latest updated version. 


SAFETY INFORMATION 

To ensure safe and smooth operation of your In Win IW- RS316-02M, it is essential that you choose an 

appropriate location for the system, provide an appropriate operating environment, and adequate 

power for all components of the system. As you plan for installation, follow the guidelines below to 

ensure that the system and its environment are safely and appropriately positioned for efficient 

operation and service. Your system should be installed and serviced only by technically qualified 

persons. 


Environment selection:

 The system is designed to operate in a typical office environment. The location 

should be a clean, dry, and free of airborne particles; a well-ventilated room and away from sources of 

heat including direct sunlight and radiators; it should keep the sources of vibration or physical shock 

away; the space should be with a properly grounded wall outlet, and with sufficient space to access the 

power supply cords. The operation environment temperature should be around 0°C to 40°C (32°F to 

104°F). 


Heed safety instructions:

 Before working with In Win IPC/Storage server/ System products, we strongly 

recommend you are using this guide as a reference and follow the safety instructions. The instructions 

in this manual will help you ensure and maintain compliance with existing product certifications and 

approvals. Follow the described, regulated components mentioned in this manual. Use of non UL 

listing products or other regulatory did not approvals will make non-compliance with product 

regulations in the region(s) in which the product is sold. 


System power on/off:

 The power button DOES NOT totally turn off the system AC power. To remove 

the power of system, you have to unplug the AC power cord from the outlet or system’s power supply 

units. Make sure the power cord is unplugged before you open the chassis, add, or remove any 

components.


Summary of Contents for IW-RS316-02M

Page 1: ...IW RS316 02M User s Manual...

Page 2: ...Fan Module P 11 2 3 1 Removing a Fan Module P 11 2 3 2 Installing a Fan Module P 11 2 4 Removing and Installing a PSU Module P 12 2 4 1 Removing a PSU Module P 12 2 4 2 Installing a PSU Module P 13 2...

Page 3: ...m is designed to operate in a typical office environment The location should be a clean dry and free of airborne particles a well ventilated room and away from sources of heat including direct sunligh...

Page 4: ...is a short length of conductor used to close open or bypass part of an electronic circuit Jumpers on In Win backplane have a small tab on top that you can pick up with your fingertips Grip the jumper...

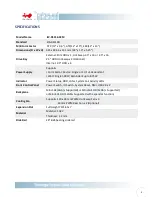
Page 5: ...r Single or 1U 1 1 Redundant Watt Single 500W Redundant up to 875W Indicator Power Status HDD LANs System Fail Activity LEDs Front Control Panel Power Switch ID Switch System Reset NMI USB 3 0 x 2 Bac...

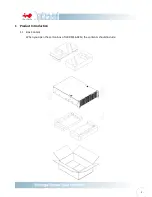
Page 6: ...5 1 Product Introduction 1 1 Box Content When you open the carton box of IW RS316 02M the contents should include...

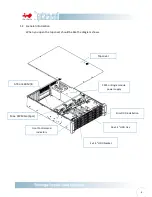
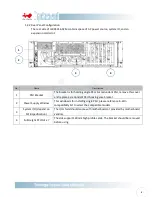
Page 7: ...When you open the top cover should be like the diagram shows Top cover CRPS or Single module power supply 16 x 3 5 HDD tray Max PWM Fan 3pcs ATX or EEB M B Front Controls and indicators Slim ODD insta...

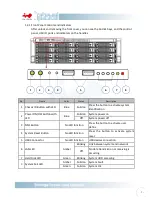
Page 8: ...F Button with LED Blue Solid on System power on Off System power off 3 NMI Button No LED function Press the button to activate user define 4 System Reset Button No LED function Press the button to act...

Page 9: ...s cover and replace as redundant PSU housing case bracket 2 Power Supply Window This window is for installing single PSU please reference In Win compatibility list to select the compatible models 3 Sy...

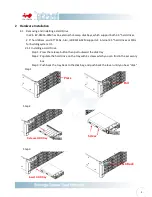
Page 10: ...ternal 2 5 hard drives or SSDs for building system OS 2 1 1 Installing a Hard Drive Step 1 Press the release button then pull outward the disk tray Step 2 Populate the hard drive on the tray with 4 sc...

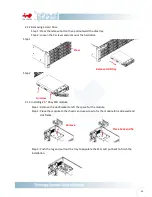
Page 11: ...1 3 Installing 2 5 2bay SSD module Step 1 Remove the slot bracket to left the space for the module Step 2 Place the module to the chassis and use screw to fix the module form side wall and slot frame...

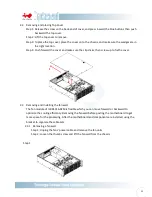
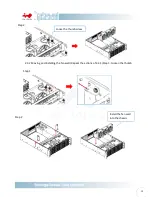
Page 12: ...clip clicks then screw up to fix the cover 2 3 Removing and Installing the fan wall The fan module of IW RS316 02M is flexible which you can move forward or backward to optimize the cooling efficienc...

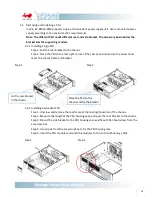
Page 13: ...12 Step 2 2 3 2 Moving and installing the fan wall Repeat the actions of 2 3 1 Step 1 Loosen the thumb Step 1 Step 2 Loose the thumb screw Install the fan wall into the chassis...

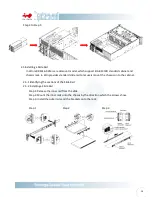
Page 14: ...nd make sure the screw holes meet the chassis frame and bracket Step 1 Step 2 2 4 2 Installing Redundant PSU Step 1 Unscrew and remove the rear frame at the rear right position of the chassis Step 2 M...

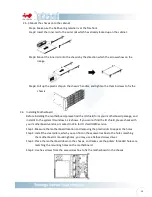
Page 15: ...s standard slide rail to let users mount the chassis on to the cabinet 2 5 1 Identifying the sections of the Slide Rail 2 5 2 Installing a Slide Rail Step 1 Release the inner rail from the slide Step...

Page 16: ...form your motherboard package and install it to the system IO window 1 2 2 shows If you cannot find the IO shield please check with your motherboard vendor or contact In Win for IO shield OEM service...

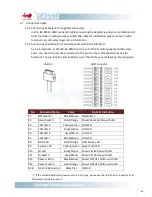
Page 17: ...find from your motherboard s user guide If the motherboard s led power source is 3 pin type please use the 2Pin to 3Pin convertor form the accessory box to connect No Connector Name Color Front IO In...

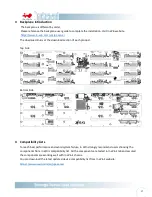
Page 18: ...ion of each product Top Side Bottom Side 4 Compatibility Lists To reach best performance and avoid system failure In Win strongly recommend users choosing the components from In Win s compatibility li...

Page 19: ...upport flash drive Any SSD supports SAS or SATA connection can be attached to the In Win IW RSXXX 02M but beware the NVMe SSD is not supported We recommend referencing In Win s compatibility list to c...

Page 20: ...he RAID controller card or not is depends on your purpose and budget We recommend discussing with In Win s channel partner for their suggestions i Where can I buy the SAS cable 6Gb SAS to 4 SATA or 6G...

Reviews: