background image

22

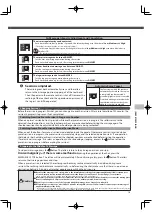
How To Use Max Intensity Mode

What is Max Intensity 
Mode?

* This mode is for an intense massage, but some people may not feel that the massage is particularly intense. This is because sensitivity varies according 

to the individual, and is not a malfunction.

This function performs changes other than adjusting 
the mechanical intensity and air intensity to make the 
massage even more intense.

① 

Select Max Intensity mode during a massage.

② 

Adjust the strength.

③ 

Cancel Max Intensity mode.

The chair enters Max Intensity mode and the mechanical intensity and air intensity are set to High.

To adjust the intensity, press the intensity adjustment buttons.

When Max Intensity mode is canceled, the mechanical intensity and air intensity remain at 

the intensity level at the time of cancelation.

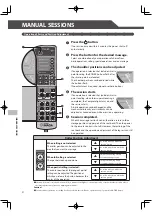
Stopping in the Middle of a Massage

To stop mid-massage, press the   button. The rollers return to their storage positions and stop.

In an emergency


or 

if there is some malfunction

 during the operation of the chair, press the EMERGENCY STOP 

button. The rollers will stop immediately. After confi rming safety, press the   button. The rollers return to their storage positions 
and stop.

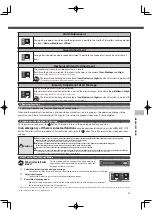
Intensity Adjustment of Air Massage

The air massage intensity can be adjusted. 
Each time the air intensity adjustment button is pressed, the intensity changes in the order of 

Low, Medium

 and 

High

.

(The default setting when the session starts is Medium.)

Max

Mode

The intensity can be changed in the order of 

Low, Medium

 and 

High

 even when Max Intensity mode is ON.

(The default setting when Max Intensity mode starts is High.)

Width Adjustment

During a basic operation where width adjustment is possible, the width of the rollers can be adjusted 
in 3 steps (

Narrow, Medium

 and 

Wide

).

Speed Adjustment

During a basic operation where speed adjustment is possible, the speed of action can be adjusted in 3 
steps.

[MANU

AL SESSIONS]

Caution

If you feel the massage is too strong, reduce the stimulation according to this Operating Manual. If this solution does not work, stop operation 
immediately and contact the “Repair Service Center“ (see back page) for assistance. 

May result in injury if you continue use with high stimulation under such circumstances.

Do not place your hands or feet into the roller tracks, into the space between the seat back and the seat or into the moving parts.
Do not sit wearing hard objects, such as hair accessories, necklace, watch, bracelet, or ring.

If your leg or foot comes out of the leg rest during the massage, do not try to force it back in.

Keep massage sessions to no more than 15 minutes in length. Do not exceed 5 minutes for an area-specifi c massage of any particular part of the body.

Continuous use for extended periods of time can result in over-stimulation, which could cause the opposite of the desired eff ect, or even injury.
The total amount of time for a daily massage should be limited to about 30 minutes.

Changing Sessions

Switching from Manual Session Mode to a Preset Session

When another preset session button is pressed while a manual session is in progress, the operation changes to the 
preset session. After a total duration of 30 minutes, the session in progress stops even if not completed.

Mechanical Intensity Adjustment

The mechanical intensity can be adjusted in 3 levels. 
Each time the button is pressed, the intensity changes in the order of 

Low, Medium

 and 

High

.

(The default setting when the session starts is Medium.)

Max

Mode

The intensity can be changed in the order of 

Low, Medium

 and 

High

 even when Max Intensity mode is ON.

(The default setting when Max Intensity mode starts is High.)

Max

Mode

Summary of Contents for Flex 3s HCP-S373A

Page 1: ... STORAGE 27 AFTER SALES SERVICE 28 SPECIFICATIONS 29 Thank you for purchasing the FLEX 3S You can enjoy various types of massage for relieving or soothing fatigue We hope the FLEX 3S will be a valued partner in your daily health preservation for many years to come Please read this Operating Manual before use Keep this Operating Manual nearby so that you can refer to it anytime This product is desi...

Page 2: ...ting Current AC circuit and has a grounding plug that looks like the plug illustrated in the figure to the right Make sure that the product is connected to an outlet having the same configuration as the plug No adapter should be used with this product Required Action Always unplug this appliance from the electrical outlet immediately after using and before cleaning Caution Prohibited Do not operat...

Page 3: ...ury may result if the chair tips over Do not sit down on the chair with the leg rest raised Any sudden impact on the leg rest could cause damage to the mechanism Also an accident or injury may result if the chair tips over Do not use with anything other than the accessories supplied with this product Required Action Before plugging the power cord into the wall outlet make sure that the power switc...

Page 4: ... Unplug the chair If there is a power outage or the possibility of a power outage stop the chair immediately and turn the main POWER switch to OFF Unplug the power plug from the wall outlet Accident or injury may result if the chair is still in operating mode when the power resumes If there is a threat of lightning stop operation immediately and turn the main POWER switch to OFF Unplug the power p...

Page 5: ...he leg rest that massages the feet and calves seat that massages the buttocks and arm shoulder units that massage from the shoulders to the fingertips Boost the power with just one button Addition of a Max Intensity Mode In addition to intensity adjustment using individual buttons as in previous models a Max Intensity mode button has been added that can boost the overall power of a massage with ju...

Page 6: ...over Wheels Main POWER Switch Power Connector Cord Connector Power Cord Plug Rollers Normally stored inside the upper part of the seat back a Arm Air Cushion 2 each on left and right b Seat Rear Air Cushion 1 each on left and right c Lower Back Air Cushion 1 each on left and right d Arm Air Cushion 4 each on left and right e Seat Air Cushion x 2 f Calf Air Cushion x 6 g Foot Air Cushion x 10 h Pal...

Page 7: ...ngle of the reclining seat back ROLLER Position Adjustment Buttons Use to adjust the shoulder position while the shiatsu point locator is operating and to adjust the roller position during manual session mode Preset Session Buttons 2 Selects the corresponding session Intensity Adjustment Buttons Adjusts the mechanical and air massage intensity Focused Sessions Buttons Special operations can be sel...

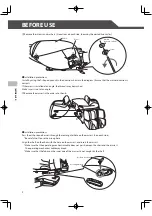
Page 8: ...into contact with direct heat such as direct sunlight or a radiator Keep fire sources such as cigarettes and ashtrays away from the chair To avoid damaging floor surfaces and to minimize the chair noise it may be better to install the chair on a carpeted surface or to lay a piece of carpet under the chair Do not install on an electric carpet The chair is heavy so please be careful when unloading i...

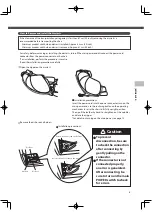
Page 9: ...Open the zipper on the armrest Remove the air hose and harness Caution Correct Connector tab on the front Incorrect Connector tab on the rear Air Hose Harness Air Hose To prevent disconnection be sure to check the connection after connecting by gently pulling on the connector If the connector is not connected properly an error is generated After connecting be sure to turn on the main POWER switch ...

Page 10: ...of a then b a b Installation precautions Pass the air hose and harness through the rectangular hole on the armrest 3 on each side Be careful not to use the wrong hole Align the shaft on the chair with the hole on the armrest and insert the armrest Make sure that the operating mechanism cable does not pass between the chair and the armrest The operating mechanism cable may break Make sure that the ...

Page 11: ...in power unplug the power plug from the wall outlet and also disconnect the power cord connector from the power connector on the chair The power cord may be damaged resulting in fire or electric shock Main Power Connection First plug the power cord into the cord connector located at the front right of the chair Then plug the other end into the wall outlet Set the main POWER switch located on the r...

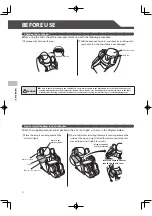
Page 12: ...ion Be sure to check for tearing on the chair before every use as shown in the illustration Also check the other parts for tearing Unplug the chair and contact the Repair Service Center see back page for assistance Never use the chair with the chair covering removed or with holes or tears in the covering because doing so is extremely dangerous How to Install the Remote Control Pocket Attach the su...

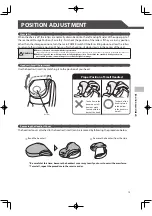
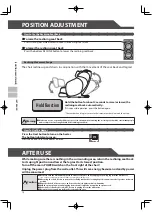
Page 13: ... the chair tips over Before using raise the reclining seat to its fully upright position Then recline the seat back slowly to the most comfortable position remembering to start off with a lighter massage Headrest Small Adjustment Use the headrest small by matching it to the position of your head Proper Position of Small Headrest The hollow in the headrest small does not make contact with the back ...

Page 14: ...bow is between the arm unit and shoulder unit Insert so that your palm is facing down How to Use the Buffer Pad If you feel that the massage is too intense place the supplied buffer pad onto the back pad and start the massage again Caution Make sure that the buffer pad does not curl up or become lop sided May result in accident or injury POSITION ADJUSTMENT How to Use the Shiatsu Balls Place the p...

Page 15: ...reful that people and or objects are not caught under the leg rest Do not release your hands suddenly while lifting the leg rest by hand Caution Do not place anything other than legs and feet on the leg rest When you sit in the chair and raise the leg rest to the specified height it automatically adjusts Retracts approximately 27cm 10 6 inch If it stops mid operation press the button again When yo...

Page 16: ...e be sure to unplug it from the wall outlet Be careful not to tangle yourself in the cords and trip over How to Use the Reclining Seat Back To raise the reclining seat back Press the top RECLINE button to raise the reclining seat back To lower the reclining seat back Press the bottom RECLINE button to lower the reclining seat back Reclining Movement Range Warning Make sure no one especially childr...

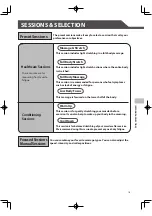
Page 17: ...session is recommended for persons who feel symptoms such as lack of energy or fatigue Low Body Focus This massage is focused on the lower half of the body Conditioning Sessions Warm Up This session is for gently stretching your muscles before exercise It can also help to wake up your body in the morning Cool Down This session is for balanced stretching of your muscles after exercise We recommend ...

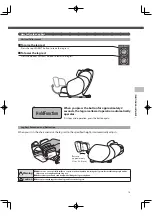
Page 18: ...s can be adjusted while the buttons flash If no adjustment is required do not use these buttons The rollers move up while this button is pressed The rollers move down while this button is pressed Shoulder Position Adjustment If the shoulder position is not correct adjust the shoulder position while the ROLLER buttons are flashing Too High Too Low Correct Position The session starts When shiatsu po...

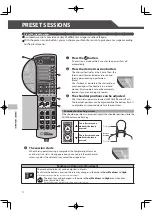
Page 19: ...g from a Preset Session to Manual Session Mode When one of the buttons for manual session mode located inside the panel of the remote control is pressed while a preset session is in progress the preset session immediately stops and the selected operation starts If an operation that detects the shoulder positions is selected the shoulder positions are rechecked before starting the operation To sele...

Page 20: ...performs full stretching of the spine using up and down movements Partial This performs partial stretching of the spine using up and down movements MANUAL SESSIONS Special Operations Button Operation Action Speed Adjustment Width Adjustment Up Down Adjustment Intensity Adjustment Human Hands Upward Kneading This performs an upward kneading operation to the neck Downward Kneading This performs a do...

Page 21: ... that you want to massage Button Operation Action Intensity Adjustment Arm Air An air massage from your shoulders to fingers Seat Air An air massage from your lower back to buttocks Leg Air An air massage from your calves to toes MANUAL SESSIONS ...

Page 22: ...upper part of the seat back Then the power to the remote control is shut off However the reclining of the seat back and the up or down adjustment of the leg rest can still be operated MANUAL SESSIONS Roller Position Adjustment When rolling is not selected The roller position can be adjusted to the area that you want to massage The rollers move up while this button is pressed The rollers move down ...

Page 23: ...d in 3 steps Narrow Medium and Wide Speed Adjustment During a basic operation where speed adjustment is possible the speed of action can be adjusted in 3 steps MANUAL SESSIONS Caution If you feel the massage is too strong reduce the stimulation according to this Operating Manual If this solution does not work stop operation immediately and contact the Repair Service Center see back page for assist...

Page 24: ...clining seat back Be especially careful when a person who weighs 100 kg 220 lb or more uses this chair The button of the remote control and the session button flash Set the main POWER switch located at the front right of the chair to OFF and then back ON after about 5 seconds If there is still a problem after the check stop using the product immediately The automatic shiatsu point locator function...

Page 25: ...een cracked or scratched The power cord or plug becomes abnormally hot The chair produces a burnt smell abnormal sound or vibration The auto timer function does not work in some cases Other failures If you find anything listed on the left stop using and unplug the power cord from the outlet to prevent failure or an accident Be sure to contact your local Inada distributor for maintenance Noise duri...

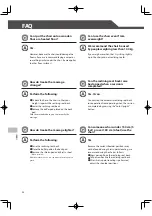
Page 26: ... installed With the methods above you can make the massage more gentle Can I use the chair even if I am overweight We recommend the chair be used by people weighing less than 100 kg If you weigh more than that try sitting slightly up in the chair and not reclining too far Can the reclining seat back raise be stopped when a session is completed Yes It can You can stop the automatic reclining seat b...

Page 27: ... After performing the above contact the your local Inada distributor for assistance The remote control panel has come off Can I fix it Reattach with the following procedure Hold the remote control as illustrated and insert the projection on the bottom left of the panel into the hole on the remote control Lightly push the panel in the direction of the arrow and insert the projection on the top left...

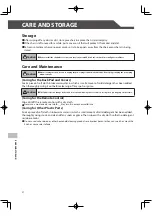
Page 28: ... of soft cloth in lukewarm water in which a small amount of mild detergent has been added Then thoroughly wring it out before cleaning off any spots or grime Caution The fabric color can change if the chair is in contact with vinyl covers or wall coverings for a prolonged period of time Caring for the Remote Control Wipe dirt off the remote control with a dry cloth Never use a moistened or wet clo...

Page 29: ...s stock We will stock service parts except fabric of this product for at least six years after terminating the production of this model Service parts refer to those necessary for maintaining the intended performance of the product For more information on service Please see the back page of this booklet 1 Warranty Please read the contents carefully and keep it in a safe place Please complete and ma...

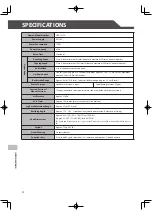
Page 30: ...ssage approx 15 cm 6 inch Preset Sessions Healthcare sessions 4 types Conditioning sessions 2 types Focused Sessions Manual Sessions 16 types automatic shiatsu point locator function included in some sessions Air Pressure Approx 37 kPa Auto Timer Approx 15 minutes preset sessions vary in duration Leg Rest Adjustment Range Approx 27cm 10 6 inch Reclining Angle Approx 115 165 from floor level contin...

Page 31: ......
Page 32: ...Manufactured by FAMILY INADA CO LTD 2 1 3 Nishi Miyahara Yodogawa ku Osaka 532 0004 Japan Made in JAPAN 778575900 DATE OF ISSUE day mo yr 1 2 2014 ...

Reviews: