background image

PAGE 17

6.


 Proof of purchase is required before you can make a 
claim under this warranty.

7.


 You may not make a claim under this warranty unless 
the defect claimed is due to faulty or defective parts 
or workmanship. Residentia Group is not liable in the 
following situations (which are not exhaustive):

(a)   the Appliance is damaged by:
 

(i) 

 accident


(ii)   misuse or abuse, including failure to properly 

maintain or service


(iii)   normal wear and tear


(iv)   power surges, electrical storm damage or 

incorrect power supply


(v)   incomplete or improper installation


(vi)   incorrect, improper or inappropriate operation


(vii)   insect or vermin infestation


(viii)   failure to comply with any additional instructions 

supplied with the Appliance;

(b)   the Appliance is modified without authority from 

Residentia Group in writing;

(c)   the Appliance’s serial number or warranty seal has 

been removed or defaced;

(d)   the Appliance was serviced or repaired by anyone 

other than Residentia Group, an authorised repairer or 
ASR.

8.


 This warranty, the contract to which it relates and the 
relationship between you and Residentia Group are 
governed by the law applicable where the Appliance 
was purchased. 

9.


 To the extent permitted by law, Residentia Group 
excludes all warranties and liabilities (other than as 
contained in this document) including liability for any 
loss or damage whether direct or indirect arising from 
your purchase, use or non use of the Appliance.

10.

   For Appliances and services provided by Residentia 

Group in Australia, the Appliances come with a 
guarantee by Residentia Group that cannot be 
excluded under the Australian Consumer Law. 
You are entitled to a replacement or refund for a 
major failure and for compensation for any other 
reasonably foreseeable loss or damage. You are also 
entitled to have the Appliance repaired or replaced 
if the Appliance fails to be of acceptable quality and 
the failure does not amount to a major failure. The 
benefits to you given by this warranty are in addition 
to your other rights and remedies under a law in 
relation to the Appliances or services to which the 
warranty relates.

11.

   At all times during the Warranty Period, Residentia 

Group shall, at its discretion, determine whether 
repair, replacement or refund will apply if an 
Appliance has a valid warranty claim applicable to it.

12.

   To enquire about claiming under this warranty, please 

follow these steps:

(a)   carefully check the operating instructions, user 

manual and the terms of this warranty;

(b)   have the model and serial number of the Appliance 

available;

(c)   have the proof of purchase (e.g. an invoice) available;
(d)   telephone the numbers shown below.

13.

   You accept that if you make a warranty claim, 

Residentia Group and its ASR may exchange 
information in relation to you to enable Residentia 
Group to meet its obligations under this warranty.

IMPORTANT


Before calling for service, please ensure that the steps in 
point 12 have been followed.

Telephone contacts
► 

Service: 

Please call 1300 11 HELP (4357)

► 

 Spare Parts: 

Please call 1300 11 SPARE (7727)

Our goods come with guarantees that cannot be excluded under the Australian Consumer Law. 
You are entitled to a replacement or refund for a major failure and for compensation for any other 
reasonably foreseeable loss or damage. You are also entitled to have the goods repaired or replaced if 
the goods fail to be of acceptable quality and the failure does not amount to a major failure.

The Australian Consumer Law requires the 
inclusion of the following statement with 
this warranty: 

Summary of Contents for IE61K

Page 1: ...MODEL CODE S IE61K PRODUCT ELECTRIC COOKTOP DOCUMENT USER MANUAL ...

Page 2: ...oking functions available and importantly taking care of your appliance when cleaning our Support Team are here to help You can use our online Support Centre at anytime by visiting http support residentiagroup com au or you can contact us via phone by dialling 1300 11 HELP 4357 It is important that you read through the following use and care manual thoroughly to familiarise yourself with the insta...

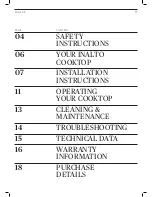
Page 3: ... CONTENT 04 SAFETY INSTRUCTIONS 06 YOUR INALTO COOKTOP 07 INSTALLATION INSTRUCTIONS 11 OPERATING YOUR COOKTOP 13 CLEANING MAINTENANCE 14 TROUBLESHOOTING 15 TECHNICAL DATA 16 WARRANTY INFORMATION 18 PURCHASE DETAILS ...

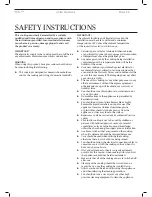
Page 4: ...agreement of Residentia Group will invalidate any warranty or liability claim You should not use this appliance to store items on or as a work surface No modifications to the appliance are permitted by Residentia Group You should not store or place flammable or highly flammable liquids materials on top of or near the appliance Items made from aluminium plastic or plastic film should also be kept a...

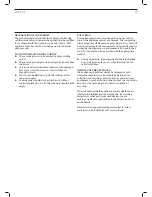
Page 5: ...damage After unpacking please dispose of all elements of packaging in a way that will not cause damage to the environment All materials used for packaging the appliance are environmentally friendly they are 100 recyclable and are marked with the appropriate symbol During unpacking the packaging materials polythene bags polystyrene pieces etc should be kept out of reach of children DISPOSAL OF THE ...

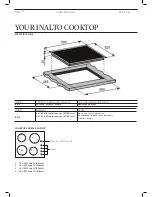
Page 6: ...RS OTHER IE61K 2 x 1 80 kW radiant zones Ø 180mm 2 x 1 20 kW radiant zones Ø 145mm Side Knob control operation 4 x Individual residual heat indicators Framless design COOKTOP SURFACE LAYOUT 1 1 20 kW zone Ø 145mm 2 1 80 kW zone Ø 180mm 3 1 20 kW zone Ø 145mm 4 1 80 kW zone Ø 180mm YOUR INALTO COOKTOP RESIDUAL HEAT INDICATOR KNOBS 1 2 4 3 ...

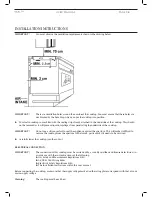
Page 7: ... room This appliance is classified as Class 3 and therefore is to be built into a kitchen unit depending on size or 600mm deep worktop providing the following minimum distances are allowed The edges of the hob must be a minimum distance of 55mm from a side or rear wall 700mm between the highest point of the hob surface including the burners and the underside of any horizontal surface directly abov...

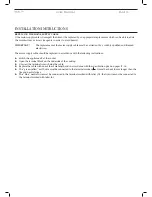
Page 8: ...appliance against the aperture This will make it difficult to remove the cooktop from the aperture in the future particularly if it needs to be serviced Carefully lower the cooktop into the cut out ELECTRICAL CONNECTION IMPORTANT The connection of this cooktop must be carried out by a suitably qualified and licensed electrician in accordance with the current versions of the following Gas Safety an...

Page 9: ...d releasing it from the securing clips The cable connections must be in accordance with the diagram located on the bottom of the cooktop see below The links must also be positioned as indicated You should use a good quality screwdriver to carefully fully tighten ALL of the terminal screws If when the cooktop is first switched on only two of the zones work you should recheck that the terminal screw...

Page 10: ...ly cable should be replaced in accordance with the following instructions Switch the appliance off at the socket Open the terminal block on the underside of the cooktop Unscrew the terminal screws fixing the cable Replace the cable with one of the same length and in accordance with the specification given on pages 17 18 The green yellow earth wire must be connected to the terminal marked It must b...

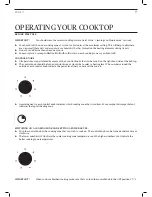
Page 11: ...e of the hob top The control knob should be turned anticlockwise or clockwise to select a heating level The numbers around the outside of each control knob indicate the power level that you have set the zone to A marking next to each control knob indicates which cooking zone that it controls For example this image below indicates the top left heating zone SWITCHING ON A COOKING ZONE AND SETTING A ...

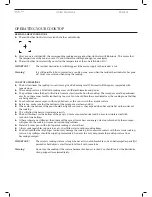
Page 12: ...used on You should not use saucepans with rough bottoms as this can scratch the ceramic surface Before use make sure that the bottoms of the saucepans are clean and dry When cold the bottom of the pans should be slightly concave as they expand when hot and lie flat on the surface of the cooktop This will allow the heat to transfer more easily The best thickness for the bottom of the pans is 2 3 mm...

Page 13: ...are not to burn yourself if cleaning the cooktop surface when it is still warm After each use Wipe the cooktop over with a damp cloth Dry the cooktop by rubbing the surface with a clean cloth Type of deposit Remove immediately Remove when the cooktop has cooled down What should I use to remove the deposit Sugar or food liquid contain ing sugar Yes No Ceramic cooktop scraper Tin foil or plastic Yes...

Page 14: ... be hotter than 50 C or has been activated for longer than 30 seconds and the residual heat indicator has not come on you should call the Customer Care Department A humming sound is heard when a cooking zone is selected This is normal the sound will disappear when the zone heats up The cooking zones have become discoloured This maybe caused by burnt on remnants of food This will not affect the wor...

Page 15: ...ECHNICAL DATA ELECTRICAL DETAILS Rated Voltage 220 240 Volts 50 60 Hz Supply Connection 30A double pole switch fuse outlet with 3mm contact gap Max Rated Inputs 6 0kW Mains Supply Lead 3 core x 4mm not supplied ...

Page 16: ...ing defects for 24 months following the date of original purchase of the Appliance h you means the purchaser of the Appliance not having purchased the Appliance for re sale and your has a corresponding meaning 2 This warranty only applies to Appliances purchased and used in Australia and is in addition to and does not exclude restrict or modify in any way any non excludable statutory warranties in...

Page 17: ...und for a major failure and for compensation for any other reasonably foreseeable loss or damage You are also entitled to have the Appliance repaired or replaced if the Appliance fails to be of acceptable quality and the failure does not amount to a major failure The benefits to you given by this warranty are in addition to your other rights and remedies under a law in relation to the Appliances o...

Page 18: ...ds please record details of your purchase below and staple your receipt on the opposite page STORE DETAILS STORE NAME ADDRESS TELEPHONE PURCHASE DATE PRODUCT DETAILS MODEL NO SERIAL NO Note Your serial number can be found on the underside of the cooktop ...

Page 19: ...PAGE 19 RECEIPT ...

Page 20: ...MODEL CODE S IE61K ...

Reviews: