Manufactured by Taylor Design Group, Inc. P.O. Box 810262 Dallas, TX 75381
©2020 by Taylor Design Group, Inc. All rights reserved.
w w w . i n c r a . c o m
Owner’s Manual
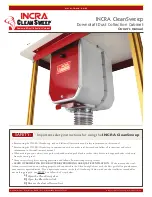
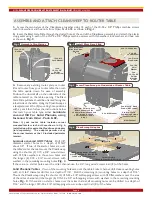
INCRA CleanSweep
Downdraft Dust Collection Cabinet
C
LEAN
S
WEEP
Downdraft Dust Collection Cabinet
Downdraft Dust Collection Cabinet
°
Before using the INCRA CleanSweep, read and follow all instructions and safety information in this manual.
°
Before using the INCRA CleanSweep in conjunction with any other tool, first read and follow all instructions and safety
information in that tool’s owner’s manual.
°
When making any cut, always use a push stick, rubber soled push block, or other safety device to keep your hands safely away
from the cutting tool.
°
Always wear safety glasses, hearing protection and follow all normal shop safety practices.
°
AVOID OVERHEATING YOUR ROUTER BY PROVIDING ADEQUATE VENTILATION. Make sure your dust col-
lection system is turned on, working properly, and connected to the CleanSweep Cabinet with the blast gate fully open whenever
your router is operated inside. If you operate your router inside the CleanSweep Cabinet with your dust collector turned off or
not working properly, you
MUST
first follow the 3 steps below.
1)
Open the CleanSweep door
2)
Open the Blast Gate slide
3)
Remove the dust collection hose
Important safety instructions for using the INCRA CleanSweep
SAFETY: