INCRA
CLEANSWEEP DOWNDRAFT DUST COLLECTION CABINET
OWNER’S MANUAL
©2020 by Taylor Design Group, Inc. All rights reserved.
Page 3
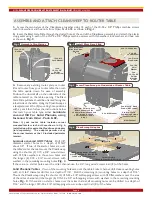
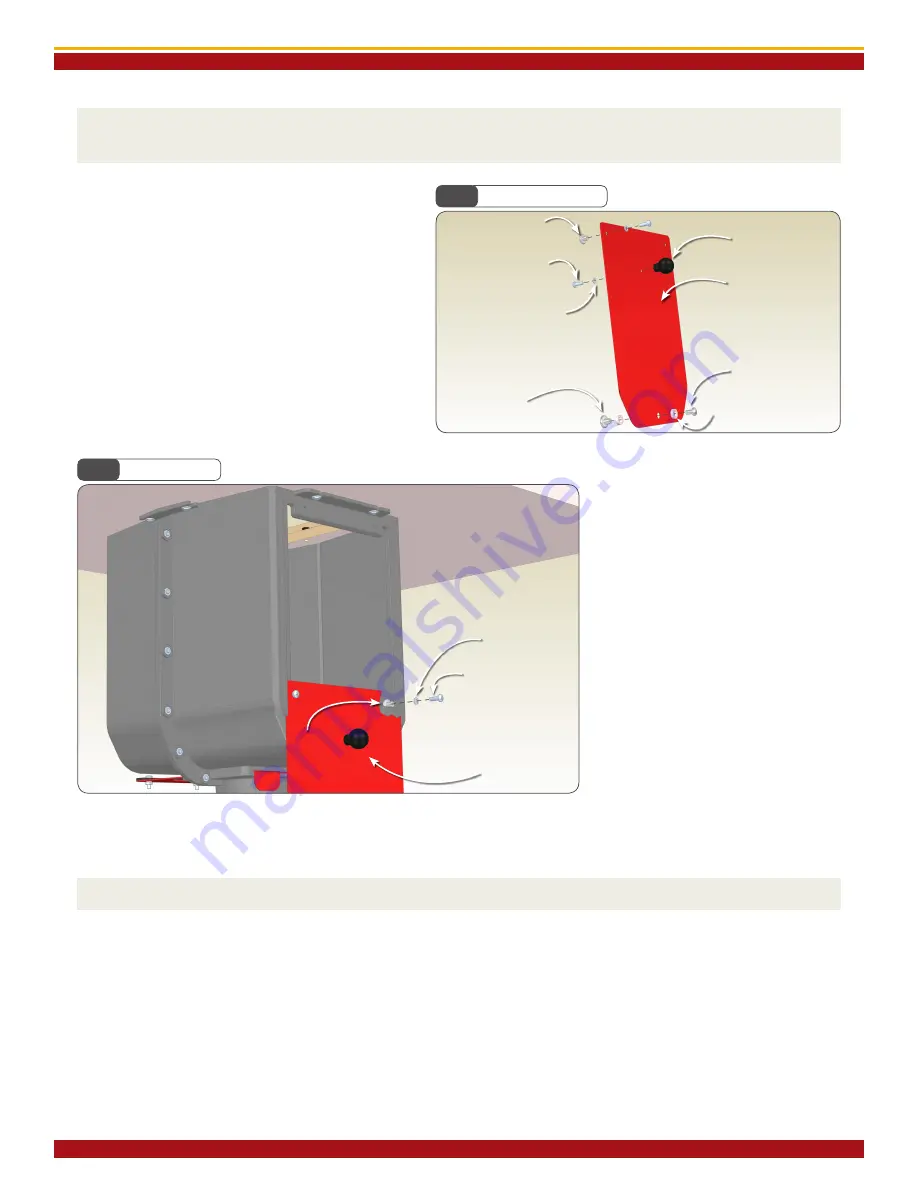
ASSEMBLE AND ATTACH FRONT DOOR
(Turn the router table right side up for final assembly)
Fig. 5
Assemble Door
1 ea. 10-32 (small)
Cylindrical Nut
4. Using fasteners from Hdwr. Pack E-10, add the
lower door catch, consisting of (1) 1/4-20 x 1/2”
Phillips machine screw, (2) 3/16” thick nylon washers
and (1) 1/4-20 cylindrical nut, into the hole located
at the tapered end of the door panel as shown in
Fig. 5. Attach a 10-32 cylindrical nut to the upper
left hole using a 10-32 x 5/8” Phillips machine screw
with lock washer. Tighten all the fasteners. Attach
the knob to the centered hole near the top of the
door using a 10-32 x 5/8” Phillips machine screw
and lock washer. The door knob features a vibration
proof nylon locking nut so the fastener will feel tight
all the way in.
Knob
1 ea. 1/4-20 x 1/2”
Phillips Machine Screw
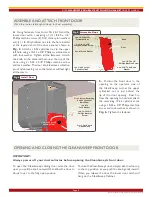
Fig. 6
Install Door
Step 2.
Screw Remaining
Small Cylindrical
Nut to Door
1 ea. 10-32 (small)
Cylindrical Nut
1 ea. #10
Lock Washer
Step 1.
Put Door in
CleanSweep
1 ea. 10-32 x 5/8”
Phillips Machine
Screw
5. Position the front door in the
opening on the operator side of
the CleanSweep so that the upper
cylindrical nut is just behind the
lip of the door opening. Reach in
from the opening to hold and attach
the remaining 10-32 cylindrical nut
using a 10-32 x 5/8” Phillips machine
screw and lock washer as shown in
Fig. 6. Tighten the fastener.
2 ea. 10-32 x 5/8”
Phillips Machine Screw
2 ea. #10 Lock Washer
1 ea. 1/4-20 (large)
Cylindrical Nut
Door
2 ea. 3/16” Thick Nylon
Washer
OPENING AND CLOSING THE CLEANSWEEP FRONT DOOR
To open the CleanSweep’s sliding door, raise the door
up as you pull the knob outward, then allow the door to
slowly lower to the fully open position.
To close the CleanSweep’s door, simply raise the door up
to the top position as you push the knob gently inward.
When you release the door, the lower door catch will
hang on the CleanSweep Cabinet.
IMPORTANT:
Always power off your dust collector before opening the CleanSweep’s front door.