4
Attach Outfeed Fence
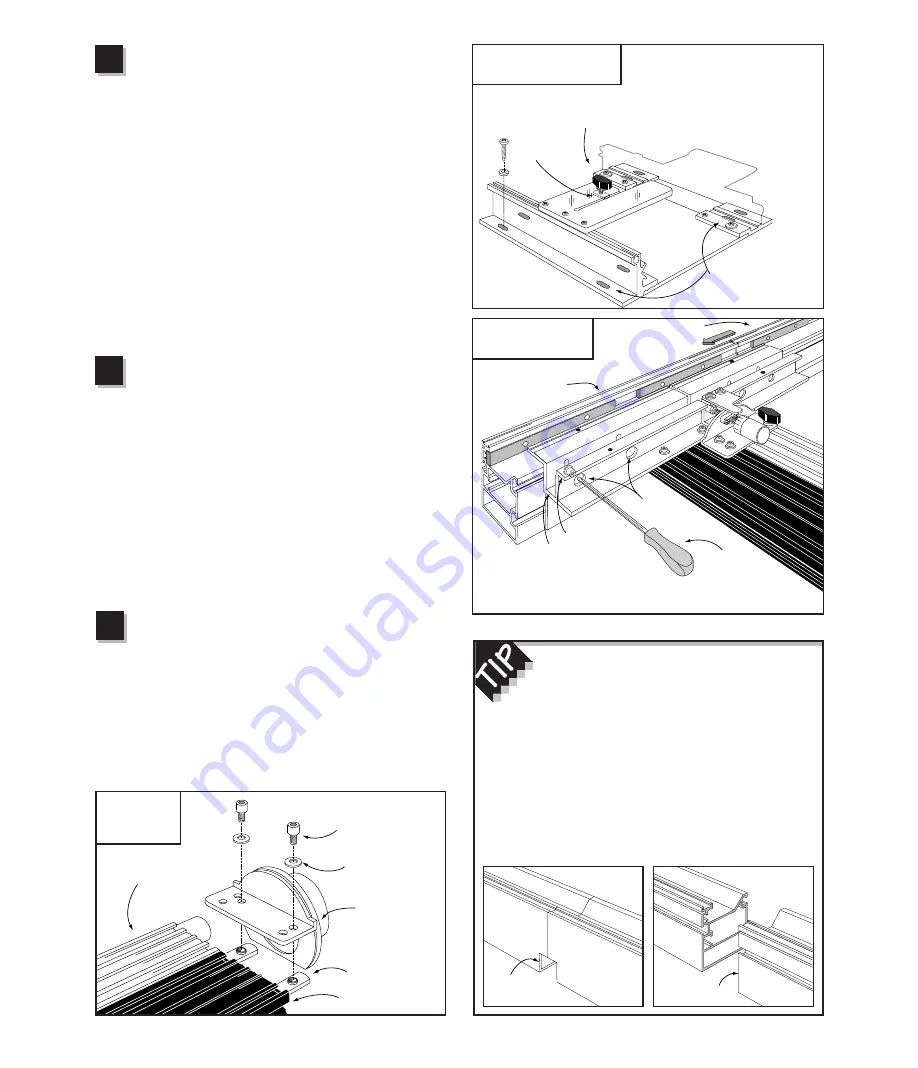
Before you slide the carriage back into the base, take
a look at the black thumbscrew that passes through the clear
acrylic hairline cursor on the base. Fig. 3. The thumbscrew
is screwed into a rectangular nut. Make sure that the
rectangular nut slides into the T-slot in the top of the infeed
carriage when you slide the carriage back into the base.
Now slide the carriage into the base and position the front of
the fence directly over the hole in your table top. Pull the
carriage clamp handle up into the locked position.
Using the supplied hex head tool, loosen the (4) socket head
cap screws about a half a turn through the access holes in
the rear of the fence mounting bracket. See Fig. 4. Place the
remaining fence half end-to-end with the half already
mounted and slide them both (as though they were one
continuous fence) until the notch at the front of the fence is
aligned directly over the hole in your router table. Retighten
the (4) socket head screws.
Initial Alignment for Primary Scale
With the carriage clamp locked in place, slide the
primary (stainless steel) scale to position the nearest scale
mark directly under the hairline cursor. The scale is held in
place by a magnetic strip. Lifting one end of the scale off of
the magnet will decrease the tension, allowing the scale to
slide more easily. Slide the Lexan plastic scale to position
the nearest scale mark under the cursor as well. You will
change the scale positions the first time you install a bit or
blade and “zero” to the cutter, but remember this: Since the
INCRA TWIN will only clamp every
1
⁄
32
", you must always
make sure the carriage clamp is locked before positioning
any of the scales or joinery templates. If the clamp is
unlocked when the scales are positioned, it almost
guarantees inaccurate cut placement.
Install Dust Collection Port
Place washers on (2)
1
⁄
4
-20 X
3
⁄
8
" socket head cap
screws and place them through the holes as shown in Fig. 5.
Loosely attach (2)
1
⁄
4
-20 rectangular nuts, then slide the nuts
into the T-slots on the top of the infeed (black) carriage. Slide
the port assembly forward until it stops, then tighten the
fasteners. Should you ever want to remove the carriage from
the base again, you must first remove the port by loosening
these same fasteners. The dust collection port accepts a
2
1
⁄
2
" diameter hose.
Fig. 3
Attach base to router table
Place mounting screw with washer
through each of the eight slotted holes
in the base. If using machine screws,
secure with washers and nuts from
beneath the table.
Fig. 4
Attach outfeed fence
Take a look at the TWINʼs fence. At one end
of each fence half youʼll find a flat cut, while on
the other end youʼll notice a small notch. Place the
two notched ends together whenever you want a
continuous fence surface above the cut area. Youʼll find
this especially useful when using the Right Angle
Fixture for joinery, since it tracks along the top surface
of the fence. Placing the two flat cut ends together is
perfect when you want to open or close the gap
between the fences for large or small diameter cutters.
4
5
Fig. 5
Install dust
collection port
3
Note: Mounting holes
are shaded in
illustration for clarity
Black
thumbscrew
Rectangular
nut
Socket head
cap screw
Fence mounting
bracket
Hex tool
Access
holes
Infeed fence
Outfeed fence
Loosen (4) socket head cap screws that secure infeed fence and slide
outfeed fence onto fence mounting bracket. Retighten mounting screws.
Notched end
Flat cut end
1
/
4
– 20 x
3
/
8
"
socket head cap screws
Stainless steel
washer
1
/
4
– 20
rectangular nuts
Outfeed carriage
Infeed carriage
Port assembly


