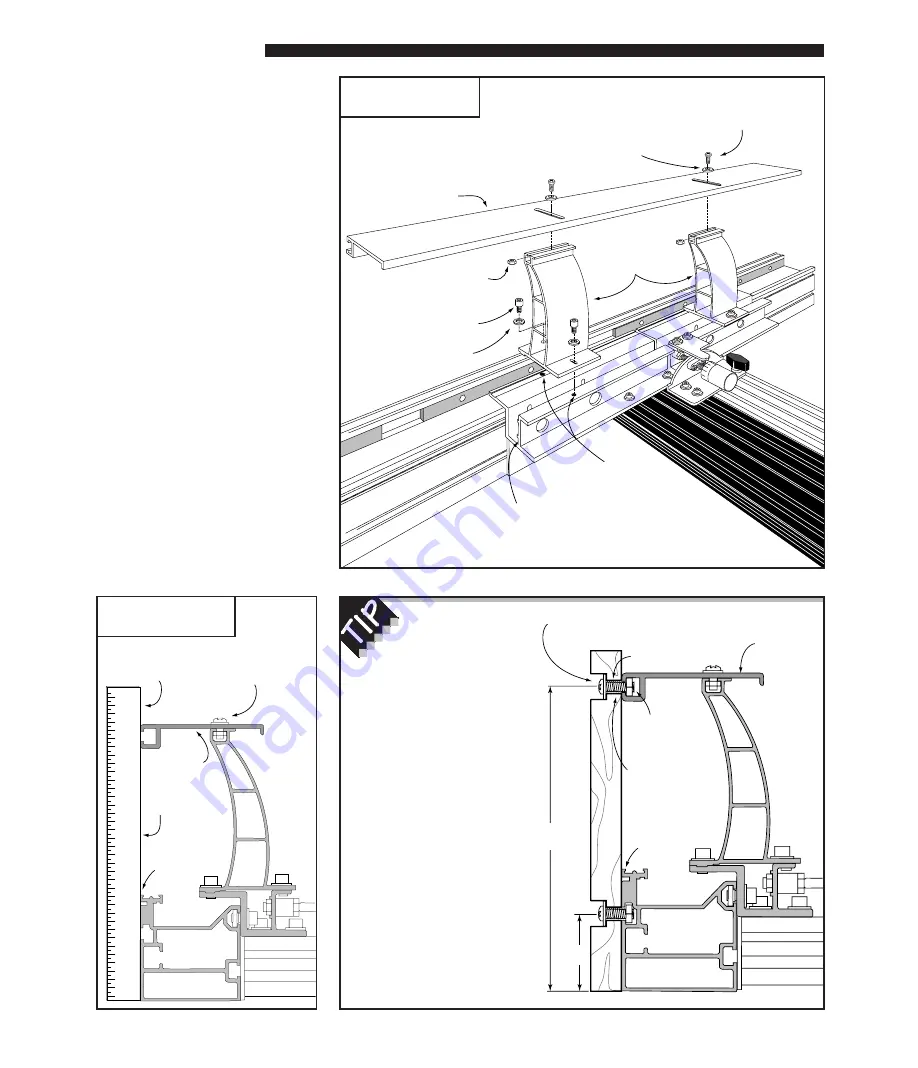
ACCESSORIES
Hi-Rise Fence Cap
Locate the (2) fence cap braces over
the threaded holes on top of the
fence mounting bracket and attach
with the
1
⁄
4
-20 x
3
⁄
8
" socket head
cap screws and washers from the
Hi-Rise hardware packet. Using the
(2) 10-32 x
1
⁄
2
" phillips pan head
screws, nylon washers, and 10-32
hex nuts, attach the fence cap to the
two braces as shown in Fig. 6. The
slotted holes in the fence cap should
be aligned to provide access to the
front brace mounting screws. Use a
straightedge to align the leading
edge of the fence cap with the front
face of the infeed and outfeed fences
and tighten the two cap mounting
screws, Fig. 7. Though designed for
permanent residence on your INCRA
TWIN, you may prefer to take it off,
since it is not needed for most of the
things youʼll do with the TWIN. Just
remove the (4) socket head cap
screws and store the Hi-Rise
assembly for future use. Place the
fasteners back in the threaded holes
and tighten.
5
Fig. 6
Attach Hi-Rise fence cap
Fig. 7
Align fence cap with fence
The fence and Hi-Rise
fence cap provide the
low and high support
necessary for large
vertical panel work. If
you want to add an
auxiliary fence to
bridge the gap between
the two, use the drill
and counterbore
dimensions shown in
the illustration. Use
1
⁄
4
– 20 x
3
⁄
4
" machine
screws with washers
and hex nuts to attach
the auxiliary fence.
Hi-Rise fence cap
1
/
4
– 20 x
3
/
8
"
socket head cap screws
Nylon washer
Fence cap braces
10 – 32 hex nut
Stainless steel washer
Fence mounting
bracket
Threaded holes
Hi-Rise
fence cap
Straightedge
Fence
First: Place
straightedge
against fence
Second: Loosen screws
and slide fence cap to
straightedge. Retighten
screws.
Hi-Rise
fence cap
1
/
4
– 20 x
3
/
4
"
machine screw
Hex nut
captured in
T-slot
Fence
9
/
16
" dia. x
3
/
8
" deep counterbore
5
/
16
" dia. through hole
7
1 5
/
32
"
1
31
/
32
"
10 – 32 x
1
/
2
"
phillips pan head screw


