User Manual
61
6 Troubleshooting
All work on electrical parts or electrical connections and the refrigerant circuit must
be carried out by qualified and authorised personnel.
Warning: Disconnect electrical power before performing any operations on electrical
parts or on electrical connections.
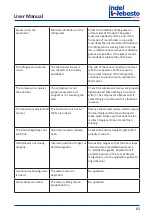
Defect
Possible cause
Intervention
The refrigerator does not
cool, the compressor will
not start.
No electrical power. Battery
in poor conditions. Faulty
thermostat. Defective
electronic control unit.
Check to make sure that the electronic
control unit is receiving sufficient power
and voltage; check the fuse. Verify that the
internal lighting is working and that the
compressor is receiving power. Check the
cables, lugs and connectors. Verify that
the battery is charging properly. Check the
thermostat: Bridge T - C with a separate
cable. If the compressor will not start,
its electronics are probably defective.
Replace. If the compressor starts up with
the bridge, the thermostat is defective.
Replace the thermostat.
The compressor only
performs brief attempts at
starting up.
There is insufficient voltage or
else a drop in voltage during
the attempt to start. The
protection device is activated.
The Batteries are drained.
Check the cables and connections; remove
any traces of oxidation or corrosion.
Charge the batteries, start the motor or
connect the battery charger.
The compressor functions
but doesn’t cool.
Loss of refrigerant through
the evaporator or the tubing.
Tubing clogged.
Carry out a leak check and repair any
leaks, drain and refill the proper amount of
R134a refrigerant. (This operation must be
carried out by a qualified technician.)
The compressor runs for
a long time but doesn’t
cool properly (reduced
efficiency).
Insufficient ventilation,
the condensation unit is
overheating. The fan is not
working properly. There is too
much frost on the evaporator.
The door does not close
properly and lets in warm,
moist air. The condenser is
blocked by dust.
Increase the ventilation. Replace the fan.
Defrost the unit. Correct the position of
the door and check the gasket. Clean the
condensing unit.
Summary of Contents for DR105
Page 2: ......
Page 3: ...3 Isotherm Drawer Serie Fig 1 Fig 2 ...
Page 4: ...4 Isotherm Drawer Serie Fig 3 Fig 4 ...
Page 5: ...5 Isotherm Drawer Custom Fig 5 Fig 6 ...
Page 6: ...6 Isotherm Drawer Custom Fig 7 Fig 8 ...
Page 7: ...7 Isotherm Drawer Custom Fig 9 ...
Page 8: ...8 Isotherm Drawer Custom Fig 10 Fig 11 ...
Page 9: ...9 Isotherm Drawer Custom Fig 12 ...
Page 10: ......
Page 12: ......
Page 40: ......
Page 42: ......
Page 70: ......
Page 72: ......
Page 100: ......
Page 102: ......
Page 130: ......
Page 132: ......
Page 160: ......
Page 162: ......
Page 190: ......
Page 192: ......
Page 220: ......
Page 222: ......
Page 250: ......
Page 252: ......
Page 280: ......
Page 281: ...281 Isotherm Drawer Standar Drawer 49 65 85 105 130 DC 12 24 Volt ...
Page 282: ...282 Isotherm Drawer Standar Drawer 49 65 85 105 130 AC DC 12 24 115 230 Volt ...
Page 283: ...283 Isotherm Drawer Drawer 160 Fridge Fridge DC 12 24 Volt ...
Page 284: ...284 Isotherm Drawer Drawer 160 Fridge Freezer Freezer DC 12 24 Volt ...
Page 285: ...285 Isotherm Drawer Drawer 160 Fidge Fridge AC DC 12 24 115 230 Volt ...
Page 286: ...286 Isotherm Drawer Drawer 160 Fridge Freezer Freezer AC DC 12 24 115 230 Volt ...
Page 287: ...287 Isotherm Drawer Drawer 55 Freezer Frtost Free DC 12 24 Volt ...
Page 288: ...288 Isotherm Drawer Drawer 65 Frost Free DC12 24 Volt ...
Page 289: ...289 Isotherm Drawer Drawer 65 Frost Free AC DC 12 24 115 230 Volt ...
Page 290: ......
Page 291: ......


