background image

 PART #22018-DH - High-Resolution Positioner 


Page 8


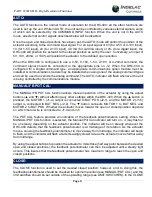
AUTO: 

The AUTO function is the normal mode of operation for the DHC-400; all the other functions are 
used to set up the unit. While in AUTO, the unit can be controlled by various external signals, some 
of  which  can  be  selected  by  the  COMMAND  INPUT function. When  the  unit  is  not  in  the  AUTO 
mode, all external control signals described below will be disabled. 

Once the open and closed positions have been set, the AUTO mode will control the position of the 
actuator according to the command input signal. For an input signal of 0V (for 0-5V or 0-10V input), 
1V (for 1-5V input), 2V (for 2-10V input), 4.0 mA (for 4-20mA input), or 0% (for a digital input), the 
DHC-400 will position the actuator to the closed position as set by the user. Conversely, an input of 
5V, 10V, 20mA, or 100% will position the actuator to the defined open position. 

When  the  DHC-400  is  configured  to  use  a  0-5V,  0-10V,  1-5V,  2-10V,  or  4-20mA  command,  the 
command  signal  should  be  connected  to  the  appropriate  pins  on  J2.  When  the  DHC-400  is 
configured  for  a  Digital  command  type,  an  appropriate  communications  option  module  must  be 
installed. A communications module may be installed when using one of the analog command types 
and can be used to override the analog command. The AUTO indicator will flash whenever the unit 
is being controlled by the communications module. 

MANUAL/FB POT CAL: 

The MANUAL/FB POT CAL function allows manual operation of the actuator by using the adjust 
buttons 

(▲ and ▼) without affecting any other settings within the DHC-400. When the ▲ button is 

pressed, the MOTOR 1 (J1-4) output is connected to BAT POS (J2-1), and the MOTOR 2 (J1-5) 
output  is  connected  to  BAT  NEG  (J2-

2).  The  ▼  button  connects  MOTOR  1  to  BAT  NEG  and 

MOTOR 2 to BAT POS. Whether the actuator moves toward the open or closed position depends 
on which motor wire is connected to J1-4 and J1-5. 

The  POT  CAL  feature  provides  an  indication  of  the  feedback  potentiometer's  setting.  When  the 
MANUAL/POT CAL function is selected, the Manual/Pot Cal indicator will turn on - it may flash or 
be  on  steady,  depending  on  the  actuator  position.  The  indicator  will  be  on  steady  whenever  the 
DHC-400  detects  that  the  feedback  potentiometer  is  at  midrange  of  its  rotation.  As  the  actuator 
moves, causing the feedback potentiometer to move away from midrange, the indicator will begin 
to flash, and the indicator will flash at a decreasingly slower rate as the actuator moves further away 
from midrange. 

By using the adjust buttons to position the actuator to mid-stroke (half way point between the desired 
open and closed positions), the feedback potentiometer can then be adjusted until a steady light 
occurs. This insures that the feedback potentiometer has maximum range to reach the open and 
closed positions. 

CLOSE: 

The  CLOSE function  is  used to  set  the desired  closed  position;  however,  prior  to doing  this,  the 
feedback potentiometer should be checked for optimum position (see MANUAL/POT CAL), and the 
limit switches should be set outside of the operating range (see LIMIT SWITCHES). In the CLOSE 

Summary of Contents for 22018-DH

Page 1: ......

Page 2: ...ry switches fault relay contact or digital communications A wide range of data is accessible through a digital communications module providing additional control or information ADDITIONAL FEATURES 10...

Page 3: ...PART 22018 DH High Resolution Positioner Page 3 BOARD OUTLINE...

Page 4: ...it s size and mounting allows the DHC 400 to replace the DMC 100 series controllers in most applications with minimal rewiring The simple three button control MODE and allows the user to perform a com...

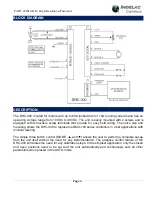
Page 5: ...otentiometer are connected to J1 as shown in the Block Diagram The feedback potentiometer wiper must be connected to pin 5 while one end is connected to pin 4 and the other end to pin 6 The Polarity D...

Page 6: ...ators will flash to indicate specific settings associated with the mode Each of the modes are described in more detail in the following sections If a 0 5V or 0 10V command signal is used the LOSS OF C...

Page 7: ...r closed positions are reached However if a feedback fault occurs see FAULT INDICATOR the motor will be turned on for a period of 15 minutes in the selected direction For this reason limit switches sh...

Page 8: ...manual operation of the actuator by using the adjust buttons and without affecting any other settings within the DHC 400 When the button is pressed the MOTOR 1 J1 4 output is connected to BAT POS J2 1...

Page 9: ...The adjust buttons are used to set the actuator to a desired position Whenever the actuator position falls between the defined closed position and the Aux Close position the Aux Close Output indicator...

Page 10: ...s the selected default setting by flashing the Open function indicator for the open default position or it will flash the Close function indicator for the closed default position When neither indicato...

Page 11: ...sed when operating the motor under a fault condition The OVERRIDE mode can also operate the motor when a fault condition exists see OVERRIDE MODE for details Note that the indicators may not indicate...

Page 12: ...disabled The command signal cannot clear this condition only manual operation or a mechanical override can clear the fault Alternatively the DHC 400 can be powered off and then on to temporarily clea...

Page 13: ...d The fault can be cleared in the same manner as previously described for a Double Stall Feedback Alarm A fault condition is detected whenever the feedback signal is out of range that is less than 5 o...

Page 14: ...lows the use of a more moderate battery power supply and smaller gauge wires for a given length see WIRE TABLE The trip setting essentially performs the same function as commonly used torque switches...

Page 15: ...turn actuator the return spring can generate high electrical energies while back driving the motor that can damage the DHC 400 motor outputs In this application the motor must be disconnected usually...

Page 16: ...VDC input 10 5V 0 10 VDC 2 10 VDC input 21mA 4 20mA input A FEEDBACK SIGNAL INPUT Input Voltage 0 to 2 5 VDC External Feedback Potentiometer 1K ohm COMMAND POTENTIOMETER POWER OUTPUT J2 6 5V OUT 5mA...

Page 17: ...PART 22018 DH High Resolution Positioner Page 17 WIRING DIAGRAMS Output Configurations...

Page 18: ...PART 22018 DH High Resolution Positioner Page 18 WIRING DIAGRAMS Input Configurations...

Page 19: ...PART 22018 DH High Resolution Positioner Page 19 WIRING DIAGRAMS Special Applications...

Page 20: ...PART 22018 DH High Resolution Positioner Page 20 WIRING DIAGRAMS Special Applications...

Page 21: ...voltage drop of 1VDC with 20 of the locked rotor current and assumes that the full load running current is less than that All signal wires on the DHC 400 should be connected with wire sizes ranging f...

Page 22: ...____________________________ _________________________________________________________________ _________________________________________________________________ _______________________________________...

Page 23: ...____________________________ _________________________________________________________________ _________________________________________________________________ _______________________________________...

Page 24: ...24 Contact Information Debbie Voges dvoges indelac com 859 727 7890 ext 100 Matt Robinson mrobinson indelac com 859 727 7890 ext 109 Talbot Caywood tcaywood indelac com 859 727 7890 ext 110 For News U...

Reviews: