GB
7
WATER LEVEL
MAX
W
A
TER LEVEL
MAX
W
A
TER LEVEL
MAX
Using the refrigerator to its full potential
• Use the REFRIGERATOR OPERATION knob to adjust the
temperature (
see Description
).
• Press the SUPER COOL button (rapid cooling) to lower the
temperature quickly. For example, when you place a large
number of new food items inside a fridge the internal
temperature will rise slightly. The function quickly cools the
groceries by temporarily reducing the temperature until it
reaches the ideal level.
• Place only cold or lukewarm foods in the compartment, not hot
foods (
see Precautions and tips
).
• Remember that cooked foods do not last longer than raw foods.
• Do not store liquids in open containers. They will increase
humidity in the refrigerator and cause condensation to form.
Using the freezer to its full potential
• Use the FREEZER OPERATION knob to adjust the temperature
(
see Description
).
• Do not re-freeze food that is defrosting or that has already been
defrosted. These foods must be cooked and eaten (within 24
hours).
• Fresh food that needs to be frozen must not come into contact
with food that has already been defrosted.
• Do not place glass bottles which contain liquids, and which are
corked or hermetically sealed in the freezer because they could
break.
• The maximum quantity of food that may be frozen daily is
indicated on the plate containing the technical properties located
on the bottom left side of the refrigerator compartment (for
example: Kg/24h: 4).
• To freeze (if the freezer is already operating): press the rapid
freezing SUPER FREEZE button (corresponding yellow indicator
light illuminates), insert the food and close the door. The function
is disabled automatically after 24 hours or when optimal
temperatures have been reached (indicator light goes out);
!
To avoid blocking the air circulation inside the freezer
compartment, it is advisable not to obstruct the ventilation holes
with food or containers.
!
Do not open the door during freezing.
!
If there is a power cut or malfunction, do not open the freezer
door. This will help maintain the temperature inside the freezer,
ensuring that foods are conserved for at least 9 -14 hours.
1 The tank can contain 3 l of water.
2 Fill with natural water only.
3 Do not leave the water in the tank for long periods or when the
HOLIDAY function is activated.
Cleaning the water tank.
1 Ensure that the tank is completely empty before removing it.
2 Clean all the elements with a clean cloth, using water only.
3 Do not use detergents or other chemical products.
4 Do not wash in the dishwasher.
5 Before putting the tank back in place, ensure that the seals are
correctly placed.
6 After water is discharged, any leaking drops are collected in the
tray located beneath the removable grille.
Child safety
The device is equipped with a safety system: when engaged, it
prevents children from discharging water from the appliance.
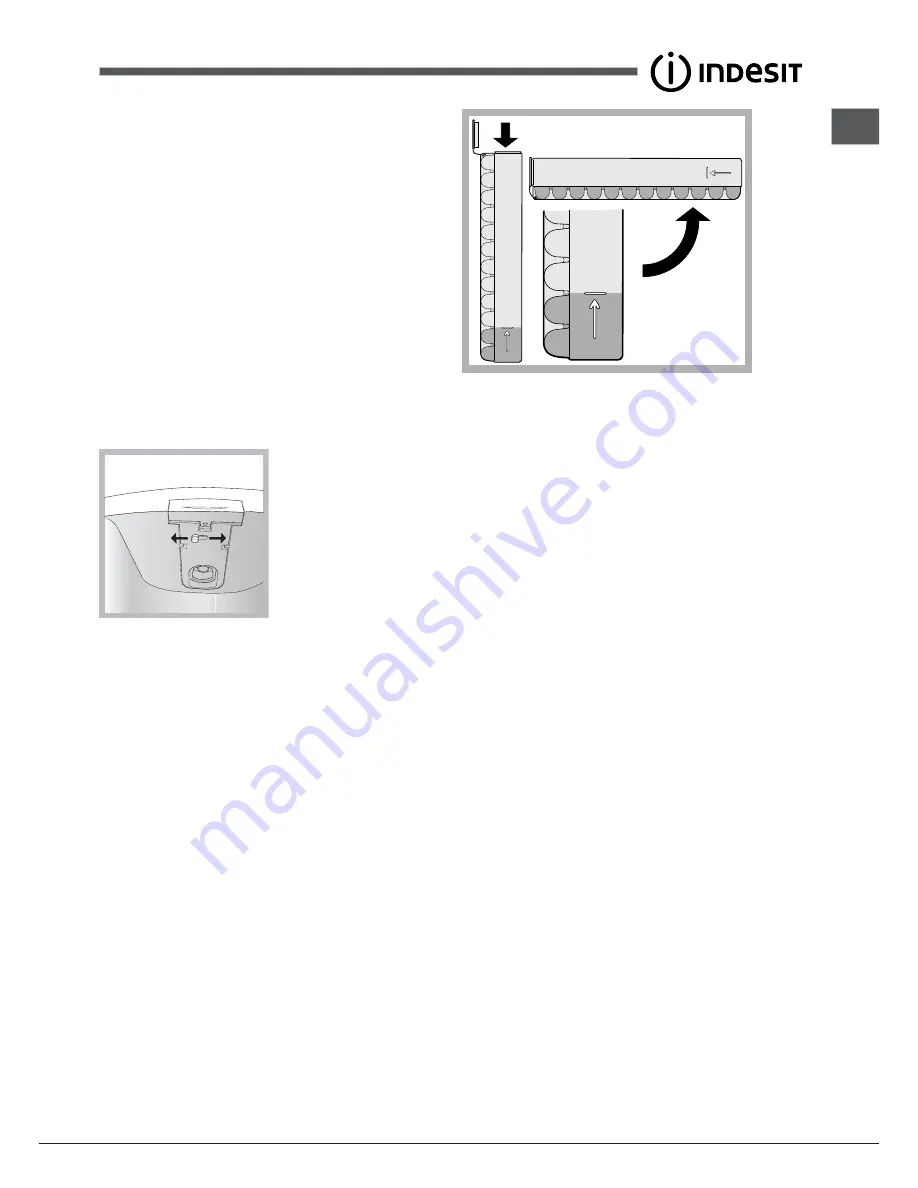
To activate the “Child Safety” system, move the lever to “Lock” as
indicated in the picture.
To deactivate the system, move the lever back into the initial
“Unlock” position.
Unlock
Lock
Freezer compartment
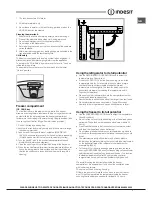
ICE CARE tray
The fact that they are situated on the top part of the freezer
drawers ensures greater cleanliness: the ice no longer comes into
contact with the food placed inside the freezer compartment;
furthermore, the dripping of the water during filling is avoided (a lid
to cover up the hole after filling with water is also provided).
1. Pull out the tray by pushing it up.
Check that the tray is ompletely empty and fill it with water through
the opening provided.
2. Take care not to exceed the level indicated (MAX WATER
LEVEL). Excess water prevents the ice cubes from dispensing
(if this happens, wait for the ice to melt and empty the tray).
3. Turn the tray 90°: due to the connected compartments each
mould fills with water (
see diagram
).
4. Close the opening with the lid provided and put the tray back.
5. When the ice has formed (minimum time approximately 8 hours)
knock the tray against a hard surface and wet the outside so
that the ice cubes come loose and take them out through the
opening.
PLEASE PHONE US TO REGISTER YOUR APPLIANCE AND ACTIVATE YOUR 5 YEAR PARTS GUARANTEE ON 08448 24 24 24

