background image

2

/*

Electrical connection

Your appliance is now supplied with a 13 amp fused plug that
can be plugged into a 13 amp socket for immediate use. Before
using the appliance please read the instructions below.

WARNING - THIS APPLIANCE MUST BE EARTHED.
THE FOLLOWING OPERATIONS SHOULD BE CARRIED
OUT BY A QUALIFIED ELECTRICIAN.

Replacing the fuse:

When replacing a faulty fuse, a 13 amp ASTA approved fuse
to BS 1362 should always be used, and the fuse cover re-
fitted. If the fuse cover is lost, the plug must not be used
until a replacement is obtained.

Replacement fuse covers:

If a replacement fuse cover is fitted, it must be of the correct
colour as indicated by the coloured marking or the colour that
is embossed in words on the base of the plug. Replacements
can be obtained directly from your nearest Service Depot.

Removing the plug:

If your appliance has a non-rewireable moulded plug and
you should wish to remove it to add a cable extension or to
re-route the mains cable through partitions, units etc., please
ensure that either:
- the plug is replaced by a fused 13 amp re-wireable plug
bearing the BSI mark of approval
or:
- the mains cable is wired directly into a 13 amp cable outlet,
controlled by a switch, (in compliance with BS 5733) which
is accessible without moving the appliance.

Disposing of the plug:

Ensure that before disposing of the plug itself, you make
the pins unusable so that it cannot be accidentally inserted
into a socket. 

Instructions for connecting cable to an

alternative plug:

Important: the wires in the mains lead are coloured in
accordance with the following code:

Green & Yellow

- Earth

Blue

- Neutral

Brown

- Live

As the colours of the wires in the mains lead may not
correspond with the coloured markings identifying the
terminals in your plug, proceed as follows:
Connect Green & Yellow wire to terminal marked


E


or


or coloured Green or Green & Yellow.

Connect Brown wire to terminal marked “

L


or coloured

Red.
Connect Blue wire to terminal marked


N

” or coloured Black.

If a 13 amp plug (BS 1363) is used it must be fitted with a 13
amp fuse. A 15 amp plug must be protected by a 15 amp
fuse, either in the plug or adaptor or at the distribution board.
If you are in any doubt about the electrical supply to your
machine, consult a qualified electrician before use.

How to connect an alternative plug:

The wires in this mains lead are coloured in accordance with
the following code:
BLUE

“NEUTRAL” (“

N

”)

BROWN

“LIVE” (“

L

”)

GREEN AND YELLOW

“EARTH” (“

E

”)

GREEN &
YELLOW

BROWN

BLUE

13 ampere fuse

CROSS-BAR
CORD GRIP

Disposing of the appliance:

When disposing of the appliance please remove the plug by
cutting the mains cable as close as possible to the plug body
and dispose of it as described above.


Summary of Contents for C 133 UK

Page 1: ...Instructions for installation and use C 133 UK Fridge freezer combined...

Page 2: ...Fridge freezer Combined Instructions for installation and use GB To maintain the EFFICIENCY and SAFETY of this appliance we recommend use only the MANUFACTURER Service use only ORIGINAL Spare Parts...

Page 3: ...tomer Service Centers In some cases the con nections are made using special terminals and in others a special tool must be used to access the connections 11 Do not use electric appliances inside the c...

Page 4: ...ccessible without moving the appliance Disposing of the plug Ensure that before disposing of the plug itself you make the pins unusable so that it cannot be accidentally inserted into a socket Instruc...

Page 5: ...maximum refrigeration set ting Removable shelf with egg compartment Removable door shelf for food products Removable door shelf for bottles Ice tray Adjustable feet Compartments for storing Compartme...

Page 6: ...asta custards puddings chocolates cream pastries bread dry pastries red tomatoes 3 or 4 days On any shelf Bottled products milk drinks yoghurt On special door shelves Fruits and legumes In vegetable c...

Page 7: ...reeze only the quantities in kg shown on the data plate on the left of the crisper For the best conservation and defrosting remember to freeze small portions this will ensure rapid and uniform freez i...

Page 8: ...e the ice has formed all you need to do is to knock the tray against a hard surface so that the ice cubes come away from their housing and come out of the same hole used to fill the tray with water To...

Page 9: ...Liver Plastic Baggies 3 Not required Sausages Cling Wrap or Tinfoil 2 As necessary Chicken and Turkey Tinfoil 1 3 9 Very slowly in refrigerator Duck and Goose Tinfoil 1 4 6 Very slowly in refrigerator...

Page 10: ...room temperature Peas Shell and wash 2 Plastic Baggies 12 Not required French Beans Wash and slice if required 2 Plastic Baggies 10 12 Not required Carrots Peppers and Turnips Peel wash and slice if...

Page 11: ...k defrost the freezer immediately See Maintenance Instructions Energy Saving Tips Before doing any cleaning disconnect the appliance from the electricity by pulling out the plug or turning off the gen...

Page 12: ...All the removable parts can be cleaned by soaking in hot soapy water or detergent If you own a dishwasher you may wash these parts in the dishwasher Remember to dry thoroughly before replacing them Wh...

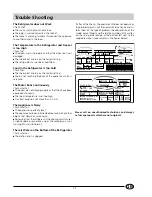
Page 13: ...rmal There is Water on the Bottom of the Refrigerator Check whether The defrost drain is clogged Trouble Shooting If after all the checks the appliance still does not operate or the problem persists c...

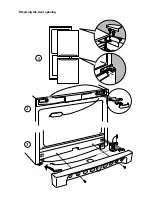
Page 14: ...3 1 2 Reversing the door opening...

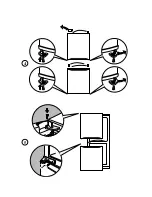
Page 15: ...4 5...

Page 16: ...Merloni Elettrodomestici Viale Aristide Merloni 47 60044 Fabriano Italy Tel 39 0732 6611 Fax 39 0732 662501 www merloni com 06 2000 195027363 00 Xerox Business Services DocuTech...

Reviews: