background image

GB

19

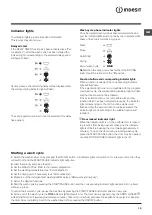
Indicator lights

The indicator lights provide important information.
This is what they can tell you:

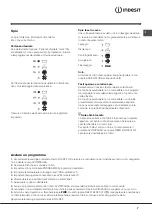
Delayed start

If the DELAY TIMER function has been activated (

see “Per-

sonalisation”

), after the wash cycle has been started the 

indicator light corresponding to the selected delay period 
will begin to flash:

As time passes, the remaining delay will be displayed and 

the corresponding indicator light will flash:

The set programme will start once the selected time delay 
has expired.

Wash cycle phase indicator lights

Once the desired wash cycle has been selected and has be-
gun, the indicator lights switch on one by one to indicate which 
phase of the cycle is currently in progress.

Note:

 when the drying cycle has finished, the DRYING 

knob should be returned to the “

0

” position.

Function buttons and corresponding indicator lights

When a function is selected, the corresponding indicator 
light will illuminate. 
If the selected function is not compatible with the program-
med wash cycle, the corresponding indicator light will flash 
and the function will not be activated.
If the selected function is not compatible with another 
function which has been selected previously, the indicator 
light corresponding to the first function selected will 
flash and only the second function will be activated; the 

indicator light corresponding to the enabled option will 
remain lit.

 Door locked indicator light

When the indicator light is on, the porthole door is locked 
to prevent it from being opened; make sure the indicator 
light is off before opening the door (wait approximately 3 
minutes). To open the door during a running wash cycle, 

press the START/PAUSE button; the door may be opened 

once the DOOR LOCKED indicator light turns off.

Starting a wash cycle

1. 

Switch the washer-dryer on by pressing the ON/OFF button. All indicator lights will switch on for a few seconds, then they 

will switch off and the START/PAUSE indicator light will pulse.

2.

 Load the laundry and close the door.

3.

 Set the WASH CYCLE knob to the desired programme.

4.

 Set the washing temperature (

see “Personalisation”).

5.


Set the drying cycle if necessary

 (see “Personalisation”).

6.

 Measure out the detergent and washing additives (

see “Detergents and laundry”).

7.

 Select the desired functions.

8.

 Start the wash cycle by pressing the START/PAUSE button and the corresponding indicator light will remain lit in a fixed 

manner, in green.

To cancel the set wash cycle, pause the machine by pressing the START/PAUSE button and select a new cycle.

9.

 At the end of the wash cycle the


FINE


indicator light will switch on. The door can be opened once the DOOR LOCKED   

indicator light turns off (wait approximately 3 minutes). Take out your laundry and leave the appliance door ajar to make sure 
the drum dries completely. Switch the washer-dryer off by pressing the ON/OFF button.

Wash

Rinse

Spin/Drain

Drying

End of wash cycle

FINE

FINE

Summary of Contents for EWDC 6105

Page 1: ...bo di alimentazione dell acqua Precauzioni e consigli 5 Sicurezza generale Smaltimento Descrizione della lavasciuga e avviare un programma 6 7 Pannello di controllo Spie Avviare un programma Programmi...

Page 2: ...fosse perfettamente orizzontale compensare le irregolarit svitando o avvitando i piedini ante riori vedi figura l angolo di inclinazione misurato sul piano di lavoro non deve superare i 2 Un accurato...

Page 3: ...ggiungibile Non usare prolunghe e multiple Ilcavonondevesubirepiegatureocompressioni Il cavo di alimentazione deve essere sostituito solo da tecnici autorizzati Attenzione L azienda declina ogni respo...

Page 4: ...iuga dotata di una pompa autopulente che non ha bisogno di manutenzione Pu per succedere che piccoli oggetti monete bottoni cadano nella precamera che protegge la pompa situata nella parte inferiore d...

Page 5: ...e costruita in conformit alle norme internazionali di sicurezza Queste avvertenze sono fornite per ragioni di sicurezza e devono essere lette attentamente Sicurezza generale Questo apparecchio stato...

Page 6: ...lavaggio La spia accesa indica la fase in corso Se stata impostata l opzione Partenza Ritardata indi cheranno il tempo mancante all avvio del programma vedi pagina a fianco Spia OBL BLOCCATO per capi...

Page 7: ...a accesa indica che l obl bloccato per impedire l apertura per aprire l obl necessario che la spia sia spenta attendere 3 minuti circa Per aprire l obl mentre un ciclo in corso premere il pulsante AVV...

Page 8: ...capi misti e colorati insieme Sintetici 59 specifico per lavare i capi sintetici In presenza di sporco pi resistente si pu aumentare la temperatura fino a 60 e utilizzare anche il detersivo in polver...

Page 9: ...lativa lampegger e l opzione non verr attivata Se l opzione selezionata non compatibile con un altra precedentemente impostata la spia relativa alla prima funzione sele zionata lampegger e verr attiva...

Page 10: ...uido pretrattare polsini colli e macchie Air Fresh programma 6 ciclo ideale per rinfrescare e ri muovere in 30 i cattivi odori dai capi in cotone e sintetico max 1 5kg in particolare il fumo senza la...

Page 11: ...ro non ha lo sfiato d aria Se dopo queste verifiche il problema non si risolve chiudere il rubinetto dell ac qua spegnere la lavasciuga e chiamare l Assistenza Se l abitazione si trova agli ultimi pia...

Page 12: ...operatore sar a completa disposizione per fissare un appuntamento con il Centro Assistenza Tecnico Autorizzato pi vicino al luogo da cui si chiama attivo 7 giorni su 7 sabato e domenica compresi e non...

Page 13: ...Precautions and tips 17 General safety Disposal Description of the washer dryer and starting a wash cycle 18 19 Control panel Indicator lights Starting a wash cycle Wash cycles 20 Table of wash cycle...

Page 14: ...nst walls furniture cabinets or anything else 2 If the floor is not per fectly level compensa te for any unevenness by tightening or loo sening the adjustable front feet see figure the angle of inclin...

Page 15: ...When the washing machine has been installed the electricity socket must be within easy reach Do not use extension cords or multiple sockets The cable should not be bent or compressed The power supply...

Page 16: ...om forming Cleaning the pump The washing machine is fitted with a self clea ning pump which does not require any mainte nance Sometimes small items such as coins or buttons may fall into the pre chamb...

Page 17: ...nd pull Do not open the detergent dispenser drawer while the machine is in operation Do not touch the drained water as it may reach extreme ly high temperatures Never force the porthole door This coul...

Page 18: ...START PAUSE button with indicator light starts or tempo rarily interrupts the wash cycles N B To pause the wash cycle in progress press this button the corresponding indicator light will flash orange...

Page 19: ...he enabled option will remain lit Door locked indicator light When the indicator light is on the porthole door is locked to prevent it from being opened make sure the indicator light is off before ope...

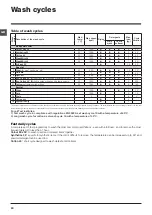
Page 20: ...59 to wash mixed and coloured items together Synthetics 59 specific for synthetic items If the dirt is difficult to remove the temperature can be increased up to 60 and powder detergent can be used to...

Page 21: ...ed function is not compatible with another function which has been selected previously the indicator light corre sponding to the first function selected will flash and only the second function will be...

Page 22: ...ash and dry a laundry load of up to 1 kg in just 45 minutes level Iron dry To achieve optimum results use liquid detergent and pre treat cuffs collars and stains 1 2 3 AirFresh 30 programme 6 ideal cy...

Page 23: ...The wall drainage system is not fitted with a breather pipe If the problem persists even after these checks turn off the water tap switch the applian ce off and contact the Assistance Service If the...

Page 24: ...rovided on the guarantee certificate Always request the assistance of authorised technicians Have the following information to hand the type of problem the appliance model Mod the serial number S N Th...

Reviews: