background image

54

NL

BE

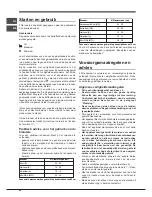
Starten en gebruik

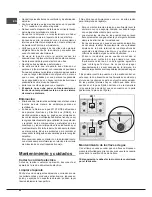
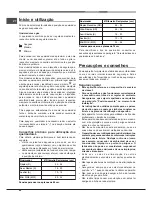
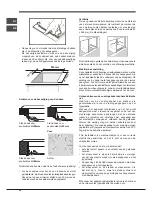
Op iedere knop staat aangegeven waar de gasbrander 

zich precies bevindt.

Gasbranders

De gekozen brander kan met de betreffende knop als volgt 

worden geregeld:

●  Uit

 Maximum

 Minimum

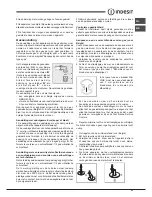
Voor het aansteken van één van de gasbranders houdt u 

er een vlammetje bij of een gasaansteker, drukt u de knop 

in en draait u hem tegen de klok in tot aan de positie van 

maximum sterkte.

Bij de modellen met veiligheidsmechanisme is het 

noodzakelijk de knop voor ongeveer 6 seconden ingedrukt 

te houden totdat het veiligheidsmechanisme dat Bij de 

modellen met ontsteking: voor het aansteken van de 

gekozen gasbrander drukt u eerst op het knopje van de 
ontsteking met het symbool 

, ) vervolgens drukt en draait 

u de betreffende bedieningsknop tegen de klok in tot aan 

de positie van maximum sterkte.

Enkele modellen zijn voorzien van ontsteking in de 

bedieningsknoppen zelf; in dit geval is er de ontsteking maar 

ontbreekt het knopje.Voor het aansteken van de gekozen 

gasbrander drukt u de betreffende knop in, u draait hem 

tegen de klok in tot aan de positie van maximum sterkte en 

u houdt hem ingedrukt totdat hij aan gaat.

! Mocht een gasbrander per ongeluk uitgaan, draai dan de 

knop uit en wacht minstens 1 minuut voordat u hem weer 

probeert aan te steken.

Om de brander uit te doen moet u de knop geheel met de 

klok meedraaien totdat hij niet meer verder kan (tot aan 

het symbool “•”).

Praktisch advies voor het gebruik van de 

branders

Voor een optimaal rendement dient u het volgende te 

onthouden:

•  gebruik voor iedere brander de pan die erop past (zie 

tabel) om te vermijden dat de vlammen er onderuit 

vandaan komen.

•  gebruik alleen pannen met een platte bodem en met een 

deksel erop.

•  draai de knop op het minimum zodra het kookpunt is 

bereikt.

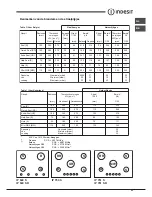
Brander


Snel (R)

Half-snel (S)

Hulpvlam (A)

Mini WOK (MW)

Ø Diameter pan (cm)

22 - 24

16 - 20

10 - 14

22 - 24

Pannen die moeten worden gebruikt op kookvlakken van 60 cm

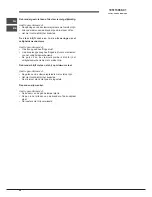
Brander


Gereduceerd Snel (RR)

Extra Snel (UR)

Half-snel (S)

Hulpvlam (A)

Mini WOK (MW)

Ø Diameter pan (cm)

24 - 26

24 - 26

16 - 20

10 - 14

24 - 26

Pannen die moeten worden gebruikt op kookvlakken van 75 cm

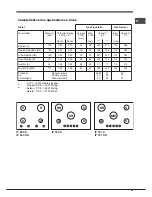
Voor het herkennen van het soort brander verwijzen wij 

u naar de afbeeldingen in paragraaf “Kenmerken van de 

branders en straalpijpen”.

Voorzorgsmaatregelen en 

advies

!

 Dit apparaat is ontworpen en vervaardigd volgens de 

geldende internationale veiligheidsvoorschriften. Deze 

aanwijzingen zijn geschreven voor uw veiligheid en u dient 

ze derhalve goed door te nemen.

Algemene veiligheidsmaatregelen

• 

Dit is een inbouwapparaat van klasse 3.

• 

Gasfornuizen hebben voor een goede werking 

behoefte aan een regelmatige luchtverversing. 

Controleer dat bij het installeren aan de vereisten 

wordt voldaan beschreven in de paragraaf  

“Plaatsing”.

• 

Deze instructies gelden alleen voor de landen 

wiens symbolen in de gebruiksaanwijzing en op het 

typeplaatje staan.

•  Dit  apparaat  is  vervaardigd  voor  niet-professioneel 

gebruik binnenshuis.

•  Het apparaat dient niet buitenshuis te worden geplaatst, 

ook niet in overdekte toestand. Het is erg gevaarlijk als 

het in aanraking komt met regen of onweer.

•  Raak  het  apparaat  niet  blootsvoets  aan  of  met  natte 

handen of voeten.

• 

Het apparaat dient gebruikt te worden om voedsel 

te bereiden. Het mag uitsluitend door volwassenen 

worden gebruikt en alleen volgens de instructies 

die in deze handleiding beschreven staan. Elk 

ander gebruik (bv.: verwarming van ruimten) is als 

oneigenlijk te beschouwen en dus gevaarlijk. De 

fabrikant kan niet aansprakelijk worden gesteld 

voor eventuele schade die te wijten is aan onjuist, 

verkeerd of onredelijk gebruik.

•  Voorkom  dat  elektrische  snoeren  van  andere  kleine 

keukenapparaten op warme delen van de oven 

terechtkomen.

•  Laat de ventilatieopeningen en warmteafvoer vrij.

•  Controleer altijd dat de knoppen in de stand “●”/“

” staan 

als de oven niet wordt gebruikt.

•  Haal de stekker nooit uit het stopcontact door aan het 

snoer te trekken maar door de stekker zelf beet te 

pakken.

•  Maak de oven niet schoon of voer geen onderhoud uit 

als de stekker nog in het stopcontact zit.

Summary of Contents for HOB IP 751 S C UK

Page 1: ...ABLE DE CUISSON Sommaire Mode d emploi 1 Avertissements 4 Assistance 7 Description de l appareil 10 Installation 26 Mise en marche et utilisation 32 Précautions et conseils 32 Nettoyage et entretien 33 Anomalies et remèdes 34 Español Manual de instrucciones ENCIMERA Sumario Manual de instrucciones 1 Advertencias 4 Asistencia 7 Descripción del aparato 10 Instalación 35 Puesta en funcionamiento y us...

Page 2: ...ing KOOKPLAAT Inhoud Gebruiksaanwijzing 2 Belangrijk 5 Service 8 Beschrijving van het apparaat 11 Het installeren 49 Starten en gebruik 54 Voorzorgsmaatregelen en advies 54 Onderhoud en verzorging 55 Storingen en oplossingen 55 ...

Page 3: ...i aprirlo Non chiudere il coperchio in vetro se presente con i bruciatori gas o la piastra elettrica ancora caldi L apparecchio non è destinato a essere messo in funzione per mezzo di un temporizzatore esterno oppure di un sistema di comando a distanza separato ATTENZIONE l uso di protezioni del piano inappropriate può causare incidenti Warnings WARNING The appliance and its accessible parts becom...

Page 4: ... avec un couvercle par exemple ou avec une couverture anti feu ATTENTION Risque d incendie ne pas laisserd objetssurlessurfacesdecuisson Ne jamais nettoyer l appareil avec des nettoyeurs vapeur ou haute pression Essuyer tout liquide pouvant se trouver sur le couvercle avant de l ouvrir Ne pas abaisser le couvercle en verre s il y en a un tant que les brûleurs gaz ou la plaque électrique sont chaud...

Page 5: ...caso tenham recebido instruções em relação ao uso do aparelho de forma segura e tenham conhecimento dos perigos associados As crianças não devem brincar com o aparelho As operações de limpeza e manutenção não devem ser efectuadas por crianças sem vigilância ATENÇÃO Deixar um fogão com gordura e óleo sem vigilância pode ser perigoso e provocar um incêndio NUNCA tente apagar as chamas com água É nec...

Page 6: ...onbewaakt te laten Er kan brand ontstaan U moet NOOIT proberen een vlam brand te blussen met water U dient daarentegen het apparaat uit te schakelen en de vlam te bedekken met bijvoorbeeld een blus deken PAS OP Brandgevaar laat nooit voorwerpen op het kookoppervlak liggen PAS OP Als het oppervlak van de glaskeramische kookplaat gebarsten is moet u het apparaat uitschakelen om te voorkomen dat u ee...

Page 7: ...to iva inclusa dal Lun al Ven dalle 18 30 alle 08 00 il Sab dalle 13 00 alle 08 00 e i giorni festivi per chi chiama dal telefono fisso Per chi chiama da radiomobile le tariffe sono legate al piano tariffario dell operatore telefonico utilizzato Le suddette tariffe potrebbero essere soggette a variazione da parte dell operatore telefonico per maggiori informazioni consultare il sito www aristoncha...

Page 8: ... N Estas últimas informações encontram se na placa de identificação situada no aparelho e ou na embalagem Service U moet doorgeven het type storing het model apparaat Mod het serienummer S N Deze informatie bevindt zich op het typeplaatje links onderin het koelgedeelte ...

Page 9: ... is accidentally extinguished Descrizione dell apparecchio Vista d insieme 1 Griglie di appoggio per RECIPIENTI DI COTTURA 2 BRUCIATORI GAS 3 Manopole di comando dei BRUCIATORI GAS 4 Candela di accensione dei BRUCIATORI GAS 5 DISPOSITIVO DI SICUREZZA BRUCIATORI GAS sono di diverse dimensioni e potenze Scegliete quello più adatto al diametro del recipiente da utilizzare Manopole di comando dei BRUC...

Page 10: ...ÉCURITÉ en cas d extinction accidentelle de la flamme coupez immédiatement l arrivée du gaz Descripción del aparato Vista en conjunto 1 Parrillas de apoyo para RECIPIENTES DE COCCIÓN 2 QUEMADORES A GAS 3 Mandos de los QUEMADORES A GAS 4 Bujía de encendido de los QUEMADORES A GAS 5 DISPOSITIVO DE SEGURIDAD QUEMADORES A GAS son de distintas dimensiones y potencias Elija siempre el más adecuado para ...

Page 11: ...OSITIVO DE SEGURANÇA no caso em que a chama se apague acidentalmente interrompe a saída do gás 5 4 1 1 2 2 3 3 Beschrijving van het apparaat Algemeen aanzicht 1 Roosters voor PANNEN 2 GASBRANDERS 3 Knoppen voor het regelen van de GASBRANDERS 4 Bougie voor ontsteking van de GASBRANDERS 5 VEILIGHEIDSMECHANISME GASBRANDERS hebben verschillende afmetingen en vermogen Kies de brander die het best overe...

Page 12: ...i petrolio liquefatti più pesanti dell aria ristagnano verso il basso Quindi i locali contenenti bidoni di GPL A Esempi di aperture di ventilazione per l aria comburente Maggiorazione della fessura fra porta e pavimento Locale adiacente Locale da ventilare debbono prevedere delle aperture verso l esterno così da permettere l evacuazione dal basso delle eventuali fughe di gas Pertanto i bidoni di G...

Page 13: ...imensionato al carico e rispondente alle norme in vigore il filo di terra non deve essere interrotto dall interruttore Il cavo di alimentazione deve essere posizionato in modo tale che in nessun punto superi di 50 C la temperatura ambiente L installatore è responsabile del corretto collegamento elettrico e dell osservanza delle norme di sicurezza Prima di effettuare l allacciamento accertarsi che ...

Page 14: ...l caso del bruciatore Mini WOK per svitare l ugello utilizzare una chiave aperta da 7mm vedi figura 3 Rimontare le parti eseguendo all inverso le operazioni 4 Al termine dell operazione sostituite la vecchia etichetta taratura con quella corrispondente al nuovo gas d utilizzo reperibile presso i Nostri Centri Assistenza Tecnica Regolazione aria primaria dei bruciatori I bruciatori non necessitano ...

Page 15: ... 60 3 40 1 65 1 00 3 50 Nomin Ridot 0 70 0 70 0 40 0 40 0 40 1 30 By pass 1 100 mm 39 39 39 28 28 61 Ugello 1 100 Portata g h mm 86 80 91 64 50 91 Ugello 1 100 Portata l h mm 116 110 123 96 79 138 286 248 324 157 95 333 218 189 247 120 73 254 214 186 243 118 71 250 Caratteristiche dei bruciatori ed ugelli A 15 C e 1013 25 mbar gas secco Propano P C S 50 37 MJ Kg Butano P C S 49 47 MJ Kg Naturale P...

Page 16: ... 24 Pentole da usare sui piani 60 cm Bruciatore Rapido Ridotto RR Ultra Rapido UR Semi Rapido S Ausiliario A Mini WOK MW Ø Diametro Recipienti cm 24 26 24 26 16 20 10 14 24 26 Pentole da usare sui piani 75 cm Per identificare il tipo di bruciatore fate riferimento ai disegni presenti nel paragrafo Caratteristiche dei bruciatori ed ugelli Precauzioni e consigli L apparecchio è stato progettato e co...

Page 17: ... Non utilizzare mai pulitori a vapore o ad alta pressione per la pulizia dell apparecchio Per una manutenzione ordinaria è sufficiente lavare il piano con una spugna umida asciugando quindi con una carta assorbente per cucina Gli elementi mobili dei bruciatori vanno lavati frequentemente con acqua calda e detersivo avendo cura di eliminare le eventuali incrostazioni Nei piani dotati di accensione ...

Page 18: ...zza Il bruciatore in posizione di minimo non rimane acceso Avete controllato se Sono ostruiti i fori di fuoriuscita del gas Ci sono correnti d aria nelle vicinanze del piano La regolazione del minimo non è corretta I recipienti sono instabili Avete controllato se Il fondo del recipiente è perfettamente piano Il recipiente è centrato sul bruciatore o sulla piastra elettrica Le griglie sono state in...

Page 19: ... than air Therefore rooms containing LPG cylinders must also be equipped with vents to allow gas to escape in the event of a leak As a result LPG cylinders whether partially or completely full must not be installed or stored in rooms or storage areas that are below ground level cellars etc It is advisable to keep only the cylinder A Examples of ventilation holes for comburant air Enlarging the ven...

Page 20: ...has been made and that it is compliant with safety regulations Before connecting to the power supply make sure that The appliance is earthed and the plug is compliant with the law The socket can withstand the maximum power of the appliance which is indicated on the data plate The voltage is in the range between the values indicated on the data plate The socket is compatible with the plug of the ap...

Page 21: ...uire adjusting Setting the burners to minimum 1 Turn the tap to the low flame position 2 Remove the knob and adjust the adjustment screw which is positioned in or next to the tap pin until the flame is small but steady 3 Having adjusted the flame to the required low setting while the burner is alight quickly change the position of the knob from minimum to maximum and vice versa several times check...

Page 22: ...0 1 65 1 00 3 50 Nomin Reduc 0 70 0 70 0 70 0 40 0 40 1 30 By pass 1 100 mm 39 39 39 28 28 61 Nozzle 1 100 Flow g h mm 86 80 91 64 50 91 Nozzle 1 100 Flow l h mm 116 110 123 96 79 138 286 248 324 157 95 333 218 189 247 120 73 254 214 186 243 118 71 250 Burner and nozzle specifications At 15 C and 1013 25 mbar dry gas Propane P C S 50 37 MJ Kg Butane P C S 49 47 MJ Kg Natural P C S 37 78 MJ m3 A S ...

Page 23: ...used on 75 cm hobs To identify the type of burner refer to the designs in the section entitled Burner and Nozzle Specifications Precautions and tips This appliance has been designed and manufactured in compliance with international safety standards The following warnings are provided for safety reasons and must be read carefully General safety This is a class 3 built in appliance Gas appliances re...

Page 24: ...esurfaces thesemayscratchthesurfacebeyondrepair Never use steam cleaners or pressure cleaners on the appliance It is usually enough to wash the hob with a damp sponge and dry it with absorbent kitchen roll The removable parts of the burners should be washed frequently with warm water and soap and any burnt on substances removed For hobs which ligth automatically the terminal part of the electronic...

Page 25: ...make sure that The gas holes are not blocked There are no draughts near the appliance The minimum setting has been adjusted properly The cookware is unstable Check to make sure that The bottom of the cookware is perfectly flat The cookware is positioned correctly at the centre of the burner The pan support grids have been positioned correctly ...

Page 26: ...senvigueur Pour la Hollande NEN 1078 en vigueur Il faut observer les conditions suivantes Lapiècedoitprévoirunsystèmed évacuationversl extérieur des fumées de combustion réalisé au moyen d une hotte ou par ventilateur électrique qui entre automatiquement en fonction dès que l on allume l appareil En cas de cheminée ou conduit de fumée ramifié réservé aux appareils de cuisson Directement à l extern...

Page 27: ...our garantir une bonne aération la cavité d encastrement doit être dépourvue de paroi arrière Il est conseillé d installer le four de manière à ce qu il repose sur deux cales en bois ou bien sur un plan d appui continu qui ait une découpe d au moins 45 x 560 mm voir figures 560 mm 45 mm La table ne peut être installée qu au dessus de fours encastrables équipés de ventilation de refroidissement Rac...

Page 28: ...sponible sur demande auprès du Service d Assistance Technique Ariston avec son étanchéité G sur le raccord en forme de L situé sur le tuyau de raccordement gaz voir figure Le raccord est fourni de filetage conique mâle avec pas 1 2 gaz L G R Le raccordement doit être réalisé au moyen ou d un tuyau rigide pour la Belgique selon les Normes NBN D51 003 ou d un tuyau flexible en acier inox sans interr...

Page 29: ...urité gaz thermocouple équipant certains appareils quand les brûleurs sont au minima augmentez leur débit en agissant sur la vis de réglage 5 Aprèsavoirprocédéàceréglage reposezlesscelléssurles by pass en utilisant de la cire ou autre matériau équivalent En cas de gaz liquides il faut visser à fond la vis de réglage En fin d opération remplacez la vieille étiquette par celle correspondant au nouve...

Page 30: ...16 110 123 96 79 138 3 00 2 60 3 40 1 65 1 00 3 30 286 248 324 157 95 333 25 20 30 Nominal mbar Minimum mbar Maximum mbar 28 30 20 35 37 25 45 20 15 25 25 15 30 G25 332 288 376 183 111 365 Débit l h 218 189 247 120 73 254 Propane 214 186 243 118 71 250 Gaz Liquidés Gaz Natural Caractéristiques des brûleurs et des injecteurs Gaz Naturels Tableau 1 Pour la Luxembourg Cat I2E 1 Brûleur Rapide R Rapid...

Page 31: ...nal 3 00 2 60 3 40 1 65 1 00 3 30 Réduit 0 70 0 70 0 70 0 40 0 40 1 30 Puissance thermique kW p c s Injecteur 1 100 mm 116 110 123 96 79 138 Nominale mbar Minimum mbar Maximum mbar A 15 C et 1013 25 mbar gaz sec Propane P C S 50 37 MJ Kg Butane P C S 49 47 MJ Kg Naturel G20 P C S 37 78 MJ m3 Naturel G25 P C S 32 49 MJ m3 1 Voir la plaquette d immatriculation de l appareil A S R S A UR RR S S A MW ...

Page 32: ...22 24 Casseroles à utiliser sur les tables de cuisson de 60 cm Brûleurs Rapide Réduit RR Ultra Rapide UR Semi Rapide S Auxiliaire A Mini WOK MW Ø Récipients cm 24 26 24 26 16 20 10 14 24 26 Casseroles à utiliser sur les tables de cuisson de 75 cm Pour distinguer le type de brûleur reportez vous aux dessins figurant dans le paragraphe Caractéristiques des brûleurs et des injecteurs Précautions et c...

Page 33: ... 19 EC sur les Déchets des Equipements Electriques et Electroniques DEEE exige que les appareils ménagers usagés ne soient pas jetés dans le flux normal des déchets municipaux Les appareils usagés doivent être collectés séparément afin d optimiser le taux de récupération et le recyclage des matériaux qui les composent et réduire l impact sur la santé humaine et l environnement Le symbole de la pou...

Page 34: ...r sont bien montées correctement il y a des courants d air dans les environs du plan de cuisson La flamme s éteint dans les versions équipées de sécurité de flamme Avez vous contrôlé si vous avez bien appuyé à fond sur la manette vous avez bien appuyé à fond sur la manette pendant un laps de temps suffisant pour permettre l activation du dispositif de sécurité les orifices de sortie du gaz situés ...

Page 35: ...os ambientes que contienen botellas de GPL deben tener aberturas hacia el exterior para permitir la evacuación desde abajo de eventuales escapes de gas Además A Ejemplos de aperture de ventilación para aire comburente Aumento de la ranura entre puerta y suelo Habitación adyacente Habitación por ventilar las botellas de GPL vacías o parcialmente llenas no deben ser instaladas o depositadas en ambie...

Page 36: ... conexión directa a la red es necesario interponer entre el aparato y la red un interruptor omnipolar con una distancia mínima entre los contactos de 3 mm dimensionado para esa carga y que responda a las normas vigentes el conductor de tierra no debe ser interrumpido por el interruptor El cable de alimentación eléctrica se debe colocar de modo tal que no alcance en ningún punto una temperatura que...

Page 37: ... para aflojar la tobera utilizar una llave abierta de 7mm veri figura 3 Vuelva a colocar las piezas realizando las operaciones en sentido contrario 4 Al finalizar la operación sustituya la anterior etiqueta de calibrado con la correspondiente al nuevo gas que se va a utilizar disponible en nuestros Centros de Asistencia Técnica Regulación de aire principal de los quemadores Los quemadores no neces...

Page 38: ... 40 1 65 1 00 3 50 Nomin Reduc 0 70 0 70 0 40 0 40 0 40 1 30 By pass 1 100 mm 39 39 39 28 28 61 Pico 1 100 Capacid g h mm 86 80 91 64 50 91 Pico 1 100 Capacid l h mm 116 110 123 96 79 138 286 248 324 157 95 333 218 189 247 120 73 254 214 186 243 118 71 250 Características de los quemadores e inyectores A 15 C y 1013 25 mbar gas seco Propano P C S 50 37 MJ Kg Butano P C S 49 47 MJ Kg Natural P C S ...

Page 39: ...l fondo plano y con tapa cuando se produce la ebullición gire el mando hasta la posición de mínimo Quemador Rápido R Semi Rápido S Auxiliar A Mini WOK MW Ø Diámetro Recipientes cm 22 24 16 20 10 14 22 24 Ollas que deben utilizarse en placas de 60 cm Quemador Rápido Reducido RR Ultra Rápido UR Semi Rápido S Auxiliar A Mini WOK MW Ø Diámetro Recipientes cm 24 26 24 26 16 20 10 14 24 26 Ollas que deb...

Page 40: ...l consumidor la obligación de separarlos para la recogida selectiva El consumidor debe contactar con la autoridad local o con el vendedor para informarse en relación a la correcta eleminación de su electrodoméstico viejo Mantenimiento y cuidados Cortar la corriente eléctrica Antes de realizar cualquier operación desconecte el aparato de la red de alimentación eléctrica Limpiar el aparato Evite el ...

Page 41: ...ente de aire en las cercanías de la encimera La llama no permanece encendida en los modelos con seguridad Controle si No ha presionado a fondo el mando No ha mantenido presionado a fondo el mando por un tiempo suficiente como para activar el dispositivo de seguridad Están obstruidos los orificios de salida del gas a la altura del dispositivo de seguridad El quemador en posición de mínimo no perman...

Page 42: ...etróleo mais pesados do que o ar estagnam se embaixo Portanto as salas que contiverem cilindros de GLP devem possuir aberturas A Exemplos de abertura de ventilação para ar comburente Aumento da fenda entre porta e soalho Local adjacente Local a ser ventilado para fora de maneira que possibilitem o escoamento para baixo dos eventuais escapes de gás Portanto os cilindros de GLP mesmo vazios ou parci...

Page 43: ...r omnipolar com abertura mínima entre os contactos de 3 mm na dimensão certa para a carga e em conformidade com as normas em vigor a ligação à terra não deve ser interrompida pelo interruptor O cabo de alimentação deve ser colocado de maneira que em nenhum ponto ultrapasse de 50 C a temperatura do ambiente O técnico instalador é responsável pela realização certa da ligação eléctrica e da obediênci...

Page 44: ... dos queimadores e dos bicos No caso do queimador Mini WOK para desparafusar o bico empregue uma chave aberta de 7 mm veja a figura 3 Monte outra vez as partes realizando estas operações na ordem contrária 4 Nofinaldaoperação troqueavelhaetiquetadecalibragem por outra corresponda ao novo tipo de gás utilizado que se encontram nos nossos centros de assistência técnica Regulação do ar primário dos q...

Page 45: ... 2 60 3 40 1 65 1 00 3 50 Nomin Reduz 0 70 0 70 0 40 0 40 0 40 1 50 By pass 1 100 mm 39 39 39 28 28 61 Bico 1 100 Capacid g h mm 86 80 91 64 50 91 Bico 1 100 Capacid l h mm 116 110 123 96 79 138 286 248 324 157 95 333 218 189 247 120 73 254 214 186 243 118 71 250 Características dos queimadores e bicos A 15 C e 1013 mbars gás seco Propano P C S 50 37 MJ Kg Butano P C S 49 47 MJ Kg Natural P C S 37...

Page 46: ...ntes cm 22 24 16 20 10 14 22 24 Panelas para usar nos planos de 60 cm Queimador Rápido Reduzido RR Ultra Rápido UR Semi Rápido S Auxiliar A Mini WOK MW Ø Diâmetro Recipientes cm 24 26 24 26 16 20 10 14 24 26 Panelas para usar nos planos de 75 cm Para identificar o tipo de queimador consultar os desenhos apresentados no parágrafo Características dos queimadores e dos bicos Precauções e conselhos Es...

Page 47: ...hos Manutenção e cuidados Desligar a corrente eléctrica Antes de realizar qualquer operação desligue o aparelho da alimentação eléctrica Limpeza do aparelho Evite o emprego de detergentes abrasivos ou corrosivos tais como tira manchas e produtos contra ferrugem detergentes em pó e esponjas com superfície abrasiva podem arranhar irremediavelmente a superfície Nunca utilize equipamento de limpeza a ...

Page 48: ...uros de saída do gás em correspondência ao dispositivo de segurança O queimador em posição de mínimo não permanece aceso Foi controlado se Estão entupidos os furos de saída do gás Há correntes de ar nas proximidades do plano A regulação do mínimo não está correcta Os recipientes são instáveis Foi controlado se O fundo do recipiente é perfeitamente plano O recipiente está no centro do queimador ou ...

Page 49: ...an raken A Voorbeelden ventilatie opening voor verbrandingslucht Een andere manier is door op indirecte wijze lucht te onttrekken aandeaangrenzendevertrekkendie door middel van een ventilatiebuis zoals boven beschreven met buiten zijn verbonden en die geen gemeenschappelijke delen zijn van het huis en ook geen ruimtes met hoog brandgevaar of slaapkamers voor België De gassen van vloeibaar gemaakte...

Page 50: ... de kleuren geel groen Als het fornuis wordt geïnstalleerd boven een inbouwovenmoetendeelektrischeaansluitingenvanfornuisen oven apart worden uitgevoerd zowel voor veiligheidsredenen als voor het eventueel makkelijker verwijderen van de oven Het aansluiten van de voedingskabel aan het elektrische net Gebruik voor de voedingskabel een stekker die genormaliseerd is voor de lading aangegeven op het t...

Page 51: ...ng krijgt tot het fornuis is voorzien van schroefdraad 1 2 gas cilindrische schroefbout De in werking stelling van deze buizen moet zodanig worden bewerkstelligd dat hun lengte in uitgerolde toestand niet meer dan 2000 mm is Nadat de aansluiting heeft plaatsgevonden moet u controleren dat de flexibele metalen buis niet in contact komt met de beweegbare delen of dat hij vastgekneld raakt L G R Gebr...

Page 52: ... de gasdruk van het gebruikte gas verschillend of variabel is dan hetgeen is voorzien moet op de toevoerbuis een drukteregelaar worden aangebracht die voldoet aan de geldende landelijke normen Elektrische aansluitingen TYPEPLAATJE zie typeplaatje Dit apparaat voldoet aan de volgende EU Richtlijnen 2006 95 EEG van 12 12 06 Laagspanning en daaropvolgende wijzigingen 2004 108 EEG van 15 12 04 Elektro...

Page 53: ...365 Bereik l h 218 189 247 120 73 254 Propane 214 186 243 118 71 250 Vloeibaar gas Natuurlijk gas Kenmerken van de branders en de straalpijpjes Natuurlijk gas Table 1 Voor Nederland Gaspit Snel R Gered Snel RR Extra Snel UR Halp Snel S Hulp A Mini WOK MW Spanning van voeding Bereik l h G25 332 288 376 183 111 365 25 20 30 Doorsnee mm 100 100 100 75 55 110 Nominaal 3 00 2 60 3 40 1 65 1 00 3 30 Ger...

Page 54: ...m Brander Gereduceerd Snel RR Extra Snel UR Half snel S Hulpvlam A Mini WOK MW Ø Diameter pan cm 24 26 24 26 16 20 10 14 24 26 Pannen die moeten worden gebruikt op kookvlakken van 75 cm Voor het herkennen van het soort brander verwijzen wij u naar de afbeeldingen in paragraaf Kenmerken van de branders en straalpijpen Voorzorgsmaatregelen en advies Dit apparaat is ontworpen en vervaardigd volgens d...

Page 55: ...un oude apparaat Onderhoud en verzorging De elektrische stroom afsluiten Sluit altijd eerst de stroom af voordat u tot enige handeling overgaat Schoonmaken van het apparaat Vermijdhetgebruikvanschuurmiddelenofbijtendemiddelen zoals vlekkenmiddelen en roestverwijderende producten schoonmaakmiddelen in poedervorm of schuursponzen deze kunnen het oppervlak onherstelbaar krassen Gebruik nooit stoom of...

Page 56: ... goed heeft ingedrukt U de knop lang genoeg heeft ingedrukt voor het activeren van het veiligheidsmechanisme De gaten van de vlamverspreiders dichtbij het veiligheidsmechanisme niet verstopt zijn De brander blijft niet aan als hij op minimum staat Heeft u gecontroleerd of De gaten van de vlamverspreiders niet verstopt zijn Het niet tocht dichtbij het kookvlak De minimum stand niet goed is ingestel...

Reviews: