EN - 55
Freezer Compartment
• The use of freezer is, storing of deep-frozen or frozen foods for long periods of time and making ice
cubes.
• To freeze fresh food, ensure that as much of the surface as possible of food to be frozen is in con-
tact with the cooling surface.
• Do not put fresh food with frozen on side by side as it can thaw the frozen food.
• While freezing fresh foods(i.e meat,fish and mincemeat), divide them in parts you will use in one
time.
• Once the unit has been defrosted replace the foods into freezer and remember to consume them in
as short period of time.
• Never place warm food in the freezer compartment. As it will disturb the frozen foods.
• For storing the frozen foods;the instructions shown on frozen food packages should always be
followed carefully and if no information is provided food should not be stored for more than 3 months
from the purchased date.
• When buying frozen foods ensure that these have been frozen at suitable temperatures and that the
packing is intact.
• Frozen foods should be transported in appropriate containers to maintain the quality of the food and
should be returned to the freezing surfaces of the unit in the shortest possible time.
• If a package of frozen food shows the sign of humidity and abnormal swelling it is probable that it
has been previously stored at an unsuitable temperature and that the contents have deteriorated.
• The storage life of frozen foods depends on the room temperature, thermostat setting, how often
the door is opened, the type of food and the length of time required to transport the product from
the shop to your home. Always follow the instructions printed on the package and never exceed the
maximum storage life indicated.
Not that; if you want to open again immediately after closing the freezer door, it will not be opened
easily. It’s quite normal! After reaching equilibrium condition, the door will be opened easily.
• Disconnect the unit from the power supply before cleaning.
• Do not clean the appliance by pouring water.
• Make sure that no water enters the lamp housing and other electrical components.
• The appliance should be cleaned periodically using a solution of bicarbonate of soda and lukewarm
water.
• Clean the accessories separately with soap and water. Do not clean them in the dishwasher.
• Do not use abrasive products, detergents or soaps. After washing, rinse with clean water and dry
carefully. When you have finished cleaning, reconnect the plugto the mains supply with dry hands.
• Never use flammable, explosive or corrosive material like thinner, gas, acid for cleaning.
• The condenser (black part with black wings at the rear of the appliance) should be
cleaned using a vacuum cleaner or a dry brush at least once a year. This will help
your appliance to operate more efficiently and will enable you to save energy.
• Make sure that no water contacts the electrical connections of the thermostat or
internal lighting. Regularly check the door seal and clean it whenever necessary.
Defrosting
Refrigerator Compartment;
• Defrosting occurs automatically in refrigerator compartment
during operation ; the defrost water is collected by the evapo-
rating tray and evaporates automatically.
• The evaporating tray and the defrost water drain hole should
be cleaned periodically with defrost drain plug to prevent the
water from collecting on the bottom of the refrigerator instead
of flowing out.
• You can also pour 1/2 glass of the water to drain hole to clean inside.
CLEANING AND MAINTENANCE
Summary of Contents for I55TM 4120 W 2
Page 2: ......
Page 5: ...BG 5 0 17 0 81 MPa 1 7 8 1 bar C 1 1...
Page 6: ...BG 6 2 3 4 5 4 1 3 4 6 8 12 2 48 5...
Page 7: ...BG 7 50 mm...
Page 8: ...BG 8 100 2012 19 WEEE Stop Frost...
Page 10: ...BG 10 crisper OK OK OK 12 OK 1 2 Crisper OK OK 1 2 crisper crisper...
Page 11: ...BG 11 3 1 2...
Page 12: ...BG 12 5 MAX 1 2 3 15 W 4 5 5 LED LED...
Page 13: ...BG 13 5 10 5 1 2 3 4 5 6 crisper 7 8...
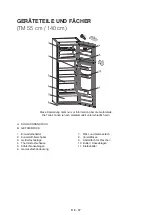
Page 14: ...BG 14 TM 55 cm 140 cm A B 1 2 3 4 5 6 Crisper 7 Crisper 8 9 10 11...
Page 104: ...GR 104 0 17 0 81 MPa 1 7 8 1 bar C 1...
Page 105: ...GR 105 2 3 4 5 4 1 3 4 6 8 12 2 48 5...
Page 106: ...GR 106 I 50 mm...
Page 107: ...GR 107 100 2012 19 Stop Frost...
Page 109: ...GR 109 OK OK 12 OK 1 2 OK OK 1 2...
Page 110: ...GR 110 3 1 2...
Page 111: ...GR 111 5 MAX 1 2 3 15 Watts 4 5 5 LED LED helpdesk...
Page 112: ...GR 112 5 10 5 1 2 3 4 5 6 7 8...
Page 113: ...GR 113 TM 55 cm 140 cm A B 1 2 3 4 5 6 7 8 9 10 11...
Page 125: ......
Page 126: ......
Page 127: ......
Page 128: ...52282183...

