background image

14

GB

Installation

!

 This instruction manual should be kept in a safe 

place for future reference. If the washing machine 

is sold, transferred or moved, make sure that the 

instruction manual remains with the machine so 

that the new owner is able to familiarise himself/

herself with its operation and features.

!

 Read these instructions carefully: they contain 

vital information relating to the safe installation 

and operation of the appliance.

Unpacking and levelling

Unpacking

1. Remove the washing machine from its packaging.

2. Make sure that the washing machine has not 

been damaged during the transportation process. 

If it has been damaged, contact the retailer and do 

not proceed any further with the installation process.

3. Remove the 

4

 pro-

tective  screws  (used 

during  transportation) 

and the rubber washer 

with the corresponding 

spacer, located on the 

rear part of the applian-

ce (

see figure

).

4.  Close  off  the  holes  using  the  plastic  plugs 

provided.

5. Keep all the parts in a safe place: you will need 

them again if the washing machine needs to be 

moved to another location.

!

  Packaging  materials  should  not  be  used  as 

toys for children.

Levelling

1. Install the washing machine on a flat sturdy 

floor, without resting it up against walls, furniture 

cabinets or anything else.

2. If the floor is not per-

fectly level, compensa-

te for any unevenness 

by  tightening  or  loo-

sening  the  adjustable 

front  feet  (

see  figure

); 

the angle of inclination, 

measured in relation to 

the worktop, must not 

exceed 2°.

Levelling the machine correctly will provide it with 

stability, help to avoid vibrations and excessive 

noise and prevent it from shifting while it is ope-

rating. If it is placed on carpet or a rug, adjust the 

feet in such a way as to allow a sufficient venti-

lation space underneath the washing machine.

Connecting the electricity and wa-

ter supplies

Connecting the water inlet hose

1. Connect the supply 

pipe  by  screwing  it  to 

a cold water tap using 

a ¾ gas threaded con-

nection

 (see figure). 

Before  performing  the 

connection,  allow  the 

water to run freely until 

it is perfectly clear.

2.  Connect  the  inlet 

hose  to  the  washing 

machine  by  screwing 

it onto the correspon-

ding water inlet of the 

appliance, which is si-

tuated on the top right-

hand  side  of  the  rear 

part  of  the  appliance


(see figure)

.

3. Make sure that the hose is not folded over 

or bent.

!

 The water pressure at the tap must fall within 

the values indicated in the Technical details table 

(see next page).

!

 If the inlet hose is not long enough, contact a 

specialised shop or an authorised technician.

!

 Never use second-hand hoses.

!

 Use the ones supplied with the machine.

Summary of Contents for IWDC 6125 K

Page 1: ...ntr le du tuyau d arriv e de l eau Pr cautions et conseils 5 S curit g n rale Mise au rebut Description du lavante s chante et d marrage d un programme 6 7 Bandeau de commandes Voyants D marrage d un...

Page 2: ...autre 2 Si le sol n est pas parfaitement horizon tal visser ou d visser les pieds de r glage avant voir figure pour niveler l appareil son angle d inclinaison mesur sur le plan de travail ne doit pas...

Page 3: ...aux orages Apr s installation du lavante s chante la pri se de courant doit tre facilement accessible N utiliser ni rallonges ni prises multiples Le c ble ne doit tre ni pli ni trop cras Le c ble d a...

Page 4: ...e Le lavante s chante est quip d une pompe autonettoyante qui n exige aucune op ration d entretien Il peut toutefois arriver que de menus objets pi ces de monnaie boutons tombent dans la pr chambre qu...

Page 5: ...cher l appareil si l on est pieds nus et si les mains sont mouill es ou humides Ne jamais tirer sur le c ble pour d brancher la fiche de la prise de courant Ne pas toucher l eau de vidange elle peut a...

Page 6: ...oir page ci contre Touche avec voyant MARCHE PAUSE pour d marrer les programmes ou les interrompre momentan ment N B pour effectuer une pause du lavage en cours appu yer sur cette touche le voyant cor...

Page 7: ...oyant allum indique que le hublot est verrouill pour en emp cher l ouverture Attendre que le voyant cesse de clignoter avant d ouvrir la porte 3 minutes environ Pour ouvrir le hublot tandis qu un cycl...

Page 8: ...lancs extr mement sales 90 1200 6 170 2 Coton blancs et couleurs r sistantes tr s sales 60 max 90 1200 6 140 3 Coton couleurs blancs peu sales et couleurs d licates 40 1200 6 90 4 Eco coton 1 blancs e...

Page 9: ...respondant la premi re fonction se met clignoter et seule la deuxi me fonction est activ e le voyant de la touche s allume au fixe La s lection de cette fonction permet d optimiser les mouvements m ca...

Page 10: ...00 1200 g 1 serviette ponge 150 250 g Linge ou v tements particuliers Laine gr ce au programme 6 vous pouvez laver la machine tous vos v tements en laine y compris ceux qui portent l tiquette lavage l...

Page 11: ...de vidange est plong e dans l eau voir Installation L vacuation murale n a pas d vent Si apr s ces v rifications le probl me persiste fermer le robinet de l eau teindre la machine et appeler le servi...

Page 12: ...inconv nient a disparu Autrement contacter le Centre d Assistance technique agr au num ro de t l phone indiqu sur le certificat de garantie Ne jamais s adresser des techniciens non agr s Communiquer l...

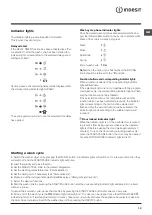
Page 13: ...let hose Precautions and tips 17 General safety Disposal Description of the washer dryer and starting a wash cycle 18 19 Control panel Indicator lights Starting a wash cycle Wash cycles 20 Table of wa...

Page 14: ...ng it up against walls furniture cabinets or anything else 2 If the floor is not per fectly level compensa te for any unevenness by tightening or loo sening the adjustable front feet see figure the an...

Page 15: ...should not be underwater We advise against the use of hose extensions if it is absolutely necessary the extension must have the same diameter as the original hose and must not exceed 150 cm in length...

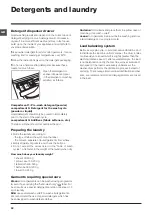
Page 16: ...om forming Cleaning the pump The washing machine is fitted with a self clea ning pump which does not require any mainte nance Sometimes small items such as coins or buttons may fall into the pre chamb...

Page 17: ...and pull Do not open the detergent dispenser drawer while the machine is in operation Do not touch the drained water as it may reach extreme ly high temperatures Never force the porthole door This co...

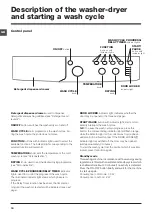
Page 18: ...START PAUSE button with indicator light starts or tem porarily interrupts the wash cycles N B To pause the wash cycle in progress press this button the corresponding indicator light will flash orange...

Page 19: ...o the enabled option will remain lit Door locked indicator light When the indicator light is on the porthole door is locked to prevent it from being opened make sure the indicator light is off before...

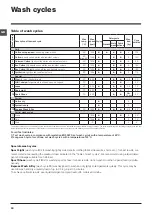
Page 20: ...is an estimation only and is calculated assuming standard working conditions The actual duration can vary according to factors such as water temperature and pressure the amount of detergent used the a...

Page 21: ...ion is not compatible with the programmed wash cycle the corresponding indicator light will flash and the function will not be activated If the selected function is not compatible with another functio...

Page 22: ...exceed the values listed in the Table of wash cycles which refer to the weight of the laundry when dry How much does your laundry weigh 1 sheet 400 500 g 1 pillow case 150 200 g 1 tablecloth 400 500 g...

Page 23: ...The free end of the hose is under water see Installation The wall drainage system is not fitted with a breather pipe If the problem persists even after these checks turn off the water tap switch the...

Page 24: ...rovided on the guarantee certificate Always request the assistance of authorised technicians Have the following information to hand the type of problem the appliance model Mod the serial number S N Th...

Reviews: