background image

14

GB

Installation

!


Before placing your new appliance into operation

please read these operating instructions carefully. They

contain important information for safe use, for installation

and for care of the appliance.

!


Please keep these operating instructions for future

reference. Pass them on to possible new owners of the

appliance.

Positioning and connection

Positioning

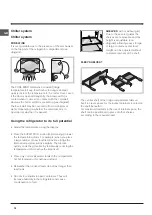
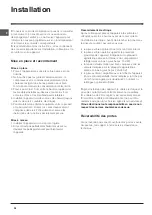
1. Place the appliance in a well-ventilated humidity-free

room.

2. Do not obstruct the rear fan grills. The compressor

and condenser give off heat and require good

ventilation to operate correctly and save energy.

3. Leave a space of at least 10 cm between the top part

of the appliance and any furniture above it, and at

least 5 cm between the sides and any furniture/side

walls.

4. Ensure the appliance is away from any sources of

heat (direct sunlight, electric stove, etc.).

5. In order to maintain the correct distance between the

appliance and the wall behind it, fit the spacers

supplied in the installation kit, following the

instructions provided.

Levelling

1. Install the appliance on a level and rigid floor.

2. If the floor is not perfectly horizontal, adjust the

refrigerator by tightening or loosening the rear feet.

Electrical connections

After the appliance has been transported, carefully

place it vertically and wait at least 3 hours before

connecting it to the electricity mains. Before inserting the

plug into the electrical socket ensure the following:

• The appliance is earthed and the plug is compliant

with the law.

• The socket can withstand the maximum power of the

appliance, which is indicated on the data plate located

on the bottom left side of the fridge (e.g. 150 W).

• The voltage must be in the range between the values

indicated on the data plate located on the bottom left

side (e.g. 220-240V).

• The socket is compatible with the plug of the

appliance.

If the socket is incompatible with the plug, ask an

authorised technician to replace it (

see Assistance

).

Do not use extension cords or multiple sockets.

!


Once the appliance has been installed, the power

supply cable and the electrical socket must be easily

accessible.

!


The cable must not be bent or compressed.

!


The cable must be checked regularly and replaced by

authorised technicians only (see Assistance).

!


The manufacturer declines any liability should these

safety measures not be observed.

Reversible doors

If it is necessary to change the direction in which the

doors open, please contact the Technical Assistance

Centre.

Summary of Contents for PBAA 33 V D

Page 1: ...recchio Sistema di raffreddamento Utilizzare al meglio il frigorifero Utilizzare al meglio il congelatore Manutenzione e cura 8 9 Escludere la corrente elettrica Pulire l apparecchio Evitare muffe e c...

Page 2: ...nto piano e rigido 2 Se il pavimento non fosse perfettamente orizzontale compensare svitando o avvitando i piedini anteriori Collegamento elettrico Dopo il trasporto posizionare l apparecchio vertical...

Page 3: ...re il blocco dei tasti del pannello di controllo onde evitare involontarie attivazioni da parte dei bambini Sulla tastiera si accende il LED CHILD LOCK Regolazione Temperatura CONGELATORE e Consentono...

Page 4: ...mplessi si trova nelle pagine seguenti Variabili per numero e o per posizione Presente solo in alcuni modelli PIEDINO di regolazione Balconcino estraibile con coperchio e PORTAUOVA Balconcino estraibi...

Page 5: ...ne ed esterne al frigo consumando il minimo di energia ci viene segnalato dall accensione del LED ECO sulla tastiera Quando attiva la funzione HOLIDAY non sono possibili regolazioni di temperatura ma...

Page 6: ...a temperatura variabile sistemando gli alimenti direttamente sulle piastre evaporanti Durante il congelamento evitare di aprire la porta In caso di interruzione di corrente o di guasto non aprire la p...

Page 7: ...tenzione a non superare il livello indicato MAX WATER LEVEL Troppa acqua ostacola la fuoriuscita dei ghiaccioli se succede attendere che il ghiaccio si sciolga e svuotare la bacinella 3 Ruotare la bac...

Page 8: ...so si voglia spegnere l apparecchio per un lungo periodo pulire l interno e lasciare le porte aperte Sbrinare l apparecchio Attenersi alle istruzioni sottostanti Per sbrinare l apparecchio non usare o...

Page 9: ...stino delle condizioni ideali di conservazione Sostituire la lampadina Per sostituire la lampadina di illuminazione del vano frigorifero staccare la spina dalla presa di corrente Seguire le istruzioni...

Page 10: ...mit alle norme internazionali di sicurezza Queste avvertenze sono fornite per ragioni di sicurezza e devono essere lette attentamente Questa apparecchiatura conforme alle seguenti Direttive Comunitari...

Page 11: ...spegnere il segnale acustico aprire e chiudere la porta oppure premere una volta i tasti e della regolazione temperatura del congelatore Premere una seconda volta tali tasti per visualizzare sul disp...

Page 12: ...che posta nel vano frigorifero in basso a sinistra Non ricorrete mai a tecnici non autorizzati e rifiutate sempre l installazione di pezzi di ricambio non originali Mod RG 2330 TI Cod 93139180000 S N...

Page 13: ...to its full potential Using the freezer to its full potential Maintenance and care 20 21 Switching the appliance off Cleaning the appliance Avoiding mould and unpleasant odours Defrosting the applianc...

Page 14: ...ust the refrigerator by tightening or loosening the rear feet Electrical connections After the appliance has been transported carefully place it vertically and wait at least 3 hours before connecting...

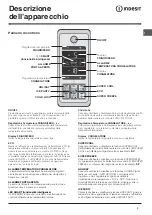
Page 15: ...al temperature so as to optimise it CHILD LOCK Activates or deactivates the control panel button lock in order to avoid the risk of the various functions being activated accidentally by children The C...

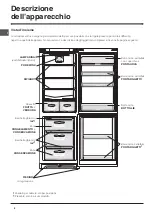
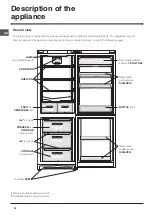
Page 16: ...hased For more complex features consult the following pages Varies by number and or position Available only on certain models Levelling FEET Removable lidded shelf with EGG TRAY Removable multipurpose...

Page 17: ...ed accordingly The temperature values that may be selected for the refrigerator compartment are 8 C 7 C 6 C 5 C 4 C 3 C and 2 C while the values that may be set for the freezer are 18 C 19 C 20 C 21 C...

Page 18: ...a large number of new food items inside a fridge the internal temperature will rise slightly The function quickly cools the groceries by temporarily reducing the temperature until it reaches the ideal...

Page 19: ...mpartment you may remove the bins except the lowest bin and the special COOL CARE ZONE bin which has an adjustable temperature and place the food directly onto the evaporator plates Do not open the do...

Page 20: ...be covered or sealed properly If you want to switch the appliance off for an extended period of time clean the inside and leave the doors open Defrosting the appliance Follow the instructions below D...

Page 21: ...n restored before placing food in the freezer compartment Replacing the light bulb To replace the light bulb in the refrigerator compartment pull out the plug from the electrical socket Follow the ins...

Page 22: ...rnings are provided for safety reasons and must be read carefully This appliance complies with the following Community Directives 73 23 EEC of 19 02 73 Low Voltage and subsequent amendments 89 336 EEC...

Page 23: ...nd freezer temperature adjustment buttons once Press these buttons a second time to display the set value on the freezer display switch off the TEMPERATURE ALARM LED and restore normal operation The t...

Page 24: ...N This information can be found on the data plate located on the bottom left side of the refrigerator compartment Never call on unauthorized technicians and always refuse spare parts which are not ori...

Page 25: ...plein de votre r frig rateur Pour profiter plein de votre cong lateur Entretien et soins 32 33 Mise hors tension Nettoyage de l appareil Contre la formation de moisissures et de mauvaises odeurs D gi...

Page 26: ...un sol plat et rigide 2 Si le sol n est pas parfaitement horizontal vissez ou d vissez les petits pieds avant pour bien niveler l appareil Raccordement lectrique Apr s le transport placez l appareil...

Page 27: ...T CHILD LOCK Ce dispositif permet de verrouiller ou de d verrouiller les touches du tableau de bord pour viter toute manipulation de la part des enfants La LED CHILD LOCK s allume sur le tableau de bo...

Page 28: ...s suivantes la description des objets plus complexes Leur nombre et ou leur emplacement peut varier N existe que sur certains mod les PIED de r glage Balconnet amovible abattant contenant un SUPPORT A...

Page 29: ...e l appareil r gle automatiquement les temp ratures selon les conditions int rieures et ext rieures au r frig rateur avec une consommation minime d nergie le tout tant signal par l allumage de la LED...

Page 30: ...ateur R glez la temp rature l aide de l afficheur Pour congeler correctement les aliments en toute s curit proc der comme suit Ranger les aliments dans le compartiment du haut CONG LATION et CONSERVAT...

Page 31: ...vue 2 Attention ne pas d passer le niveau indiqu MAX WATER LEVEL Une trop grande quantit d eau g ne la sortie des gla ons si celase produit attendez que la glace fonde et videz le bac 3 Faites pivoter...

Page 32: ...casion la formation de taches Si vous devez laisser votre appareil teint pendant une p riode de temps prolong e nettoyez le bien l int rieur et laissez les portes ouvertes D givrage de l appareil Conf...

Page 33: ...onservation des aliments Remplacement de l ampoule d clairage Pour remplacer l ampoule d clairage du compartiment r frig rateur d branchez la fiche de la prise de courant Suivez les indications fourni...

Page 34: ...t con u et fabriqu conform ment aux normes internationales de s curit Ces conseils sont fournis pour des raisons de s curit et doivent tre lus attentivement Cet appareil est conforme aux Directives Co...

Page 35: ...les consommer dans les 24 heures ou de les recongeler apr s cuisson Pour faire cesser le signal sonore ouvrir et fermer la porte ou bien appuyer une fois sur les touches de r glage et de la temp ratu...

Page 36: ...jours pas et l inconv nient persiste faites appel au service apr s vente le plus proche de chez vous Signalez le type d anomalie le mod le de l appareil Mod le num ro de s rie S N Vous trouverez tous...

Page 37: ...Sistema de enfriamiento Utilizar el refrigerador en forma ptima Utilizar el congelador en forma ptima Mantenimiento y cuidados 44 45 Cortar la corriente el ctrica Limpiar el aparato Evitar la formaci...

Page 38: ...gido 2 Si el piso no fuera perfectamente horizontal compense los desniveles atornillando o desatornillando las patas delanteras Conexi n el ctrica Despu s de su transporte coloque el aparato vertical...

Page 39: ...D LOCK Permite activar o desactivar el bloqueo de los botones del panel de control para evitar que los ni os realicen involuntarias activaciones En el panel de control se enciende el LED CHILD LOCK Re...

Page 40: ...lejos se encuentra en las p ginas sucesivas La cantidad y o su ubicaci n pueden variar Se encuentra solo en algunos modelos PIE de regulaci n Balconcito extra ble con tapa con HUEVERA Balconcito extra...

Page 41: ...emperaturas en base a las condiciones internas y externas del frigor fico consumiendo una energ a m nima esto se se ala con el encendido del LED ECO en el panel de control Cuando se activa la funci n...

Page 42: ...a forma m s correcta y segura es necesario proceder como se indica a continuaci n Introduzca los alimentos en el compartimento superior CONGELACI N Y CONSERVACI N cuidando que los mismos no queden en...

Page 43: ...obstaculiza la salida de los cubitos de hielo si esto sucede espere hasta que el hielo se derrita y vac e la cubeta 3 Gire la cubeta 90 el agua llena las formas por el principio de vasos comunicantes...

Page 44: ...do en el compartimiento congelador recipientes con agua tibia Mantenimiento y cuidados Cortar la corriente el ctrica Durante los trabajos de limpieza y mantenimiento es necesario aislar el aparato de...

Page 45: ...nts dans le compartiment cong lateur attendez environ 2 heures pour le r tablissement des conditions id ales de conservation des aliments Sustituir la bombilla Para sustituir la bombilla de iluminaci...

Page 46: ...salir el fr o ver Mantenimiento El aparato ha sido proyectado y fabricado en conformidad con las normas internacionales sobre seguridad Estas advertencias se suministran por razones de seguridad y deb...

Page 47: ...s dentro de las 24 horas o volver a congelarlos previa cocci n Para apagar la se al sonora abra y cierre la puerta o presione una vez los botones y de regulaci n de temperatura del congelador Presi ne...

Page 48: ...o n mero de serie 195076094 00 03 2009 Xerox Fabriano La siguiente informaci n es v lida solo para Espa a Para otros pa ses de habla hispana consulte a su vendedor Ampliaci n de garant a Llame al 902...

Reviews: