background image

GB

15

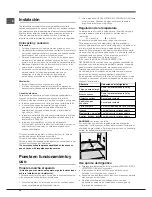
Installation

!

 Before placing your new appliance into operation please read

these operating instructions carefully. They contain important

information for safe use, for installation and for care of the
appliance.

!

 Please keep these operating instructions for future reference.

Pass them on to possible new owners of the appliance.

Positioning and connection

Positioning

1. Place the appliance in a well-ventilated humidity-free room.
2. Do not obstruct the rear fan grills. The compressor and

condenser give off heat and require good ventilation to
operate correctly and save energy.

3. Leave a space of at least 10 cm between the top part of the

appliance and any furniture above it, and at least 5 cm

between the sides and any furniture/side walls.

4. Ensure the appliance is away from any sources of heat (direct

sunlight, electric stove, etc.).

5. In order to maintain the correct distance between the

appliance and the wall behind it, fit the spacers supplied in
the installation kit, following the instructions provided.

Levelling

1. Install the appliance on a level and rigid floor.
2. If the floor is not perfectly horizontal, adjust the refrigerator by

tightening or loosening the front feet.

Electrical connections

After the appliance has been transported, carefully place it

vertically and wait at least 3 hours before connecting it to the
electricity mains. Before inserting the plug into the electrical

socket ensure the following:

• The appliance is earthed and the plug is compliant with the law.
• The socket can withstand the maximum power of the

appliance, which is indicated on the data plate located on the
bottom left side of the fridge (e.g. 150 W).

• The voltage must be in the range between the values

indicated on the data plate located on the bottom left side

(e.g. 220-240V).

• The socket is compatible with the plug of the appliance. If the

socket is incompatible with the plug, ask an authorised
technician to replace it (

see Assistance

). Do not use

extension cords or multiple sockets.

!

 Once the appliance has been installed, the power supply cable

and the electrical socket must be easily accessible.

!

 The cable must not be bent or compressed.

!

 The cable must be checked regularly and replaced by

authorised technicians only (see Assistance).

!

 The manufacturer declines any liability should these safety

 The manufacturer declines any liability should these safety

 The manufacturer declines any liability should these safety

 The manufacturer declines any liability should these safety

 The manufacturer declines any liability should these safety

measures not be observed.

measures not be observed.

measures not be observed.

measures not be observed.

measures not be observed.

Start-up and use

Starting the appliance

! Before starting the appliance, follow the installation
instructions (

see Installation

).

!

 Before connecting the appliance, clean the compartments and

accessories well with lukewarm water and bicarbonate.

1. Insert the plug into the socket and ensure that the internal

light illuminates.

2. Turn the TEMPERATURE ADJUSTMENT knob to an average

value. After a few hours you will be able to put food in the

refrigerator.

Setting the temperature

The temperature inside the refrigerator compartment
automatically adjusts itself according to the position of the

thermostat knob.

1

 = warmest

4

 = coldest

We recommend, however, a medium position.
The cooling section of the refrigerator is located inside the back

wall of the refrigerator compartment for increased space and
improved aesthetics. During operation, the back wall will be

covered in frost or water droplets depending on whether the
compressor is operating or paused. Do not worry, the refrigerator

is functioning normally.
If the REFRIGERATOR OPERATION knob has been set on high

values with large quantities of food and with a high ambient
temperature, the appliance can operate continuously, resulting in

excessive frost formation and excessive energy consumption:
compensate for this by shifting the knob towards lower values

(defrosting will occur automatically). In static appliances, the air
circulates in a natural way: the colder air tends to move

downwards as it is heavier. The food should be stored as follows:

Food 

Arrangement inside the 
refrigerator 

Fresh fish and meat 

Above the fruit and vegetable bins 

Fresh cheese 

Above the fruit and vegetable bins 

Cooked food 

On any shelf 

Salami, loaves of bread, 
chocolate 

On any shelf 

Fruit and vegetables 

In the fruit and vegetable 
compartment bins 

Eggs 

On the shelf provided 

Butter and margarine 

On the shelf provided 

Bottles, drinks, milk 

On the shelves provided 


SHELVES:

 with or without grill.

Due to the special guides the shelves are removable and the

height is adjustable (

see diagram

), allowing easy storage of

large containers and food. Height can be adjusted without

complete removal of the shelf.

Using the refrigerator to its full potential

• Use the TEMPERATURE ADJUSTMENT knob to adjust the

temperature (

see Description

).

• Place only cold or lukewarm foods in the compartment, not

hot foods (

see Precautions and tips

).

• Remember that cooked foods do not last longer than raw

foods.

• Do not store liquids in open containers. They will increase

humidity in the refrigerator and cause condensation to form.

Summary of Contents for TLA 1xx

Page 1: ...1 Assistance 3 Description of the appliance 6 Reversible doors 11 Installation 15 Start up and use 15 Maintenance and care 16 Precautions and tips 16 Troubleshooting 17 English English English English...

Page 2: ...Yhteenveto K ytt ohjeet 2 Huoltoapu 5 Laitteen kuvaus 9 Ovien avaussuunnan k nt minen 11 Asennus 30 K ynnistys ja k ytt 30 Huolto ja hoito 31 Varotoimet ja suosituksia 31 H iri t ja korjaustoimet 32...

Page 3: ...ariffe potrebbero essere soggette a variazione da parte dell operatore telefonico per maggiori informazioni consultare il sito www indesit com Assistance Before calling for Assistance Check if the mal...

Page 4: ...onsulte a su vendedor Para otros pa ses de habla hispana consulte a su vendedor Para otros pa ses de habla hispana consulte a su vendedor Para otros pa ses de habla hispana consulte a su vendedor Ampl...

Page 5: ...h nd se Feil og l sninger Dersom man til tross for alle kontroller ikke f r apparatet til fungere og feilen fortsatt er tilstede m dere kontakte n rmeste senter for teknisk assistanse Man m oppgi type...

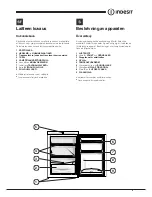
Page 6: ...estraibile PORTAOGGETTI 8 Scomparto per una BOTTIGLIA da 2 LITRI 9 Balconcino BOTTIGLIE Variabili per numero e o per posizione Presente solo in alcuni modelli Description of the appliance Overall view...

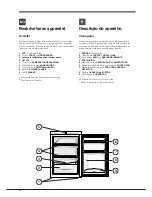
Page 7: ...Compartiment pour BOUTEILLE 2 LITRES 9 Balconnet BOUTEILLES Leur nombre et ou leur emplacement peut varier N existe que sur certains mod les Beschrijving van het apparaat Algemeen aanzicht Deze gebrui...

Page 8: ...acio para una BOTELLA de 2 LITROS 9 Balconcito BOTELLAS La cantidad y o su ubicaci n pueden variar Se encuentra solo en algunos modelos Beskrivelse af apparatet Komplet oversigt Brugervejledningen g l...

Page 9: ...stia 2 LITRAN PULLOLLE 9 PULLOHYLLYKK M r ja tai asento voivat vaihdella Olemassa vain tietyiss malleissa Beskrivning av apparaten versiktsvy Anvisningarna ang ende anv ndning g ller f r flera olika m...

Page 10: ...9 Hylle FLASKER Varierer med hensyn til antall og eller posisjon Kun p enkelte modeller Descri o do aparelho Vis o geral Estas instru es sobre a utiliza o s o v lidas para v rios modelos portanto poss...

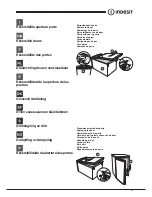
Page 11: ...bilidade da abertura das portas Rimozione della porta Remove the door D montage de la porte Het verwijderen van de deur Eliminaci n de la puerta Fjernelse af d ren Luukun poisto Borttagning av d rren...

Page 12: ...cchio Prima di avviare l apparecchio seguire le istruzioni sull installazione vedi Installazione Prima di collegare l apparecchio pulire bene i vani e gli accessori con acqua tiepida e bicarbonato 1 I...

Page 13: ...gliendo la protezione come indicato in figura Sostituirla con una analoga di potenza a quella indicata sulla protezione 10W Precauzioni e consigli L apparecchio stato progettato e costruito in conform...

Page 14: ...rande spreco di energia elettrica Sbrinare l apparecchio qualora si formasse del ghiaccio vedi Manutenzione uno spesso strato di ghiaccio rende pi difficile la cessione di freddo agli alimenti e fa au...

Page 15: ...eclines any liability should these safety measures not be observed measures not be observed measures not be observed measures not be observed measures not be observed Start up and use Starting the app...

Page 16: ...dicated on the cover 10W Precautions and tips The appliance was designed and manufactured in compliance with international safety standards The following warnings are provided for safety reasons and m...

Page 17: ...s see Maintenance A thick layer of ice makes cold transference to food products more difficult and results in increased energy consumption Regularly check the door seals and wipe clean to ensure they...

Page 18: ...ation Mise en service de l appareil Avant de mettre l appareil en service suivez bien les instructions sur l installation voir Installation Avant de brancher votre appareil nettoyez bien les compartim...

Page 19: ...he de la prise de courant Suivez les indications fournies ci dessous Pour pouvoir remplacer l ampoule d montez le couvercle de protection comme illustr voir figure Remplacez la par une ampoule semblab...

Page 20: ...d s que de la glace se d pose voir Entretien une couche de glace trop paisse g ne consid rablement la cession de froid aux aliments et augmente la consommation d lectricit Gardez toujours les joints p...

Page 21: ...aat in gebruik stelt dient u de instructies voor wat betreft de installatie na te volgen zie Installatie Voordat u het apparaat aansluit dient u zowel het koel als het diepvriesgedeelte alsook het toe...

Page 22: ...t met een lampje dat eenzelfde vermogen heeft als staat aangegeven op het kapje 10 W Voorzorgsmaatregelen en advies Het apparaat is ontworpen en vervaardigd volgens de geldende internationale veilighe...

Page 23: ...in het apparaat deze zouden de binnentemperatuur verhogen waardoor de compressor harder werkt en er een groter elektrisch verbruik ontstaat Houdt de afdichtingen effici nt en schoon zodat ze goed aan...

Page 24: ...marcha el aparato siga las instrucciones sobre la instalaci n ver Instalaci n Antes de conectar el aparato limpie bien los compartimientos y los accesorios con agua tibia y bicarbonato 1 Enchufe el a...

Page 25: ...ontinuaci n Acceda a la l mpara quitando la protecci n como se indica en la figura Sustit yala con otra bombilla con una potencia igual a la indicada en la protecci n 10 W Precauciones y consejos El a...

Page 26: ...ento una espesa capa de hielo vuelve m s dif cil la cesi n de fr o a los alimentos y hace que aumente el consumo de energ a Mantenga eficientes y limpias las juntas para que se adhieran bien a las pue...

Page 27: ...s Start og brug Start af apparatet Inden apparatet t ndes skal man f lge installationsinstruktionerne se Installation Inden apparatet tilsluttes skal man omhyggeligt reng re rum og tilbeh r i lunken v...

Page 28: ...ndringer 89 336 E F af 03 05 89 Elektromagnetisk kompatibilitet og senere ndringer 2002 96 CE Generelt om sikkerheden Apparatet er udviklet til ikke professionel brug i hjemmet Apparatet m skal anvend...

Page 29: ...r bedes du kontrollere at det ikke drejer sig om et simpelt problem der kan l ses ved hj lp af nedenst ende skema Den invendige lampe t nder ikke Stikket er ikke sat i stikkontakten eller det sidder i...

Page 30: ...tys ja k ytt Laitteen k ynnistys Ennen laitteen k ynnist mist noudata asennusohjeita katso Asennus Ennen kuin laite liitet n s hk verkkoon puhdista osastot ja lis varusteet huolellisesti l mpim ll ved...

Page 31: ...n osoitettu kuvassa Vaihda se samantehoiseen uuteen lamppuun teho osoitettu suojuksessa 10 W Varotoimet ja suosituksia Laite on suunniteltu ja valmistettu kansainv listen turvallisuusm r ysten mukaise...

Page 32: ...hk energiaa Puhdista laite huurteesta mik li muodostuu j t katso Huolto paksu j kerros tekee vaikeaksi kylm n vapauttamisen ruuille sek lis energiankulutusta Pid tiivisteet puhtaina ja tehokkaina jot...

Page 33: ...anvisningarna f ljas se Installation Innan apparaten ansluts ska utrymmena och tillbeh ren reng ras med ljummet vatten och bikarbonat 1 S tt in stickkontakten i v gguttaget och f rs kra dig om att lam...

Page 34: ...m ssig anv ndning i hemmet Apparaten ska anv ndas f r att f rvara och frysa mat Apparaten ska endast anv ndas av vuxna personer och i enlighet med anvisningarna i denna bruksanvisning Apparaten f r in...

Page 35: ...Kundservice se Kundservice ska du kontrollera att det inte r r sig om ett problem som kan tg rdas p ett enkelt s tt med hj lp av f ljande lista Lampan f r den inre belysningen t nds inte Stickkontakte...

Page 36: ...ar dersom disse reglene ikke overholdes Oppstart og bruk Oppstart av apparatet F r du starter opp apparatet m installasjonsanvisningene f lges se installasjon F r apparatet koples til m rommene og eks...

Page 37: ...av samme type som det som er angitt p dekslet 10 W Forholdsregler og gode r d Apparatet er blitt utformet og utviklet i overensstemmelse med internasjonale sikkerhetsnormer Disse advarslene blir gitt...

Page 38: ...turen internt og tvinge kompressoren til arbeide hardere noe som medf rer energisl sing Avrim apparatet dersom det danner seg is p innsiden se Vedlikehold et tykt islag gj r det vanskeligere avgi kuld...

Page 39: ...e utiliza o Iniciar o aparelho Antes de iniciar o aparelho obede a as instru es para a instala o veja a Instala o Antes de ligar o aparelho limpe bem os compartimentos e os acess rios com gua morna e...

Page 40: ...tru es Para obter acesso l mpada retire a protec o da maneira indicada na figura Substitua a por uma de pot ncia an loga indicada na protec o 10 W Precau es e conselhos Este aparelho foi projectado e...

Page 41: ...o de energia el ctrica Descongele este aparelho quando se formar gelo veja a Manuten o uma camada grossa de gelo torna mais dif cil a transmiss o do frio aos alimentos e aumenta o consumo de energia M...

Page 42: ...42 P...

Page 43: ...P 43...

Page 44: ...44 P 195051992 02 04 2010...

Reviews: