background image

HOW TO ADJUST THE TOMAHAWK S-Series Indoor Cycle

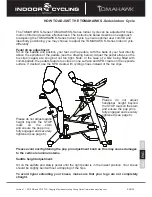
The TOMAHAWK S-Series TOMAHAWK S-Series Indoor Cycle can be adjusted for maxi-

mum comfort and exercise effectiveness. The instructions below describe one approach 

to adjusting the TOMAHAWK S-Series Indoor Cycle to ensure optimal user comfort and 

ideal body positioning; you may choose to adjust the TOMAHAWK S-Series Indoor Cycle 

differently.

Pedal strap adjustment:

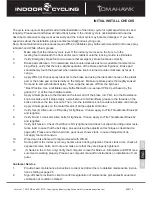
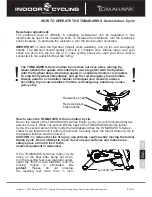
Sit on the saddle and position your feet on the pedals, with the balls of your feet directly 

above the spindles of the pedals (see the drawing below). Adjust the pedal straps so the 

toe clips (cages) are snug but not too tight. Note: In the case of a bike being fitted with

combi-pedals, the pedals feature toe clips on one surface and SPD cleats on the opposite

surface. If desired, use the SPD cleats with cycling shoes instead of the toe clips.

Saddle height adjustment:

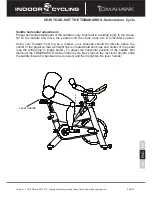
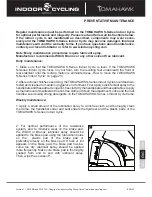
Sit on the saddle and slowly pedal until the right pedal is in the lowest position. Your knees 

should be slightly bent without a dropping of the hips.

To avoid hyper extending your knees, make sure that your legs are not completely 

straight.

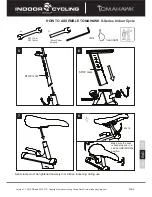
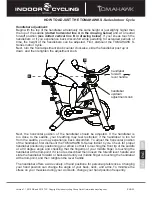
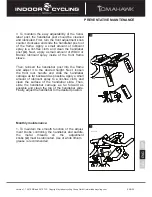
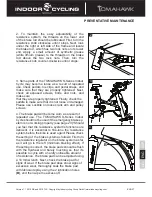
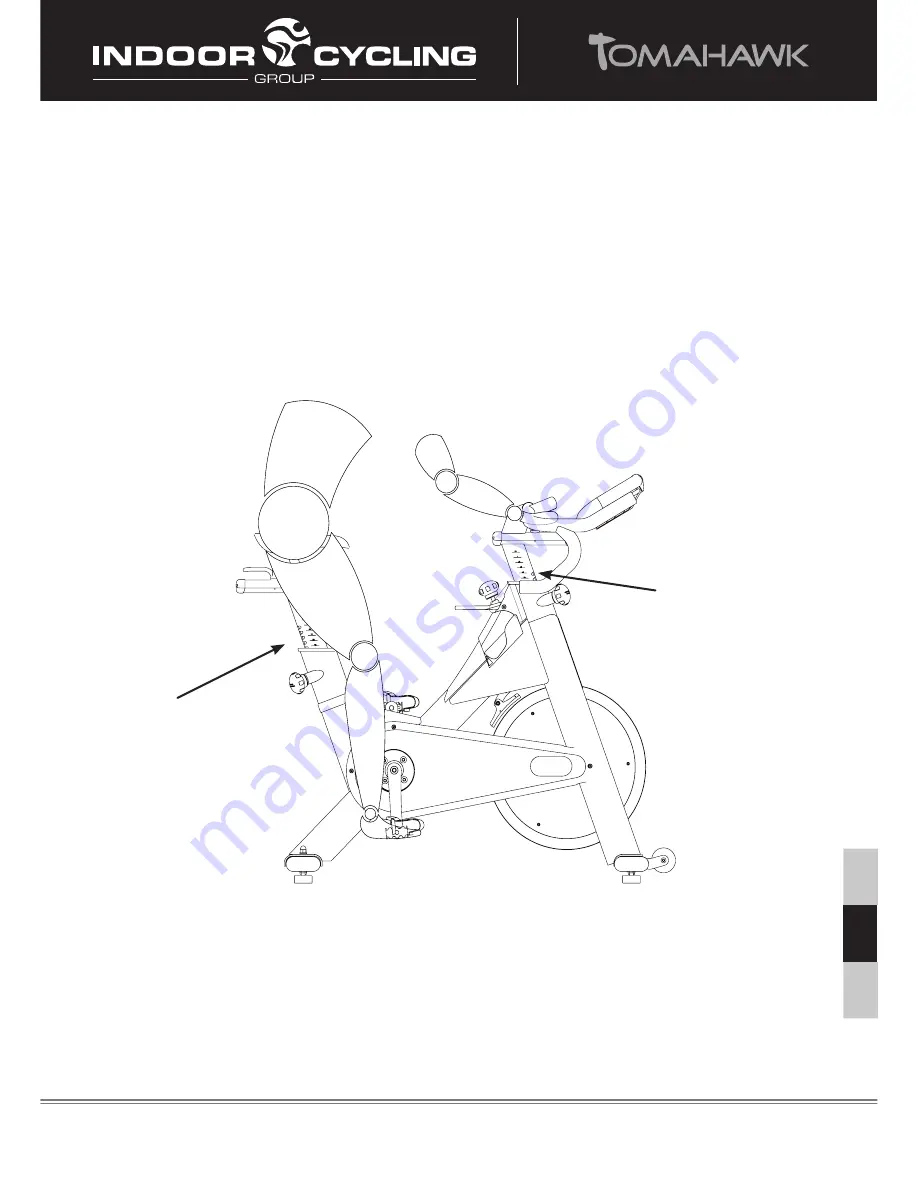
Please do not adjust

handlebar height beyond

the STOP mark on the stem 

and ensure the pop pin is 

fully engaged and securely 

tightened (see page


6).

Version 1.1  2010 SB and 2010 TLS  Copyright by Indoorcycling Group GmbH | www.indoorcycling.com      

ENG 20

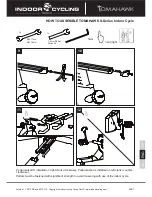
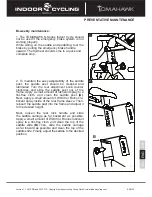
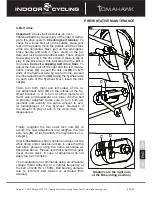
Please do not adjust saddle 

height beyond the STOP 

mark on the stem 

and ensure the pop pin is 

fully engaged and securely 

tightened (

see pag

e 6).

Please avoid overtightening the pop pin adjustment knob as this may cause damages 

to the vertical aluminum stems. 

ENG

DEU

ESP

Summary of Contents for Tomahawk 2010 SB TLS

Page 1: ...e Handhabung oder unzureichende Wartung f hrt zum Erl schen der Garantie Version 1 1 2010 SB and 2010 TLS Copyright by Indoorcycling Group GmbH 2010 www indoorcycling com DEU 1 TOMAHAWK S Serie Model...

Page 2: ...des TOMAHAWK S Series Indoor Cycle Seite 23 Regelm ige Pflege und Wartungsma nahmen Seite 24 T gliche Wartungsma nahmen Seite 24 W chentliche Wartungsma nahmen Seite 24 2 W chentliche Wartungsma nahme...

Page 3: ...es nicht erlaubt das Bike ohne Aufsicht durch einen dazu qualifizierten Instruktor oder Trainer zu verwenden Das Bike ist f r ein maximales Benutzergewicht von 130 KG ausgelegt Das Bike sollte nicht...

Page 4: ...arantieanfragen zwingend erforderlich Feststellhebel Kabelloser Bord computer special edition Dual Flaschenhalter EINF HRUNG Sehr geehrter Kunde Wir m chten uns zuerst f r Ihr Vertrauen und Ihre Kaufe...

Page 5: ...mentr ger und der Edelstahl beilagscheibe platziert sein Wichtig Sicherstellen das alle Verbindungselemente ausreichend Fest angezogen wurden Bitte stellen sich sicher dass die Plastikdich tung zwisch...

Page 6: ...ing com DEU 6 5 6 8 STOP Markierung STOP Markierung 14mm Wichtig 14mm Mutter der Sattelklemme ausreichend fest anziehen Sattel in vertikaler und horizontaler Position ausrichten 15mm Pedalschl ssel SW...

Page 7: ...festziehen standard Rechtsgewinde Das mit L markierte Pedal am linken Kurbelarm montieren und gegen die Uhrzeigerrichtung festziehen Linksgewinde Bitte darauf achten das beide Pedale mit ausreichender...

Page 8: ...and 2010 TLS Copyright by Indoorcycling Group GmbH www indoorcycling com DEU 8 DEU ESP ENG Der kabellose Radcomputer PRO 1 0 ist n i c h t im Standart Lieferumfang der 2010 SB Tomahawk S Serie enthal...

Page 9: ...nder Lenkerhalterung f r Computer Herzfrequenz Brustgurt Art nr 02 01 21 Art nr ST02 01 21 Art nr 02 01 23 Art nr ST02 01 23 Art nr 02 01 22 Art nr ST02 01 22 Art nr 02 01 25 Art nr ST02 01 25 2x 1x 1...

Page 10: ...r dass zwi schen Komponenten mit gleicher Kanaleinstellung mindestens 52 1 3m Abstand liegt Seite 14 Bild 10 Um sicher zu stellen dass das digitale Signal synchronisiert ist kontrollieren Sie bitte o...

Page 11: ...g com DEU 11 3 4 2 2 Bei Betrieb des Radcomputers mit wiederaufladbaren Batterien ist darauf zu achten das die Batterien ein Spannung von 1 5V nicht unterschreiten das es ansonsten zu Funktionsst rung...

Page 12: ...Version 1 1 2010 SB and 2010 TLS Copyright by Indoorcycling Group GmbH www indoorcycling com DEU 12 5 6 Sensor 5 2 Magnet Magnet handfest anziehen 1x PZ 2 MONTAGE DEU ESP ENG...

Page 13: ...Version 1 1 2010 SB and 2010 TLS Copyright by Indoorcycling Group GmbH www indoorcycling com DEU 13 7 8 3 1 x B 2 x A 1 x C 3 handfest anziehen 1x PZ 2 MONTAGE DEU ESP ENG...

Page 14: ...ng Group GmbH www indoorcycling com DEU 14 9 10 120 Digitaler Trittfrequenzsignalkegel 45 1 3 0 c m 5 2 i n c h Analoger Herzfrequenzsignalkegel r a Rad 1 Rad 2 Rad 3 Daten berschneidung keine Daten b...

Page 15: ...ble Herzfrequenzmessung integrierter Brustgurtempf nger Hintergrundbeleuchtung des Displays 5 sec Einfache Bedienung ber 2 Tasten Premium Produkt Design Spezielle Lenkerhaltung Kilometer oder Meilen A...

Page 16: ...miles Kilometer Einstellung Dr cken Sie die sun Taste f r 5sek um in den Einstellungs modus zu gelangen Wechseln Sie die Voreinstellung von miles in Kilometer indem Sie die flow Taste dr cken Best tig...

Page 17: ...nen ungenau sein berm iges Trainieren kann zu ernsthaftem gesundheitlichem Schaden oder zum Tod f hren Bei Schwindel Schw chegef hl sofort das Training beenden Dieses Ger t ist nicht daf r bestimmt du...

Page 18: ...terien auslaufen entfernen Sie sofort alle R ckst nde und setzen Sie neue Batterien in den Computer ein Bei Kontakt mit den R ckst nden entfernen Sie diese sorgf ltig Verwenden Sie nach M glichkeit wi...

Page 19: ...lasche und f llen diese mit treibmittel und s urefreien Schmierstoff um die Umwelt nicht unn tig zu belasten 5 Lithiumfett auf die Metallgewinde am unteren Ende der Bremszugstange geben Hierf r zuerst...

Page 20: ...lls Ihr Bike mit einem Kombipedalsystem ausger stet ist Fangen Sie an langsam zu treten bis das Pedal die im Bild gezeigte Position erreicht hat Die vertikale Sattelst tze sollte jetzt so eingestellt...

Page 21: ...n den Kniegelenken vorzubeugen Setzen Sie sich auf den Sattel und bringen Sie die Kurbelarme in die horizontale Position Das Kniegelenk am nach vorne gerichteten Bein sollte sich direkt ber derAchse d...

Page 22: ...Sie bitte Ihren Arm an und ber hren mit dem Ellenbogen das vordere Ende des Sattels Bei ausgestrecktem Unterarm sollte nun die Spitze Ihres Mittelfingers den Mittelpunkt des Lenkers ber hren Verstelle...

Page 23: ...liert um anzuhalten oder ziehen Sie den roten Notbremsgriff einfach nach oben um die Bewegung schnell zu verlangsamen damit die Schwungscheibe zum Stehen kommt um das Training zu unterbrechen Notbrems...

Page 24: ...ussaushygienischenGr nden nach jeder Benutzung durchgef hrt werden Sorgen Sie auch daf r dass ausreichend weiche Lappen oder Zellstofft cher sowie Wartungs und Desinfektionsmittel bereit stehen Desinf...

Page 25: ...tikale und horizontale Sattelst tze regelm ig gereinigt und eingefettet werden Hierzu nehmen Sie die komplette vertikale Sattelst tze A aus ihrer F hrung spr hen diese mit Wartungsspray ein und reiben...

Page 26: ...unststofff hrungsbuchsen um die Leichtg ngigkeit der vertikalen Verstellung zu gew hrleisten Reinigen Sie die Kontaktfl chen der horizontalen Lenkerverstellung B vorher von Schwei r ck st nden und spr...

Page 27: ...nicht ausreichend mit Wartungsspray behandelt wurden Warten Sie die Bremsbel ge indem Sie Wartungsspray in die daf r vorgesehenen War tungs ffnungen B am Bremsbelag spr hen Seite 24 3 Verbindungseleme...

Page 28: ...ung Wichtig Der Riemenantrieb darf aus Sicherheitsgr nden unter normalen Nutzungsbedingungen nicht durch rutschen Es ist darauf zu achten das die Riemen spannung gem den Herstellervorgaben akkurat ein...

Page 29: ...g Seite 23 25 Reinigung und Pflege der Sattelst tze und des Lenkers 14 t gig Seite 25 26 Wartung der Verstellkn pfe Monatlich Seite 26 berpr fung und Wartung des Bremssystems Monatlich Seite 27 berpr...

Page 30: ...w indoorcycling com DEU 30 14 t gige Checkliste Bike No Produktionscode Anmerkungen Handlung Resultat Name Datum Monatliche Checkliste Bike No Produktionscode Anmerkungen Handlung Resultat Name Datum...

Page 31: ...2 50 A S LS Spec Ed 02 50 02 02 50 01 02 50 06 SX 02 50 04 02 50 03 S 10 02 50 03 S LS 10 Spec Ed 02 50 05 SX 02 50 01 Antriebsteile 02 50 03 A SX nur schwarz 02 50 03 B 02 40 C S 08 02 40 CrMo R SX 0...

Page 32: ...TLS Copyright by Indoorcycling Group GmbH www indoorcycling com DEU 32 02 40 H L 02 40 02 Lenker 02 10 B 08 02 10 B LS Spec Ed 02 30 02 LX7 02 10 E 02 40 H 02 30 02 PK 02 30 02 PK ERSATZTEILE 02 40 0...

Page 33: ...ndoorcycling com DEU 33 02 10 A 02 20 04 2010 RA S silber 02 42 01 SX 08 02 42 03 S 10 02 42 03 S LS 10 Special Edition 02 99 03 02 42 02 S 10 02 42 02 TLS 10 Special Edition 02 42 04 Kettenkasten 02...

Page 34: ...2010 TLS Copyright by Indoorcycling Group GmbH www indoorcycling com DEU 34 Trittschutzplatten 02 99 11 02 99 10 02 99 02 10 HB optional bei S Serie 02 10 B LS Spec Ed 02 10 B 08 ERSATZTEILE Trittsch...

Page 35: ...and 2010 TLS Copyright by Indoorcycling Group GmbH www indoorcycling com DEU 35 Sattelaufnahme 02 21 S TLS Spec Ed 01 21 VL 3125 SW 02 21 AK 02 10 E Pedale 01 40 A2 02 21 05 AL 02 30 02 PK 2 Stk ERSA...

Page 36: ...doorcycling com DEU 36 Hinterer Stabilisator Vorderer Stabilisator 02 11 06 SX 08 02 11 B 02 11 A 02 11 06 SX 08 02 11 E 02 11 05 B 02 11 05 B ERSATZTEILE 02 11 01 SX 08 02 11 01 E 08 Spec Ed 02 11 02...

Page 37: ...01 40 A 3 Pedalriemen paar Rahmen 2010 RA S Rahmen S Serie silber 02 10 A Einschubbuchse vertikal 02 20 04 Anschlaggummi Lenker 02 99 02 10 FR Flaschenhalter Rahmen 02 99 02 10 HB Flaschenhalter Lenke...

Page 38: ...dcomputer PRO1 0 Art Nr ST02 01 20 1 Jahr Garantie Computer und Trittfrequenzsender Batterien sind von der Garantie ausgeschlossen GARANTIEZEITEN S Serie Indoor Cycle 10 Jahre Garantie Bruch der Rahme...

Page 39: ...void the warranty terms Version 1 1 2010 SB and 2010 TLS Copyright by Indoorcycling Group GmbH 2010 www indoorcycling com ENG 1 TOMAHAWK S series model no 2010 SB silver 2010 SB TLS black yellow speci...

Page 40: ...24 Bi Weekly maintenance page 25 Monthly maintenance page 26 27 Belt drive system page 28 Maintenance activity plan check lists page 29 30 Explosion drawings of structural components page 31 36 Spare...

Page 41: ...he TOMAHAWK S Series Indoor Cycle should not be used by persons weighing more than 290 pounds 130 kg Always wear appropriate athletic clothes and shoes while operating the TOMAHAWK S Series Indoor Cyc...

Page 42: ...l please contact Indoorcycling Group GmbH or refer to the website www indoorcycling com Before reading further please familiarize yourself with the parts that are labeled in the drawing below Version...

Page 43: ...ch 1x Assure that plastic gasket is placed between stabilizer and frame Assure that plastic gasket is placed between stabilizer and frame Assure that black rubber washer is placed between upper frame...

Page 44: ...om ENG 6 5 6 8 STOP mark STOP mark HOW TO ASSEMBLE TOMAHAWK S Series Indoor Cycle SW 17mm SW 14mm 3mm hand tight 2x 1x 14mm Seat clamp must be tightened securely to minimize loosening during use Make...

Page 45: ...TO ASSEMBLE TOMAHAWK S Series Indoor Cycle SW 17mm SW 14mm 3mm hand tight 2x 1x Pedal marked R installed on right crank clockwise Pedal marked L installed on left crank counter clockwise Pedals must b...

Page 46: ...uter PRO 1 0 Article no ST02 01 20 Article no 02 01 20 Version 1 1 2010 SB and 2010 TLS Copyright by Indoorcycling Group GmbH www indoorcycling com ENG 8 ENG DEU ESP Optional accessory wireless commer...
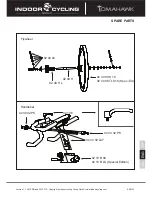
Page 47: ...1x 1x A B C 1x 2x 2x PZ 2 4 optional accessory Computer console Wireless cadence transmitter Computer mounting bracket Textile heart rate chest belt Art no 020121 Art no ST 020121 Art no 020123 Art n...

Page 48: ...between components set on identical channels or simply swap to another channel See therefor picture 10 To assure that the digital cadence signal is synchronized please assure that the channel setting...

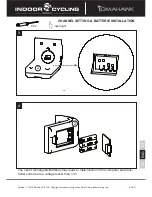
Page 49: ...ycling Group GmbH www indoorcycling com ENG 11 3 4 2 2 The use of rechargable Batteries may leads to male function of the computer and trans mitter units due to a voltage lesser than 1 5V CHANNEL SETT...

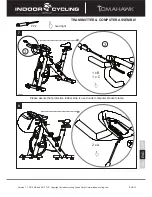
Page 50: ...y Indoorcycling Group GmbH www indoorcycling com ENG 12 5 6 5 sensor 2 Magnet Magnet Screws are made of plastic in order to avoid rust point Do not overtighten and strip the head sensor TRANSMITTER CO...

Page 51: ...Copyright by Indoorcycling Group GmbH www indoorcycling com ENG 13 7 8 3 1 x B 2 x A 1 x C 3 Please assure that protective rubber strip is used under computer bracket clamp TRANSMITTER COMPUTER ASSEM...

Page 52: ...ling Group GmbH www indoorcycling com ENG 14 9 10 120 digital cadence signal distribution 45 1 3 0 c m 5 2 i n c h analog heart rate signal distribution r a bike 1 bike 2 bike 3 cross reading no cross...

Page 53: ...sion integrated chest belt receiver Display background illumination 5 seconds Simple operation via Sun and Flow button Premium design Superior handlebar mounting bracket Optional setting for miles or...

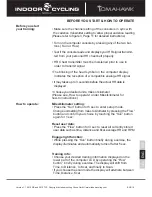
Page 54: ...ual HR data is displayed Choose your desired units miles or kilometer Please see How to operate under Miles kilometer for how to instructions How to operate Miles kilometer setting Press the Sun butto...

Page 55: ...e RPM average cadence RPM actual training information training time mile km presetting scan functionality for time distance and calories distance calorie consumption BEFORE YOU START HOW TO OPERATE WA...

Page 56: ...remove all residue immediately and insert new batteries into the computer If you come into contact with residue avoid contact with eyes and wash hands thoroughly If possible please use rechargeable ba...

Page 57: ...o the threads on the lower end of the brake rod First turn the Resistance knob clockwise until it stops Apply a small amount of white lithium grease to the threads on the brake rod above the two lock...

Page 58: ...oe clips on one surface and SPD cleats on the opposite surface If desired use the SPD cleats with cycling shoes instead of the toe clips Saddle height adjustment Sit on the saddle and slowly pedal unt...

Page 59: ...pedal so that a straight line is created between knee and center of the pedal see the dotted line in image below To adjust the horizontal position of the saddle first dismount the TOMAHAWK S Series In...

Page 60: ...To adjust the horizontal position of the handlebar first dismount the TOMAHAWK S Series Indoor Cycle Check for proper handlebar position by positioning your elbow so that it is touching the front tip...

Page 61: ...nce according to your own abilities Pull the red emergency handle up emer gency stop How to move the TOMAHAWK S Series Indoor Cycle Due to the weight of the TOMAHAWK S Series Indoor Cycle it is recomm...

Page 62: ...about maintenance contact your local distributor or refer to www indoorcycling com Note Many maintenance procedures require lubricant spray Manufacturer recommends WD40 Brunox or any other solvent fr...

Page 63: ...far backward as possible Apply a small amount of WD40 or Brunox lubricant spray to a lint free cloth and clean the top of the saddle slide B Then slide the saddle carriage as far forward as possible...

Page 64: ...t lock handle and slide the handlebar carriage as far backward as possible Apply a small amount of lubricant spray to a lint free cloth and clean the surface of the handlebar slide Then slide the hand...

Page 65: ...pad does show signs of excessive wear thoroughly soak the brake pad with lubricant spray using the 2 lubrication holes B and then wipe the excess off 3 Some parts of the TOMAHAWK S Series Indoor Cycle...

Page 66: ...ng belt tension To check for a loose belt sit on the saddle place your feet on the pedals move the pedals until the crank arms are horizontal Next pull up the emergency brake handle and hold it Then s...

Page 67: ...leaning of the bike daily page 23 Servicing brake pads detailed cleaning of the entire bike weekly page 24 Check emergency brake function bi weekly page 25 Clean and lubricate saddle and handlebar sli...

Page 68: ...aken Result Name date Bi Weekly maintenance Checklist Bike No Production code Observations Action Taken Result Name date Version 1 1 2010 SB and 2010 TLS Copyright by Indoorcycling Group GmbH www indo...

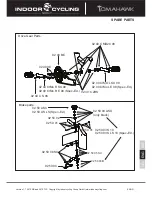
Page 69: ...o R SX 08 02 40 CrMo R E 08 Spec Ed 02 40 90 02 40 BE 02 40 C MD20 08 02 40 CrMO L SX 08 02 40 CrMo L E 08 Spec Ed 02 40 C 2RS Drive Gear Parts Brake parts 02 50 A SX 02 50 A S LS Spec Ed 02 50 02 02...

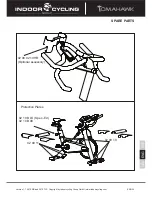
Page 70: ...yright by Indoorcycling Group GmbH www indoorcycling com ENG 32 02 40 H L 02 40 02 Handlebar 02 10 B 08 02 10 B LS Special Edition 02 30 02 LX7 02 10 E 02 40 08 S 10 02 40 08 TLS 10 Spec Ed 02 40 H 02...

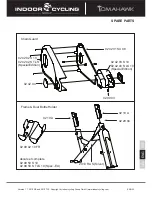
Page 71: ...ndoorcycling com ENG 33 02 10 A 02 20 04 2010 RA S Silver 02 42 01 SX 08 02 42 03 S 10 02 42 03 S LS 10 Special Edition 02 99 03 02 42 02 S 10 02 42 02 S TLS Special Edition 02 42 04 Chain Guard 02 99...

Page 72: ...2010 SB and 2010 TLS Copyright by Indoorcycling Group GmbH www indoorcycling com ENG 34 Protection Plates 02 99 11 02 99 10 02 99 02 10 HB Optional assessory 02 10 B LS Spec Ed 02 10 B 08 SPARE PARTS...

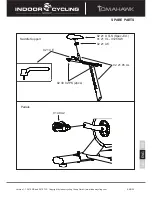
Page 73: ...and 2010 TLS Copyright by Indoorcycling Group GmbH www indoorcycling com ENG 35 Saddle Support 02 21 S TLS Spec Ed 01 21 VL 3125 SW 02 21 AK 02 10 E Pedals 01 40 A2 02 21 05 AL 02 30 02 PK 2pcs SPARE...

Page 74: ...ycling Group GmbH www indoorcycling com ENG 36 Rear Stabilizer Front Stabilizer 02 11 06 SX 08 02 11 B 02 11 A 02 11 06 SX 08 02 11 E 02 11 05 B 02 11 05 B SPARE PARTS 02 11 01 SX 08 02 11 01 E 08 Spe...

Page 75: ...A 2 Combi Pedals pair 01 40 A 3 Toe strap pair Frame 2010 RA S S Series frame Silver 02 10 A Vertical insert sleeve 02 20 04 Rubber stop handleb tube 02 10 B LS Pop pin adj knob Spe Ed 02 10 B 08 Pop...

Page 76: ...ies Indoor Cycle Version 1 1 2010 SB and 2010 TLS Copyright by Indoorcycling Group GmbH www indoorcycling com ENG 38 S Series TOMAHAWK S Series Indoor Cycle 10 Year warranty Frame 3 Year warranty Hand...

Page 77: ...las instrucciones descritas para montaje mantenimiento y funcionamiento del aparato El uso y manejo inapropiado montaje incorrecto y la falta de mantenimiento puede causar cancelaci n de la garant a T...

Page 78: ...semana 24 Mantenimiento cada dos semanas 25 Mantenimiento cada mes 26 27 Accionamiento por correa 28 Lista de chequeo y Plan para trabajos de cuidado y mantenimiento 29 30 Dibujos de los componentes...

Page 79: ...lificado La bicicleta est dise ada para un peso m ximo de usuario de 130 kg La bicicleta TOMAHAWK S Series no debe ser usada por personas que excedan este peso m ximo admisible Use ropa de deporte o d...

Page 80: ...namiento sin problemas durante muchos a os Version 1 1 2010 SB and 2010 TLS Copyright by Indoorcycling Group GmbH www indoorcycling com ESP 4 Importante El c digo de producci n de la bicicleta TOMAHAW...

Page 81: ...stico est colocada entre el estabilizador y el marco Aseg rese de que la guarnici n de pl stico est colocada entre el estabilizador y el marco La arandela negra de pl stico tiene que estar colocada e...

Page 82: ...8 Marca STOP Marca STOP SW 17mm SW 14mm 3mm Apretado a mano 2x 1x 14mm Las abrazaderas del sill n deben estar bien apretadas para evitar que se suelten durante el uso Aseg rese que el sill n est fijad...

Page 83: ...rcado con la letra R montado en sentido horario en la biela derecha R Pedal izquierdo marcado con la letra L montado en sentido antihorario en la biela izquierda L Preste atenci n a que los pedales es...

Page 84: ...ico PRO 1 0 Art culo n ST02 01 20 Art culo n 02 01 20 Version 1 1 2010 SB and 2010 TLS Copyright by Indoorcycling Group GmbH www indoorcycling com ESP 8 Accesorio opcional Computador inal mbrico p gin...

Page 85: ...C 1x 2x 2x PZ 2 4 Accesorio opcional Computador Transmisor de la caden cia de pedaleo Abrazadera del manillar para montaje del com putador Banda telem tica de pecho ritmo cardiaco Art n 020121 Art n S...

Page 86: ...componentes con igual ajuste de canal medie una distancia m nima de 52 1 3 m Cuando sea ne cesario tambi n es posible efectuar un cambio manual del canal P g 14 Fig 10 Para asegurar que la se al digit...

Page 87: ...www indoorcycling com ESP 11 3 4 2 2 Cuando se usan pilas recargables para el computador preste atenci n a que las pilas no excedan la tensi n de 1 5V ya que de lo contrario esto puede causar problem...

Page 88: ...pyright by Indoorcycling Group GmbH www indoorcycling com ESP 12 5 6 5 sensor 2 Im n Im n Los tornillos son de pl stico para evitar la oxidaci n No fuerce demasiado la cabeza del tornillo sensor Apret...

Page 89: ...TLS Copyright by Indoorcycling Group GmbH www indoorcycling com ESP 13 7 8 3 1 x B 2 x A 1 x C 3 Aseg rese que la banda protectora de goma est puesta debajo de la abrazadera del computador Apretado a...

Page 90: ...oorcycling com ESP 14 9 Cono de se al digital de la cadencia de pedaleo 45 1 3 0 c m 5 2 i n c h DISTRIBUCI N DE SE ALES 10 120 r a Bici 1 Bici 2 Bici 3 Solapamiento de datos Sin solapamiento de datos...

Page 91: ...eptor de la banda telem tica de pecho integrada Retroiluminaci n autom tica una vez activada la pantalla se ilumina en cada funci n activada en el curso del ejercicio 5 segundos Manejo c modo y f cil...

Page 92: ...que la fre cuencia cardiaca actual en la pantalla Seleccione su ajuste deseado Millas o Kil metros conmutable Mando y operaci n Ajuste de Millas Kil metros Presione el bot n Sun durante 5 segundos par...

Page 93: ...trenamiento Miles km preajuste Funci n scan Tiempo Distancia y Consumo de calor as Distancia Consumo de calor as ADVERTENCIA Los valores obtenidos a trav s de estos sistemas de monitoreo de la frecuen...

Page 94: ...longado de tiempo Si se producen fugas en las pilas elimine inmediatamente todos los residuos e instale pilas nuevas en el computador Si tiene contacto con los residuos remu valos con cuidado En lo po...

Page 95: ...e metal en el extremo inferior del tirante de freno Primero gire el bot n regulador de resistencia en sentido horario hasta que se pare Aplique un poco de grasa de litio sobre las roscas en el tirante...

Page 96: ...ilustraci n Nota Si la bicicleta est equipadao con un el sistema de pedales combi con calas SPD el usuario podr optar por zapatillas con calas o zapatillas normales de deporte Ajuste de la altura del...

Page 97: ...al creando una l nea perpendicular entre rodilla y centro del pedal ver la l nea rayada en la ilustraci n de abajo Para ajustar la posici n horizontal del sill n desm ntese primero de la bicicleta TOM...

Page 98: ...posici n horizontal del manillar Si el manillar est de masiado cerca del sill n puede ser que Vd se sienta restringido al respirar y si el manillar est demasiado lejos del sill n puede ser que le due...

Page 99: ...a hasta que la rueda pare por completo Por favor controle siempre sus movimientos y reduzca la veloci dad de forma controlada Para detener de inmediato la rueda de inercia tire la palanca roja del fre...

Page 100: ...elaci n debajo del estabilizador delantero o trasero hasta que el movimiento de balanceo quede eliminado 2 Limpieza La limpieza y desinfecci n peri dica de la bicicleta TOMAHAWK S Series debe realizar...

Page 101: ...l y suave marcha de la gu a corredera de ajuste de los sillines tiene que limpiar y engrasar en intervalos regulares el so porte del sill n tija Gire el bot n de ajuste en sentido antihorario y saque...

Page 102: ...illar en el tubo del marco aplique bastante spray lubri cante de modo uniforme en las correderas de pl stico para garantizar una f cil y suave mar cha del ajuste vertical Limpie antes los residuos de...

Page 103: ...uir piezas que muestren desgaste deterioro o da os ocasionados por el uso de la m quina for ros de freno sill n calzapi s correas pedales calas del sistema SPD 4 Pastilla de freno Dependiendo de las m...

Page 104: ...edales hasta que las bielas del pe dal est n en posici n horizontal Luego accione el freno de emergencia y balancee de pie en los pedales hacia delante y atr s Los pedales no deben tener juego longitu...

Page 105: ...Cada 2 semanas P gina 25 Limpieza y lubricaci n de barras y tubos del sill n y manillar Cada 2 semana P gina 25 26 Lubricaci n de los botones de ajuste y fijaci n Cada mes P gina 26 Comprobaci n y lub...

Page 106: ...bre DWxg Version 1 1 2010 SB and 2010 TLS Copyright by Indoorcycling Group GmbH www indoorcycling com ESP 30 LISTA DE CHEQUEO Y PLAN PARA ACTIVIDADES DE MANTENIMIENTO Lista de chequeo para cada 2 sema...

Page 107: ...istema de frenos 02 40 C S 08 02 40 CrMo R SX 08 02 40 CrMo R E 08 Spec Ed 02 40 90 02 40 BE 02 40 C MD20 08 02 40 CrMO L SX 08 02 40 CrMo L E 08 Spec Ed 02 40 C 2RS 02 50 A SX 02 50 A S LS Spec Ed 02...

Page 108: ...S Copyright by Indoorcycling Group GmbH www indoorcycling com ESP 32 02 40 H L 02 40 02 Manillar 02 10 B 08 02 10 B LS Spec Ed 02 30 02 LX7 02 10 E 02 40 H 02 30 02 PK 02 30 02 PK PIEZAS DE RECAMBIO 0...

Page 109: ...0 04 2010 RA S Plateado 02 42 01 SX 08 02 42 03 S 10 02 42 03 S LS 10 Special Edition 02 99 03 02 42 02 S 10 02 42 02 S TLS Special Edition 02 42 04 Protector de cadena 02 99 02 10 FR 02 10 A PIEZAS D...

Page 110: ...SB and 2010 TLS Copyright by Indoorcycling Group GmbH www indoorcycling com ESP 34 Placas protectoras 02 99 11 02 99 10 02 99 02 10 HB accesorio opcional 02 10 B LS Spec Ed 02 10 B 08 PIEZAS DE RECAM...

Page 111: ...TLS Copyright by Indoorcycling Group GmbH www indoorcycling com ESP 35 Soporte de sill n tija 02 21 S TLS Spec Ed 01 21 VL 3125 SW 02 21 AK 02 10 E Pedales 01 40 A2 02 21 05 AL 02 30 02 PK 2 piezas PI...

Page 112: ...up GmbH www indoorcycling com ESP 36 02 11 06 SX 08 02 11 B 02 11 A 02 11 06 SX 08 02 11 E 02 11 05 B 02 11 02 SX 08 02 11 02 E 08 Spec Ed 02 11 01 SX 08 02 11 01 E 08 Spec Ed 02 11 05 B PIEZAS DE REC...

Page 113: ...n ajuste Pop pin Soporte de sill n tija 02 21 S TLS Sill n Spe Ed 01 21 VL 3125 SW Sill n 02 21 AK Abrazadera de montaje sill n 02 21 05 AL Soporte de sill n horizontal y vertical 02 10 E Palanca de b...

Page 114: ...edal cubierta del sill n portabotellas DISPOSICIONES DE GARANT A Version 1 1 2010 SB and 2010 TLS Copyright by Indoorcycling Group GmbH www indoorcycling com ESP 38 Matrix Fitness Systems Corp garanti...

Reviews: