background image


MAF1000 OPERATION MANUAL

Page 3


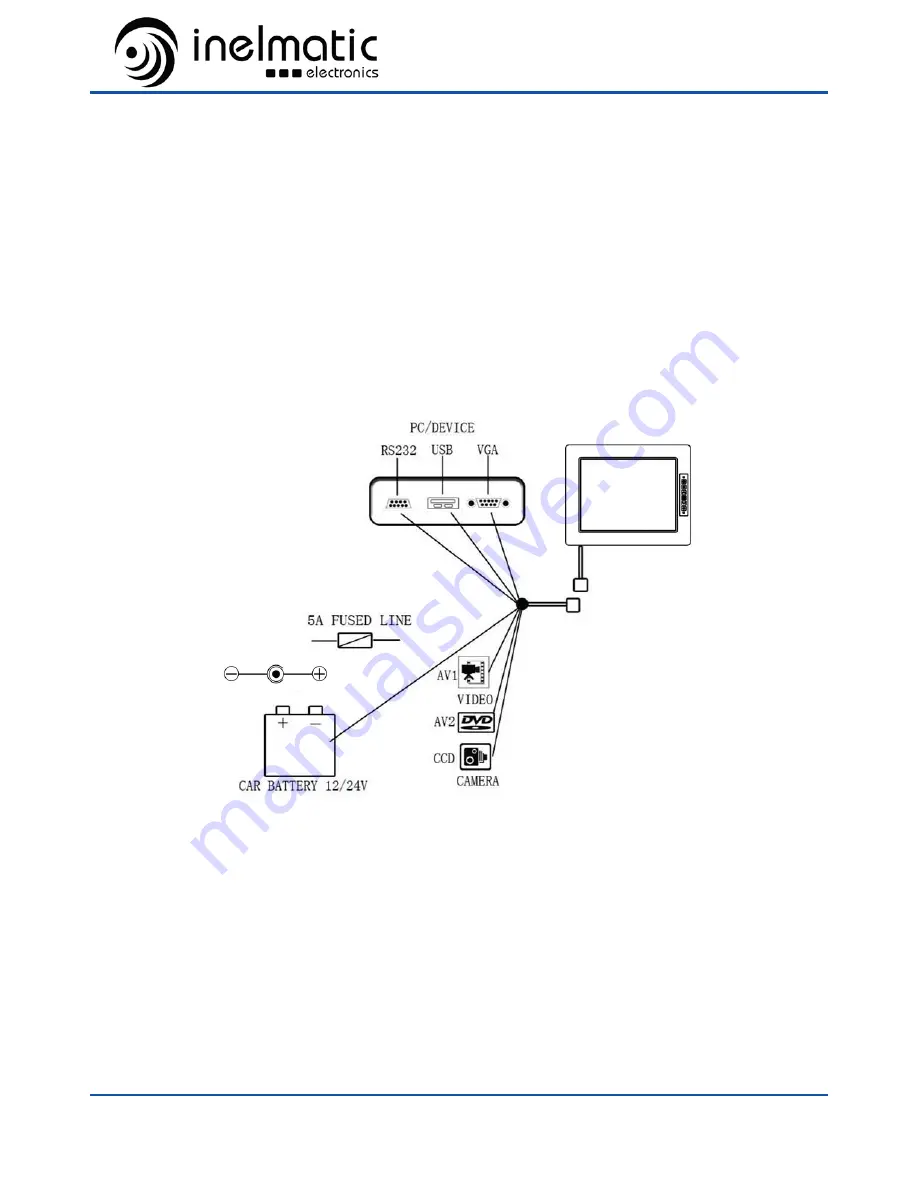
Typical connection:


Summary of Contents for MAF1000

Page 1: ...MAF1000 OPERATION MANUAL High Brightness 10 4 inch Industrial Monitor ...

Page 2: ...or is damaged The cable cord is damaged The equipment has obvious sign of breakage Environment To prevent the risk of fire electric shock or malfunction avoid using your equipement in environments where it will be exposed to Extreme temperatures over the operation range Heat sources such as radiators or stoves High humidity or moisture Excessive dust or sand Handling Do not place naked flame sourc...

Page 3: ...pecification Pag 1 3 Installation Pag 2 3 1 Connection Pag 2 3 2 Power on Pag 4 4 Adjusting Pag 4 4 1 Keyboard Pag 4 4 2 OSD On Screen Display Pag 5 4 3 Basic settings Pag 6 4 4 Advanced Settings Pag 7 5 Dimensions Pag 8 6 Packing Pag 9 7 Certifications Pag 10 ...

Page 4: ...cations Size 10 4 inches Aspect 4 3 Colors 256k Native resolution 1024 x 768px VGA modes VESA standard 640x480 to 1920x1440px Contrast 700 1 Inputs VGA DVI HDMI factory option 2x Composite Video Audio 2 x 1 8W stereo Optional Touch Panel Resistive 4 wires Endurance 2M touch Optional Power supply 9 36VDC automotive car truck suitable Power consumption T 8W HB 10W Dimensions 249 83 x 227 22 x 38 5mm...

Page 5: ...nput Left channel Video input AV1 Composite Video input 1 CCD Input Composite Video input with auto switch and auto start feature Auto switch the monitor will automatically switch to the CCD input when composite Video signal is present on CCD input The monitor will return to the previous input once the signal isn t present Auto start the monitor will automatically power on and switch to CCD input ...

Page 6: ...MAF1000 OPERATION MANUAL Page 3 Typical connection ...

Page 7: ...re are different ways to power on the monitor 1 Connect the VGA to any VGA source 2 Connect the Rear camera input to a CVBS source 3 Press the power on button until the monitor power on 4 Adjusting 4 1 Keyboard 1 Power on key 2 Show OSD window 3 Increase Brightness OSD Parameter 4 Source switching 5 Decrease Brightness OSD Parameter 6 Dimmer 7 Power on Indicator LED ...

Page 8: ...e Powered off Powered on Shortcut Powered on Menu opened Dimmer Switch to Auto Dimmer Roll parameter Dec Brightness Dec Dec Value OK Power on and roll source Roll Source Inc Brightness Inc Inc Value Accept Menu Open OSD Return Close Menu Power Power on Power Off Power Off ...

Page 9: ...MAF1000 OPERATION MANUAL Page 6 4 3 Basic Settings ...

Page 10: ...sly 4 4 1 Dimmer options The dimmer option allows to configure the values of brightness and backlight intensity for each step 1 Use to select the desired parameter 2 Use to enter in edit mode 3 Use and to adjust from 0 to 100 4 To exit roll to Exit using and press the settings are automatically stored ...

Page 11: ...MAF1000 OPERATION MANUAL Page 8 5 Dimmensions 5 1 Front profile 5 2 Rear ...

Page 12: ...ZE 33x25 5x10cm Q TY CTN 1 UNITS GW CTN kgs 2 46Kg 2 5 meter cable 2 62Kg 4 5 meter cable NW CTN kgs 1 86Kg 2 5 meter cable 2 02Kg 4 5 meter cable CTN SIZE 53x53x34cm Q TY CTN 10 UNITS GW CTN kgs 26 3Kg 2 5 meter cable 27 9Kg 4 5 meter cable NW CTN kgs 24 6Kg 2 5 meter cable 26 2Kg 4 5 meter cable ...

Page 13: ...t contain any of the restricted substances referred to in the European Union Commis sion Decision of August 18 2005 2005 618 EC in connection with Articles 4 and 5 of the RoHS Directive in concentrations in excess of the values permitted thereunder or because removal of the restricted substances is not technically possible and their existence in the products at levels in excess of these concentrat...

Reviews: