2 / 3
7
1
+
-
5
+
-
6
+
-
2
ON
1 2 3
4
+
-
3
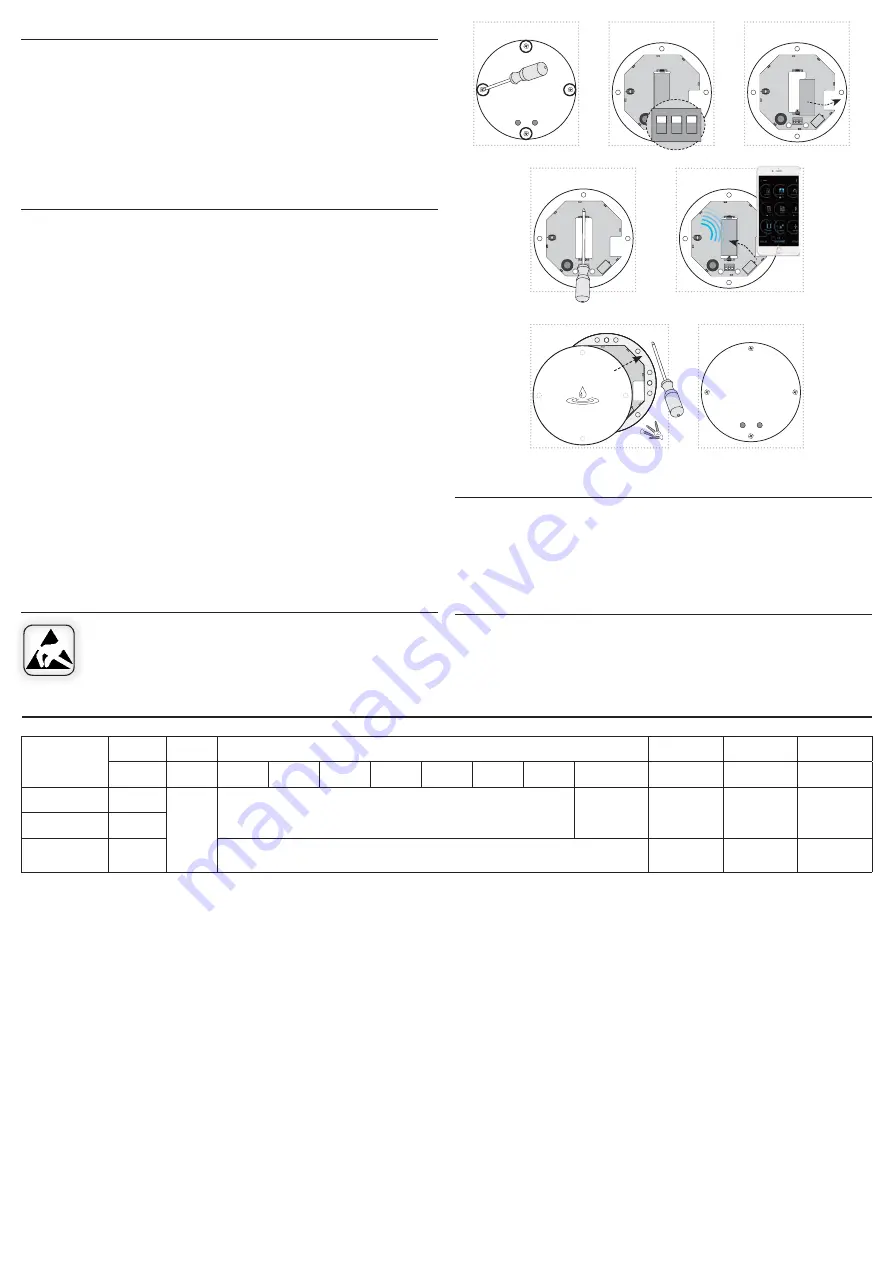
Replacement of a battery
1. Use a screwdriver to open the detector.
3. Remove the battery.
4. Use a metal object (such as a screwdriver) to connect the battery holders (to reset the
device). Caution - Do not touch other parts of the device with a metal object!
5. Insert the battery and check the correct location (when the battery is inserted, the
detector functionality message will be sent to the application).
6. Replace the seal, attach the front cover - make sure the correct location. Screw in,
tighten the screws to maintain IP protection.
7. Commissioning: To activate the detector, place a conductive object (such as the in-
cluded paper clips) on the sensing contacts. Hold for 20 seconds. The detector triggers
a light and beep and sends an initial message.
Notice:
Only use batteries designed for this product correctly inserted in the device! Immediately replace
weak batteries with new ones. Do not use new and used batteries together. If necessary, clean the
battery and contacts prior to using. Avoid battery shorts! Do not dispose of batteries in water or
fi re. Do not dismantle batteries, do not try to charge them and protect them from extreme heating
- danger of leakage! Upon contact with acid, immediately rinse the aff ected area with a stream of
water and seek medical attention. Keep batteries out of the reach of children. If it is suspected that
the battery has been swallowed or somehow placed inside the body, consult a doctor immediately.
Give the doctor information about the type of battery (from battery case, device or its manual, etc.)
to determine the chemical composition of the battery. Batteries must be recycled or returned to an
appropriate location (e.g. collection container) in accordance with local legal provisions.
Signal settings
1. Use a screwdriver to open the detector.
2. Set the DIP as required (all DIP switch positions are on by default).
- Position 1: turn off optical signal
- Position 2: turn off mechanical signal
- Position 3: turn off sound signal
6. Replace the seal, attach the front cover - make sure the correct location. Screw in,
tighten the screws to maintain IP protection.
UPLINK
Byte
0
1
2
3
Port
Bit
7
6
5
4
3
2
1
0
NOTIFICATION
1
Reserved for future use
„Flood:
1 - alarm
0 - OK“
HEARTBEAT
2
START
3
Version FW
Subversion
FW
Version FW
LoRaWAN
Subversion
FW LoRaWAN
Safe handling
Placement recommendations
Place the activated detector on a flat, non-conductive surface where flooding is likely.
The detector requires no maintenance and is intended for indoor use.
If a fl ood is detected, your immediate attention and action is required.
It is essential to identify the source of the fl ood and take appropriate action.
What to do when fl ood is detected
When handling a device unboxed it is important to avoid contact with
liquids. avoid unnecessary contact with the components of the device. Do
not touch the metal objects inside the unit.


