background image

 
C-COM Satellite Systems Inc. 


Page 104 of 164 


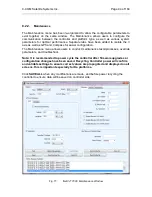
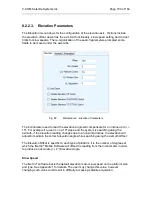
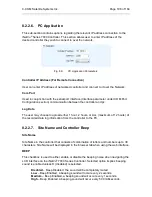
8.2.2.5.  Polarization Parameters 

 
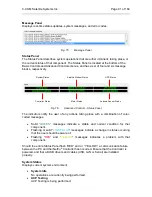
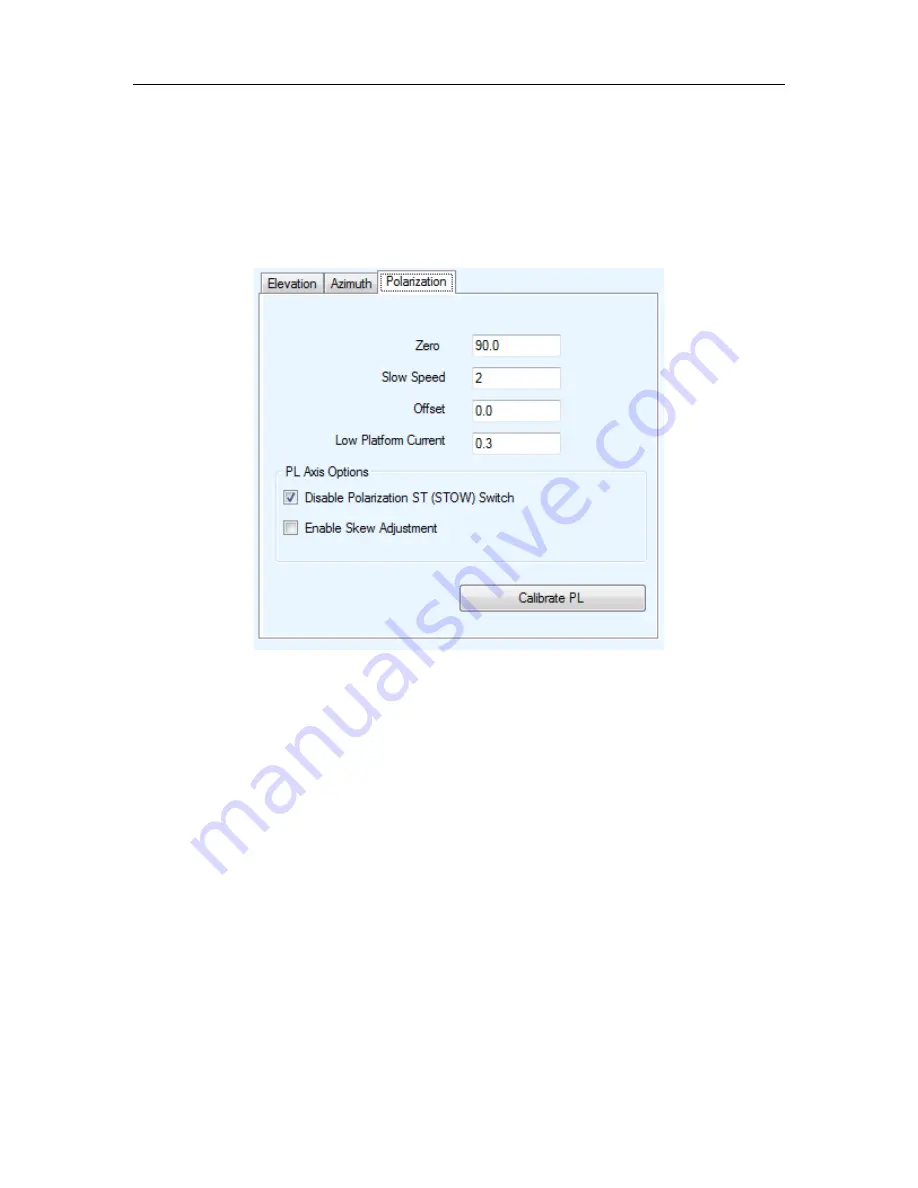
The Polarization menu allows for the configuration of the polarization axis.  Options 
include the setting of (PL) Zero, skew adjustment and stow limit functionality, polarization 
offset, slow speed, and current limits for slow speeds. 


Fig. 85: 

Maintenance - Polarization Parameters 

Zero  

 
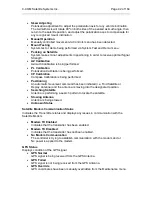
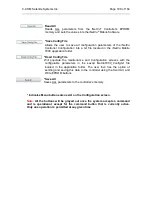
PL Zero is an A/D converted value from the Potentiometer and or a calculated value 
acquired from the Inclinometer Tilt Sensor which exists on all New Generation platforms 
and newer versions of the Legacy platforms. The Tilt Sensor is replacing the 
Potentiometer which physically determines where the iNetVu

®

 Mobile Software places 

Polarization Angle 0. The Zero value may vary approxi/-15% from the default 
values for all platforms using potentiometers (see Appendix 1). The Tilt Sensor provides 
better accuracy than the Potentiometer. The PL Zero is calculated along with PL offset 
during the Polarization Calibration process on platforms with Tilt Sensors and entering a 
calibrated value in the Zero field. The Tilt Sensor must be levelled prior to calibration to 
ensure the calculated PL Zero value that gets populated in the Zero field is accurate. 
The Tilt Sensor calibration process is not valid on the following platform types with 2 axis 
(Ka-75V, Ka-98H, 98G and Ka-98V) and button will be grayed out. 
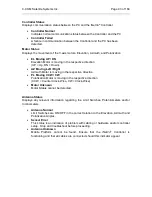
The user may manually calibrate and edit these values through this window; however 
any changes may result in failure to recognize the correct 0 location. See Appendix 1 for 
Potentiometer and Tilt Sensor Zero default values. 

Summary of Contents for 7000 Series

Page 1: ...ntroller User Manual With SW FW 7 5 8 0 The iNetVu brand and logo are registered trademarks of C COM Satellite Systems Inc Copyright 2009 C COM Satellite Systems Inc 1 877 iNetVu6 www c comsat com May 27 2015 Revision 1 48 ...

Page 2: ...C COM Satellite Systems Inc Page 2 of 164 This page is intentionally left blank ...

Page 3: ... except as followed under the copyright laws Both the iNetVu and C COM names and logos are registered trademarks of C COM Satellite Systems Inc Intel Pentium is a registered trademark of Intel Corporation Microsoft Windows Windows NT and MapPoint are registered trademarks of Microsoft Corporation All other product names mentioned in this manual may be trademarks or registered trademarks of their r...

Page 4: ...n locations that are not readily accessible to children and in a manner that prevents human exposure to potential radiation hazards 4 For large vehicles with roof mounts the height of the bottom lip of the earth station when fully deployed must be at least six feet above the ground at all times or six feet above a surrounding surface which a person may easily access 5 If a roof access ladder or an...

Page 5: ...itions This includes but is not limited to damages caused by improper installation or due to the failure to provide required information to the end user Note 1 This equipment has been tested and found to comply with the limits for a Class B digital device pursuant to Part 15 of FCC rules These limits are designed to provide reasonable protection against harmful interference when the equipment is o...

Page 6: ...ial RS232 Setup 24 6 6 Existing iNetVu Mobile Platform Installation 25 7 iNetVu Front Panel Operation 27 7 1 LED Definition 27 7 2 Manual and Automatic Controls Button Operation 28 7 3 LCD Screen and Navigator Keypad Operation 29 7 4 Front Panel Menu Navigation Tree 30 7 5 Opening Screen 31 7 6 Main Menu 31 7 6 1 MONITOR 32 7 6 1 1 MAIN 33 7 6 1 2 EL 35 7 6 1 3 AZ 36 7 6 1 4 PL 37 7 6 1 5 GP 38 7 ...

Page 7: ...4 8 2 2 1 Platform Parameters 95 8 2 2 2 GPS and Compass 96 8 2 2 3 Elevation Parameters 100 8 2 2 4 Azimuth Parameters 102 8 2 2 5 Polarization Parameters 104 8 2 2 6 PC Application 106 8 2 2 7 Site Name and Controller Beep 106 8 2 2 8 Maintenance Menu Buttons 107 8 2 3 Configuration 109 8 2 3 1 Target Satellite Parameters 110 8 2 3 2 Reference Satellite Parameters 113 8 2 3 3 Modem Parameters 11...

Page 8: ... Management 146 12 APPENDICES 147 12 1 Appendix 1 Default Limits and Configuration Data Tables 148 12 2 Appendix 2 Compass Direction and System Ref AZ Table 151 12 3 Appendix 3 LCD Table Summary 152 12 4 Appendix 4 Router Configuration Example 156 12 5 Appendix 5 Tooway Look up Table 157 12 6 Appendix 6 DC Input Power Cable Connectivity 161 12 7 Appendix 7 Declaration of Conformity 163 Proprietary...

Page 9: ...S Module inside and the capability to connect an external GLONASS GPS device via serial port a DVB S2ACM CCM Tuner an onboard LCD displaying real time system status and a Keypad Navigator makes using the iNetVu 7000 Series Controller extremely simple The iNetVu 7000 Series Controllers along with any iNetVu platform can work as a complete stand alone unit No modem or RF splitters are required for s...

Page 10: ...or Signal Input Female DB26 Connector GPS Connector SMA Sub Miniature Version A Rx Connector Type F RG6 PC Interface USB Interface Network Interface Serial Interface Web Interface Front Panel Interface Automatic and Manual Control Keypad LCD Screen and Keypad Navigator Tuner Specifications RF Input Range 950MHz to 2150MHz Input Signal Level 65dBm to 25dBm Input Output Impedance 75 Ω Symbol Rate 1 ...

Page 11: ...ons Manual Control Buttons Front Panel LEDs Keypad Navigator Reset Button LAN Network Interface SENSORS 26 pin Interface for Sensor Cable MOTOR POWER 9 Position Interface for Motor Control Cable Power Input 90 264 VAC Power Input and Switch USB USB Interface RX OUT Additional Receive Signal output RX IN Receive Signal from iNetVu Mobile Platform 12 24 VDC Power Input External VDC Power Input Groun...

Page 12: ...System Manual for configuration procedures corresponding to the service used This situation or practice might result in property or equipment damage Ensure Sensor and Motor cables are connected prior to powering on 7000 Series Controller Do not connect or disconnect cables once controller has been powered on It is recommended that controller is properly grounded at all times NOTE The 7000C 7024C c...

Page 13: ...els Only See Appendix for VDC power input external cable wiring RX IN GPS Glonass Antenna 1201 iNetVu Mobile Platform MOTOR CONTROL TX Satellite Modem VSAT 100 260VAC TX OUT RX IN SENSOR CABLE RX RX OUT Ground Connection RG6 Coaxial Cable Network Cable Power Cable Sensor Cable Motor Control Cable Ground Connection Ground protection External grounding connection 12 24 VDC Power Input 7000C 7024C mu...

Page 14: ...pendix for VDC power input external cable wiring GPS Antenna MOTOR CONTROL TX Satellite Modem VSAT TX OUT RX IN SENSOR CABLE 100 260VAC Network Cable USB Cable RX RX RX OUT Ground protection External grounding connection iNetVu Mobile Platform RG6 Coaxial Cable Network Cable Power Cable Sensor Cable Motor Control Cable USB Cable Ground Connection 12 24 VDC Power input 7000C 7024C must use the GLON...

Page 15: ...endix for VDC power input external cable wiring Satellite Modem VSAT iNetVu Mobile Platform SENSOR CABLE MOTOR CABLE 100 260VAC RX TX RX IN RX OUT Serial Port RS232 TX Out RX IN GPS Glonass Antenna Network Cable Ground protection External grounding connection RG6 Coaxial Cable Network Cable Power Cable Sensor Cable Motor Control Cable Serial Cable Ground Connection 12 24 VDC Power input 7000C 7024...

Page 16: ...y See Appendix for VDC power input external cable wiring 100 260VAC GPS Glonass Antenna MOTOR CONTROL SENSOR CABLE Satellite Modem VSAT RX OUT Network Cable RX IN TX RX TX OUT RX IN Ground protection External grounding connection iNetVu Mobile Platform 12 24 VDC Power input 7000C 7024C must use the GLONASS GPS antenna that was shipped with the controller Motor Control Cable RG6 Coaxial Cable Netwo...

Page 17: ...t feature is available in the 7000C and 7024C Models Only See Appendix for VDC power input external cable wiring RX GPS Glonass Antenna iNetVu Mobile Platform MOTOR CONTROL TX Satellite Modem VSAT 100 260VAC TX OUT RX SENSOR CABLE If the splitter option is used ensure the LNB Power is disabled in the 7000 Series Controller See section 8 1 3 1 LNB Power for more detail RX IN Ground protection Exter...

Page 18: ...llation If you are installing the iNetVu 7000 Series Controller onto a rack ensure that you use supporting rails or a shelf to support the weight of the iNetVu 7000 Series Controller and use the provided ears brackets to fasten the unit to the rack face 6 2 iNetVu Software Software and USB Driver Installation It is recommended that the previous software be uninstalled before installing latest soft...

Page 19: ...ftware have been installed 1 Install the software from the Memory Stick or from a downloaded file by double clicking on iNetVuSetup exe and follow the installation wizard Note The Driver installation will be done in two stages FTDI CDM Drivers and USB Drivers 2 Install the iNetVu 7000 Software and close when complete ...

Page 20: ...the FTDI USB Drivers and iNetVu USB Drivers Both are required Click Extract Click Next Click Finish 4 Click Next on Device Driver installation Wizard window Two windows may appear one for FTDI and one for Legacy click Next on both Click Next Click Finish ...

Page 21: ...are wizard and let windows automatically install the drivers Select No not this time Select Install the software automatically Click Continue Anyway Click Finish 7 Now that the drivers and software package has been installed connect the iNetVu 7000 Controller via USB to your PC 8 Windows Vista and 7 users the drivers should install automatically without any further user action when the controller ...

Page 22: ...r click NO to proceed to the iNetVu Mobile 7000 software NOTE It is recommended that you continue to the iNetVu Setup Wizard and confirm all required information is correct Please select Do not show this message again so this pop up will not appear after you have completed the initial Controller setup 2 If the controller firmware does not match you will be prompted to update ...

Page 23: ...ions to update the controller firmware Once complete the wizard will resume 4 You may wish to continue through the wizard to complete the controller configuration or verify the settings You can switch to the iNetVu software at any time by right clicking and selecting Controls ...

Page 24: ...the C2 option in the controller to PC 9600 to do this advance to CONF2 option on the controller key pad and depress ENTER button in the password field enter the password if this was changed from the default If default password has not been changed press up arrow followed by the ENTER button 4 Navigate to the C2 menu option and press the ENTER button 5 Using the up arrow button change the C option ...

Page 25: ...1800 version 2 0 and all new generation platforms and set the iNetVu Mobile Platform Serial Number prior to searching for satellite LCD Method 1 Advance to the Operations menu using the and arrows on the keypad 2 Advance to AZC using the and arrows and press the Enter key on the keypad IMS will begin the Azimuth Calibration Function Verify that there are no obstructions that would impede a full Az...

Page 26: ...the or to change the value of the digit The iNetVu Mobile Platform Serial Number and Hardware Version will be found on your iNetVu Mobile Platform ONLY the LAST 5 DIGITS need be entered for the Serial No Older systems may have ONLY 4 DIGITS Note When configuring iNetVu system you must enter serial number first then select platform type not following this priority order may result in inaccurate val...

Page 27: ... to move COMM LOCK Indicates Communication between Controller and Modem it also indicates communication between GPS and controller NA must be selected when checking GPS communication status Slow blinking 2 sec intervals indicates no communication Slow blinking 1 sec intervals indicates idle communication TX EN Solid Light indicates transmitter has been enabled STOW Light indicates iNetVu Mobile Pl...

Page 28: ...election and press FIND SAT will launch satellite search routine on that selection Search routine will ignore GPS and RF status until after compass heading has been read to reduce search time If GPS and RF conditions not met after 60 seconds the search will fail and a message will be displayed How to Stow the Antenna Press STOP STOW Button and hold for 2 seconds iNetVu Mobile Platform will automat...

Page 29: ... OFF is controlled by the external source How to Reset the Controller Press RESET Button Power cycles the iNetVu Controller DOES NOT reset default values 7 3 LCD Screen and Navigator Keypad Operation Fig 13 iNetVu 7000 Series Controller LCD and Keypad Navigator Used to move the cursor position Used to select a displayed function Used back out of a selection and return the display to the previous s...

Page 30: ...nclude 1 Navigating to the CONF1 menu on the main screen using the button 2 Press the ENTER button once the cursor is above the CONF1 menu 3 At this point the user should be in the CONF1 menu after entering password and can select any of the sub categories available Press the ENTER button once the cursor is above the S1 sub category 4 To change the longitudinal coordinate of the target satellite n...

Page 31: ...PERATION This menu branch allows the user to perform miscellaneous functions such as enabling disabling the transmitter Find Satellite Stow and perform axes calibrations etc CONF1 This menu branch allows the user to configure and save the 5 Satellite parameters with 5 Beacon settings as well as other configurable options for satellite searching CONF2 This menu branch allows the user to configure t...

Page 32: ... PL Polarization Displays real time current drawn and speed settings for the polarization motor as well as real time polarization angle and limits window size and PL zero GP Displays GPS Status and coordinates SM Search Mode Displays compass status Search Mode RF status S1 Satellite Displays Target Satellite longitude and the antennas target coordinates This branch also contains the DVB Carrier pr...

Page 33: ...levation Stow Indicator is ON for mobile drive away units U Elevation up Limit has been reached Typically set above 75 for 1200 1500 1800 Mobile Platforms above 65 for 740 950 980 Mobile Platforms and above 90 for the 1201 985 755 Drive away Platforms The Flyaway is set above 78 D Elevation down Limit has been reached Typically set between 5 and 10 for 1200 1500 1800 Mobile Platforms and between 0...

Page 34: ... Compass Status has failed O GPS Compass Coordinates have been overridden 5 System Status status meanings explained in the software section of this report AC Azimuth Calibration AT ACP Testing CC Compass Calibration DT Dish Testing II Idle MM Manual Movement PC Polarization Calibration PK Peaking PA PE PS Positioning SR Searching ST Stowed 6 Receive RF DVB Signal Receive RF Signal as measured from...

Page 35: ...ngle has reached the stow position Antenna Stowed The inclinometer used to read the elevation angle will compensate for an incline up to 15º For example if a user is on a 10º slope and the system is searching along the azimuth if the elevation reading changes due to a horizontal incline the elevation will adjust to maintain the correct elevation angle while searching along the azimuth 2 Current an...

Page 36: ...ngle e g O 31 implies elevation offset of 31 These values initially default and are set after target calibration is performed 6 Elevation of Compass Reading Status Number of degrees that the Antenna requires to be elevated to ensure that the compass is level and is able to acquire an accurate compass reading see Appendix 1 for default values 7 6 1 3 AZ Displays real time current drawn and speed se...

Page 37: ...on process 7 6 1 4 PL Displays real time current drawn and speed settings for the polarization motor as well as real time polarization angle and limits offset and PL zero Fig 21 PL Polarization Display 1 Real Time Polarization Angle P Polarization Indicates the real time polarization angle of the iNetVu Antenna S The letter S will appear to indicate the stow Limit has been reached on the polarizat...

Page 38: ...forms 980 and 1200 version 3 0 and all platforms equipped with the inclinometer tilt sensor PL Zero value is set to 90 2 for all tilt sensor equipped units 7 6 1 5 GP Displays GPS Status and current GPS Heading Fig 22 GP GPS Display 1 GPS Status V V GPS Status is Valid second V is for Velocity Status F GPS Status has failed O GPS Coordinates have been overridden 2 GPS Coordinates LA Current Latitu...

Page 39: ...n entered manually considered FS Full Search searches a full 360º search window 3 Compass Heading Calibrate Check Compass Routine Displays Compass Heading after Compass has been read Approximate Headings North 354 East 87 South 176 West 265 Antenna will rotate 90 to each of the following positions and read the compass at each 0 90 180 90 0 and display the compass headings Vehicle front end windshi...

Page 40: ...h and Polarization coordinates respectively 4 Transponder Number There are usually six 6 transponders for each satellite stored into the controller memory 0 2 are horizontal receive and 3 5 are vertical receive the user may overwrite the transponder data with his her own see configuration section 5 DVB Transponder Frequency MHz 6 Transponder Symbol Rate Ksps 7 Transponder Code Rate DB 1 1 2 DB 2 2...

Page 41: ...tus E implies the target satellite option is enabled 2 Reference Satellite Antenna Elevation Azimuth and Polarization coordinates respectively 3 Transponder Number for reference satellite There are six 6 transponders for each satellite stored into the controller memory 0 2 are horizontal receive and 3 5 are vertical receive The user may overwrite the transponder data 4 Reference Satellite DVB Tran...

Page 42: ...te with the 7000 Series Controller See iNetVu User Manual Beacon Receiver 7000 Controller section for details 7 6 1 9 1 Hughes Modem Status Only 1 Modem Communication Status INIT will appear if still initializing or no communication NA will appear if no modem selected SQ will appear with after modem communication is establish Modem TX Disabled 2 Displays the status of the TX satellite receiver tra...

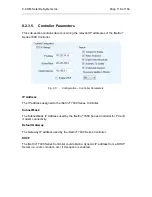
Page 43: ...e IP address of the user configured iNetVu 7000 Series Controller and Modem Ensure the IP address of the modem configured is the actual IP address of the modem and that the 7000 Controller is operating on the same network as the modem Fig 27 IP Controller and Modem IP Display 1 C_IP iNetVu 7000 Series Controller s IP Address Default 192 168 0 2 2 M_IP The Modem IP configured in the 7000 Series Con...

Page 44: ...ition on the Blue Beam Find Satellite BEAM ID Performs automatic satellite acquisition on the Beam ID selected BLU BM01 SS1 Find Satellite 1 Performs automatic satellite acquisition for configured satellite 1 Find Satellite ORG Performs automatic satellite acquisition on the Orange Beam ORG SS2 Find Satellite 2 Performs automatic satellite acquisition for configured satellite 2 Find Satellite PRP ...

Page 45: ...h the Satellite Modem and using the GPS coordinates the compass heading and internal parameters of the Satellite Modem Typically it takes approximately 3 5 minutes to find satellite The Service Type must be selected and Update Beam Table button applied for the correct Beam ID information to propagate when using HN_KA Modem Type If the Antenna is already pointed on the satellite clicking Find Satel...

Page 46: ...tely rotate clockwise to the physical limit and temporarily record the A D value from the Potentiometer Based on the A D values of the two 2 physical limits and the maximum range of motion for the Mobile Platform the center angle is determined Antenna will center itself and attempt to locate the cut off edges of the Polarization Stow Switch After detecting at which angles the ST Switch turns OFF t...

Page 47: ...pass version these systems are identified by platform version Please consult with C COM Technical support before running the compass calibration Fig 30 Compass Orientation and Approximate Values Software will display a pop up on the pc screen asking end user to verify correct orientation of platform after Compass Calibration is selected within software The Antenna will now rotate in 90 intervals a...

Page 48: ...enus of the configuration CONF1 menu and what each field parameter means 7 6 3 1 Password Protection The LCD Configuration Interface is password protected Fig 31 Password screen The default password is password case sensitive Use the or button to select the characters and the or to navigate through the character fields Press on the ENTER button of the front panel when the password has been complet...

Page 49: ...ered along with the LNB power requirements Fig 33 S1 Target Satellite Configuration Display 1 Target Satellite Satellite Number and Orbital slot Longitude of the desired Satellite The Find Satellite command will use this value when attempting to find and lock onto a satellite signal The user can configure and save up to 5 satellites 0 to 4 2 DVB Configuration The user can configure the type of car...

Page 50: ... like to power LNB from the controller or if the user would like to find satellite without the use of a modem this option allows for power from the controller to be supplied to the LNB through the RX IN cable from the controller to the platform itself DD will disable this option and provide power to the LNB straight from the modem In this case a splitter must be used for the RF connection as depic...

Page 51: ...arch NOT selected nor is compass overridden O Override the compass has been overridden and direction entered manually considered F Full Search searches a full 360º search window Fly away systems 70 º Full search also overrides compass 3 Compass Heading Compass Heading after Compass has been read Approximate Headings North 354 East 87 South 176 West 265 Calibrate Check Compass Routine see CPC under...

Page 52: ...ve Beam ID that locked on signal The Multi Sat Search option must be enabled and the different Sat No configured with the proper Beam ID for the beam switching to toggle to the next Beam in the list 2 BR Beacon Receiver Frequency and Power Level Optional If the Optional Beacon Receiver is used to acquire satellite the user may enter the beacon frequency of the satellite that he she wishes to lock ...

Page 53: ...zation Allows configuration of the polarization zero skew adjustment stow limit polarization offset speed and current limits GP GPS and Compass Configuration of GPS coordinates and Compass parameters C1 Contains Multi Sat Search option controller configuration feature information such Motion Protection ES NO Inclined Orbit etc C2 Contains configuration of the platform type serial number and the co...

Page 54: ...d the Find Satellite command will use this value when attempting to find and lock onto the reference satellite signal then pivot to the target satellite position Only works with DVB search mode D The user should select D if he she does not wish to use this option E If the user wishes to use the reference satellite E should be selected 2 DVB Configuration The user can configure the type of carrier ...

Page 55: ...ould like to find satellite without the use of a modem this option allows for power from the controller to be supplied to the LNB through the RX IN cable from the controller to the platform itself DD will disable this option and provide power to the LNB straight from the modem In this case a splitter must be used for the RF connection as depicted in the figure below Fig 39 RF Cable Setup for DIS s...

Page 56: ... other service providers may not need this requirement E East W West Modems operating in the eastern hemisphere require E to be selected while modems operating in the western hemisphere require W to be selected 5 Auto Transmit Disable N If N is selected the controller will leave the modem status as is if a reset is pushed to the modem from the NOC or for any other reasons after communication betwe...

Page 57: ...ll offset the reading from the Inclinometer in order to produce an accurate 2 Elevation Angle The user may set the offset with the range of 15º 55º although altering this number from its default value may give an inaccurate offset reading This should not be tampered with without first consulting a C COM Technical Support Representative 2 Speed Setting S The user may configure the slow speed of the...

Page 58: ...the desired Satellite is found The Search Window range is pre set by default for optimum performance however this offset may be manually changed in the range of 2º 20º Fig 42 Elevation Coverage of search window The default Elevation Vertical range is 3 on each side of the Target Point Increasing the size of the Search Window will increase the ability to find the desired Satellite although increasi...

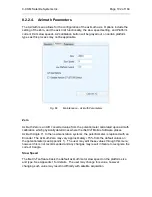
Page 59: ... configuration of the Azimuth axis including AZ zero and stow limit azimuth search window size slow speed movements and current limits at high and slow speeds Fig 43 AZ Azimuth Display 1 Configurable AZ Zero Pot AZ Zero is an A D value from the potentiometer calculated upon azimuth calibration which physically determines where the iNetVu Mobile Software places Azimuth Angle 0 The AZ Zero may vary ...

Page 60: ...Platform s motors are moving at the associated speed the current drawn to move the motor is monitored and should it exceed the Current Limit an error message will appear For Motor Speeds that are not listed Speed 1 2 4 5 7 8 the Current Limit for those speeds is calculated using a percentage of the Current Limit above it See Appendix 1 for the default current limits for all iNetVu Mobile Platforms...

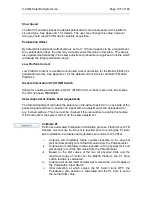
Page 61: ... however any changes may result in failure to recognize the correct 0 angle This parameter has a configurable range of 50 500 2 Skew Adjustment and Stow Limit Function Allows the enabling and disabling of the skew adjustment and polarization stow limit respectively The first character EE represents the skew adjustment The second character EE represents the Polarization ST limit The user my change ...

Page 62: ...hen any of the Mobile Platform s motors are moving at the associated speed the current drawn to move the motor is monitored and should it exceed the Current Limit an error message will appear For Motor Speeds that are not listed Speed 1 2 4 5 7 8 the Current Limit for those speeds is calculated using a percentage of the Current Limit above it See Appendix 1 for the default current limits for all i...

Page 63: ...atically stowing if vehicle movement and or severe motion are detected If the vehicle drives off with the platform deployed it will not stow as it should because the GPS is overridden Moving vehicle GPS speed and location must reach min 5km h and or Elevation angle changes by 2 or more degrees in order for the movement protection feature to trigger 2 GPS Latitude Coordinate 3 GPS Longitude Coordin...

Page 64: ...re must not be used when the iNetVu system is being moved around or in transport mode In this case the system should be powered off completely Otherwise there is a risk of the antenna attempting to deploy while vehicle is moving Please ensure this feature is turned off when vehicle is in transit from one location to another The user may disable or set the unattended re deploy delay time to 5 10 or...

Page 65: ...ed DIS Disabled 1 Re peak every 10 minutes 2 Re peak every 30 minutes 3 Re peak every 1 hours 4 Re peak every 2 hours 5 Re peak every 3 hours 6 Re peak every 4 hours 7 Re peak every 6 hours 8 Re peak every 8 hours 9 Re peak every 12 hours 6 Motion Protection iNetVu Platform will automatically stow if the antenna detects extreme motion such as severe shaking caused by poor weather conditions If the...

Page 66: ...Console port could be used for the following 1 MDM Modem Communication If the COM port is used to establish communication between the Controller and the VSAT Modem i e iDirect Viasat etc then MDM must be selected in this field along with the Baud Rate the Modem operates on prior to configuring the Service and Communication Interface MDM 4800 MDM 9600 MDM 38400 2 B_R Beacon Receiver The Beacon Rece...

Page 67: ... Band N755A iNetVu 75cm New Gen Drive away Platform Ka Band Circular A98A iNetVu 98cm Mobile Platform Ku Band N981A iNetVu 98cm New Gen Drive away Platform Ku Band N985A iNetVu 98cm New Gen Drive away Platform 2 Axis Ka Band Circular Ka 98G Skyware Global Feed boom Ka 98H HNS Feed boom Ka 98V Viasat Feed boom N985B iNetVu 98cm New Gen Drive away Platform 3 Axis Ka Band Circular Ka 98G Skyware Glob...

Page 68: ...NetVu platform between 5º to 5º e g 1 Calculated Target Polarization Angle 10º TX_O 3º The iNetVu system will position 7º when pointing e g 2 Calculated Target Polarization Angle 10º TX_O 3º The iNetVu system will position 13º when pointing 4 Platform Serial Number The user must enter the last four or five digits of the platform serial number located next to the connector plate on the iNetVu Mobil...

Page 69: ... web interface 2 LO LNB Configurable to allow satellite accusation when frequency changes values range from 10 75 9 75 10 00 10 60 and 11 30 The default value should be set to 10 75 the user is not required to change this value unless necessary otherwise select the carrier from the table or enter one if not listed 3 22 KHz Tone Enable Disable This feature allows users to enable disable the 22 KHz ...

Page 70: ...Series Controller s Subnet Mask IP Address Default is 255 255 255 0 2 Gateway IP Address Default 192 168 0 1 this can be changed to support the network you are on 7 6 4 12 IP This menu will allow the user to configure the controller IP address as well as the Modem IP address Fig 51 IP Configuration 1 iNetVu 7000 Series Controller s IP Address 2 Modem IP Address S_IP 255 255 255 0 G_IP 192 168 0 1 ...

Page 71: ... Viasat SurfBeam2 CT Comtech Service RD Radyne Service SF Surfbeam Service GL Gilat Service TY Tachyon Service ST STM Service PD Paradise Service HN Hughes Service HN_95 Hughes Services HN9500 Modem HN_KA Hughes Ka Service ET Romantis Eastar Service AV EMS Advent NT Newtec NA Stand Alone service Used to locate and lock onto a manually configured satellite using the DVB receiver unit inside of the ...

Page 72: ... password is required this area should be left blank CD Key must be entered instead of the password if iPSTAR Service is selected 7 6 5 TST Fig 53 Test Menu E A P Will allow for Demo Testing on all axes elevation azimuth and polarization for a user specified angle range DPY Deploys the antenna to a user specified azimuth elevation and polarization position DPY_C Will read the compass heading at a ...

Page 73: ...he start and stop angle of the azimuth axis as well as set the specific speed for azimuth movement A 180 180 7 implies from angle 180 to 180 at speed 7 4 Axis Selection and looping option The first two characters refer to the axis selection i e DD D DD Disable Test for all axes EL Perform test on the Elevation axis only AZ Perform test on the Azimuth axis only PL Perform test on the Polarization a...

Page 74: ...erval between tests 5 Test Selection Initiates the test on the specified axes according to the specified ranges and speeds 7 6 5 2 DPY Deploy antenna to the specified angles Fig 55 Deploy Configuration 1 Elevation Movement User defined elevation angle of deploy 2 Polarization Movement User defined polarization angle of deploy 3 Azimuth Movement User defined azimuth angle of deploy 4 Deploy Automat...

Page 75: ...ompass reading 2 Polarization Movement User defined target polarization angle for compass reading 3 Azimuth Movement User defined target azimuth angle for compass reading 4 Check Compass at specified target point Tests the compass heading and accuracy at the user defined Elevation Polarization and Azimuth angles by rotating the antenna at 90 intervals and comparing the compass readings with the ac...

Page 76: ...re this value is configurable RF DVB signal value 30N If in RF search mode this will represent RF signal value if in DVB Mode it will display DVB carrier signal The letter N next to the RF Value indicates the LNB is not being powered properly The letter L next to the value indicates a DVB signal LOCK 2 Compass Status V Valid O Override F Failed 3 Compass Heading Compass Heading after Compass has b...

Page 77: ...for the Satellite using smaller concentric windows until the desired Satellite is found 7 6 5 6 A_ACP Initiates an automatic cross pol test 7 6 5 7 M_ACP Initiates a Manual cross pol test 7 6 5 8 S_ACP Stops the cross pol testing instantly 7 6 6 INFO Displays information regarding the iNetVu 7000 Series Controller s firmware and software versions installed the Mobile Platform it is configured to a...

Page 78: ...umber is located on the base of the controller The ID displays the last 4 or 5 digits of the Serial Number 2 Signal Quality Threshold Minimum SNR Value required for the iNetVu 7000 Series Controller to validate signal 3 7000 Series Controller Board Hardware Type Version 4 7000 Series Controller Firmware and Boot loader version The firmware version is to the left of the dash i e 7 5 8 0 7 6 1 0 and...

Page 79: ...VB module information If there is no lock on DVB it will simply indicate No Lock otherwise it will display real time DVB information such as DVB type modulation code rate if applicable symbol rate and frequency 7 6 6 5 MOD This branch menu displays the VSAT Modems ID Serial Number and software version number if proper controller modem communication is established Fig 61 MOD Modem Display 1 VSAT Mo...

Page 80: ...e and serial number 2 Data recording information C COM internal use 7 6 6 7 ERR This branch menu displays the error code if an error occurs The top line represents the latest error the bottom line will represent any previous errors Fig 62 ERR ERROR Display 1 iNetVu Error code display Error INFO 1 A12B 1234 R 15754 1 2 ...

Page 81: ...tem parameters such as Signal Strength GPS Coordinates motor currents as well as allowing the user the capability of manually moving the antenna and performing any maintenance tests and calibration tasks The user has a choice of languages currently English Simplified Chinese Traditional Chinese Russian Spanish and newly added Swedish to select from on the fly Application windows can be resized on ...

Page 82: ...To navigate the iNetVu Mobile Software right click the iNetVu swirl icon located in the System Tray There are 7 options available Controls Maintenance Configuration About Setup Wizard Language Exit 8 2 1 iNetVu Controls The Controls menu allows users to monitor system parameters and manually move the antenna as well as conduct automatic processes and functions Improper use of iNetVu Controls menu ...

Page 83: ...obtained from the Satellite Modem when locked onto a signal Using a red yellow green color coated system it denotes the strength of the received signal from the current satellite Should the Signal Strength be lower than 29 when locked on satellite click Find Satellite again to re acquire the signal Fig 64 Signal Strength Display ...

Page 84: ... 0 is default satellite and will be the one searched on if no other is selected from the drop down list Selected Beams will be displayed in the drop down list for some services Find Satellite Automatically finds and locks onto the satellite signal by communicating with the Satellite Modem and using the GPS coordinates the compass heading and internal parameters of the Satellite Modem Typically it ...

Page 85: ...de for each configured satellite If no satellites are configured the default is SAT0 The Beam and or Carrier will be displayed after the SAT 4 field Angle and Limit Switch Indicators Displays real time angles and Limit Switch status Fig 68 Angle and Limit Switch Indicators Elevation UP Limit Indicator Elevation DOWN Limit Indicator Elevation STOW Limit Indicator Azimuth STOW Left Right Limit Indic...

Page 86: ... away Platforms will display AW at the 180 5 degree limits A YELLOW colour STF will appear if a Limit Switch has been disabled in the Maintenance Menu Ka 75V Ka 98H Ka 98G and Ka 98V Ka platforms LHCP or RHCP will display in the PL Angle field for 3rd axis polarization to indicate right hand or left polarizer position Ka 98G third axis If the Polarization is disabled for circular signal frequency ...

Page 87: ...bles the ACP Automatic Cross Pol Testing and Manual Cross Pol Testing Fig 70 ACP Option Selection To Enable ACP select AUTO or MANUAL from the ACP drop down list and click on the Enable Disable ACP Button to initiate To Stop ACP testing select STOP from the ACP drop down list and click on the Enable Disable ACP Button to initiate Deploy Antenna Automatically moves antenna to the manually entered E...

Page 88: ...xt to the value indicates an unlocked status An L next to the DVB value indicates locked signal Beacon Signal 0 100 If the optional beacon receiver is used the Beacon Signal will appear in this area along with the power density received from the satellite This will only appear when a lock status occurs which is indicated by an L next to the beacon signal value RF Signal 30 120 Displays the real ti...

Page 89: ...llite parameters Fig 73 Satellite Target Angles Target Elevation Target EL Calculated Elevation Angle that the Antenna must point in order to locate the desired Satellite Target Real Azimuth Target AZ Calculated Azimuth Angle that the Antenna must point in order to locate the desired Satellite in reference to True North Target Antenna Azimuth System Ref AZ Calculated Azimuth Angle that the Antenna...

Page 90: ...ing Orientation of the Mobile Platform This value is only read during the Find Satellite Check Compass and Calibrate Compass processes Fig 74 Compass Orientation and Approximate Values This end faces South This end is the reference for Vehicle Orientation this end faces North This end faces South North 354 N West 265 South 176 East 87 W E S This end faces North Front of Vehicle ...

Page 91: ...ssages Solid GREEN messages indicate a stable and normal condition for that component Flashing or solid LIGHT BLUE messages indicate a change in status occurring that the user should be aware of Flashing RED and YELLOW messages indicates a problem with that component Should the entire Status Panel flash RED and or YELLOW a communication failure between the PC and the iNetVu Controller has occurred...

Page 92: ...eing performed Positioning An automatic movement command has been initiated i e Find Satellite or Deploy Antenna and the antenna is moving into the designated position Searching Satellite Antenna is performing a search pattern to locate the satellite Stowing Antenna Antenna is being stowed Unknown Status Satellite Modem Communication Status Indicates the Transmitter status and displays any issues ...

Page 93: ...or is moving in the respective direction PL Moving CCW CW Polarization Motor is moving in the respective direction CCW Counter Clock Wise CW Clock Wise Motor Unknown Motor Status cannot be detected Antenna Status Displays any relevant information regarding the Limit Switches Potentiometers and or Inclinometers Antenna Normal Limit Switches are ON OFF in the correct relation to the Elevation Azimut...

Page 94: ...Compass for easier configuration The Maintenance menu allows users to conduct maintenance tests processes override parameters and troubleshoot Note It is recommended to power cycle the controller after firmware upgrades or configuration changes have been saved Recycling Controller power will confirm and validate settings to ensure correct values are propagated and displayed on all screens this is ...

Page 95: ...u Band A1210A iNetVu A1210A Airline Checkable Carbon Fibre Reflector Ku Band A0120A iNetVu A0120A 1 2 Fixed Motorized Ku Band A0121A iNetVu A0121A 1 2 New Gen Fixed Motorized Ku Band A0125A iNetVu A0125A 1 2 New Gen Fixed Motorized Ka Band A1500A iNetVu A1500A Mobile Platform Ku Band A1500B E iNetVu A1500B Mobile Platform Standard C Band Linear INSAT A1500C iNetVu A1500C Mobile Platform C Band Cir...

Page 96: ... Generation platform types PL Skew Offset for OMT This field allows the user to place a fixed offset for the target polarization angle This value could make up for any noticeable mechanical offsets in the polarization assembly of the iNetVu platform between 5º to 5º e g 1 Calculated Target Polarization Angle 10º TX_O 3º The iNetVu system will position 7º when pointing e g 2 Calculated Target Polar...

Page 97: ...urate Warning Overriding the GPS prevents the movement protection feature from working properly and will not stow the antenna if vehicle drives off as neither speed nor GPS relocation can be detected Moving vehicle speed must reach min 5km h plus Elevation angle change of 2 degrees or more with GPS coordinates change in order for the movement protection feature to trigger GPS Latitude This field r...

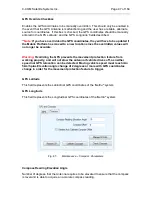
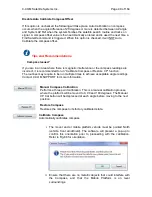
Page 98: ...librate Compass or Restore CP function The routines may require to be run multiple times to achieve acceptable angle readings Contact C COM SUPPORT for more information Manual Compass Calibration Performs a three point calibration This is a manual calibration process where the platform will be moved to 0 90 and 180 degrees The Manual CP Cal button will be depressed at each angle before moving to t...

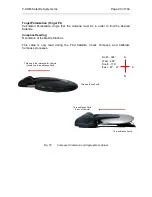
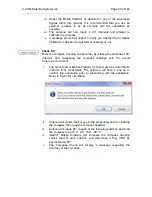
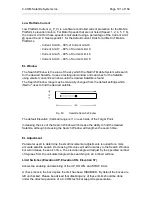
Page 99: ... and comparing the compass readings with the actual antenna s movement i The mount and or Mobile Platform Vehicle must be pointed North Vehicle front windshield The software will have a pop up to confirm this orientation prior to proceeding with the calibration Refer to Fig 85 for orientation ii Antenna will center itself move to the proper Elevation for reading the compass then read the compass h...

Page 100: ...le if a user is on a 10º slope and the system is searching along the azimuth if the elevation reading changes due to a horizontal incline the elevation will adjust to maintain the correct elevation angle while searching along the azimuth Offset The Elevation Offset is specific to each type of platform It is the number of degrees at which the iNetVu Mobile Software will offset the reading from the ...

Page 101: ...ed from the default settings which iNetVu uses to find the desired satellite Fig 83 Satellite Search Window The default Elevation Vertical range is 3 on each side of the Target Point Increasing the size of the Search Window will increase the ability to find the desired Satellite although increasing the Search Window will lengthen the search time EL Adjustment Parameter used to determine the small ...

Page 102: ...ulated upon azimuth calibration which physically determines where the iNetVu Mobile Software places Azimuth Angle 0 In the new Generation systems the potentiometer is replaced with an Encoder The Azimuth Zero may vary approximately 15 from the default values on the potentiometer see Appendix 1 The user may edit these values through this menu however this is not recommended and any changes may resu...

Page 103: ... check mark in the box implies the limit has been DISABLED By default the boxes are left unchecked Please be advised that disabling any of these limits should be done under the direct supervision of a C COM Satellite Systems Inc technical support representative Calibrate AZ Performs automated Azimuth Calibration process Not applicable on New Generation platforms i e Ka 75V A0755A Ka 98H G V A0985A...

Page 104: ...ization Angle 0 The Zero value may vary approximately 15 from the default values for all platforms using potentiometers see Appendix 1 The Tilt Sensor provides better accuracy than the Potentiometer The PL Zero is calculated along with PL offset during the Polarization Calibration process on platforms with Tilt Sensors and entering a calibrated value in the Zero field The Tilt Sensor must be level...

Page 105: ...he Skew Adjustment will rotate the antenna on the azimuth axis 90 on each side of the peaked signal and then re position on signal with an adjustment to the polarization for any inclined surface This box must be checked if the user wishes to enable this feature If left unchecked the system will not do the skew adjustment Calibrate PL Performs automated Polarization Calibration process Platforms wi...

Page 106: ...er may choose to upload either 1 hour 2 hours or ALL maximum of 12 hours of the recorded data log information from the controller to the PC 8 2 2 7 Site Name and Controller Beep Site Name Site Name in the controller that consists of combination of letters and numbers up to 30 characters Site Name will be displayed in the browser tab when using the web interface BEEP This checkbox is used to either...

Page 107: ...e Controller section of this maintenance menu The maximum data a user may upload is 12 hours Load Firmware Loads the iNetVu_Box s19 firmware file into iNetVu Controller from the iNetVu program folder By default this option is grayed out and only available once the controller is in Boot Load mode The update process is displayed on screen and will notify the user when the process is complete The con...

Page 108: ...maintenance and Configuration screens with the configurable parameters in the saved iNetVu7000_Config txt file located in the application folder The user then has the option of sending and saving this data to the controller using the Send All and Write EPROM buttons Save All Saves ALL parameters to the controller s memory Indicates Menu buttons also exist on the Configuration screen Note All the b...

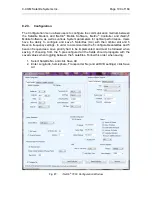
Page 109: ... 5 Satellites 0 4 with their orbital slot and 5 Beacon frequency settings In order to accommodate the 5 configurable satellites and 5 beacon frequencies a save priority had to be implemented and must be followed when saving If choosing from the 5 pre configured all the fields should propagate with the saved values when toggling between the 5 satellites Follow this order when saving 1 Select Satell...

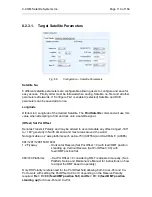
Page 110: ... Polarity and may be altered to accommodate any offset ranged 180 to 180 generally in North America and most areas around the world Not applicable on 2 axis platforms such as Ka 75V A0755A and Ka 98h G V A0985 981 1201 1200 1500 1800 1 2 Flyaway Horizontal Receive Sat Pol Offset 0 with feed OMT position standing up Vertical Receive Sat Pol Offset 90 with feed OMT position flat 980 740 Platforms Sa...

Page 111: ...zation reference in the Offset field and click on the SEND ALL e g 1 Longitude Satellite 4 0 E Manual Offset value entered 90 Calculated Offset value 93 5 e g 2 Longitude Satellite 4 0 E Manual Offset value entered 0 Calculated Offset value 3 5 Refer to Eutelsat Polarization Skew Angle Satellite s document for more information LNB Power V In cases where the LNB requires more power than the modem c...

Page 112: ...d but will default back after the modem resets TR No Transponder Number There are Six 6 Transponder values in the 7000 Series Controller for each satellite Transponder 0 2 TR0_H TR2_H are horizontal receive Transponder 3 5 TR3_V TR5_V are vertical receive The user may override the default values saved in the controller with his her transponder information frequency symbol rate FEC rate DVB Type Th...

Page 113: ...nfiguration Reference Satellite Parameters Enable Ref Sat If this checkbox is selected the Reference Satellite Option becomes active The MAX ES NO field will be disabled and the value will be set to the default 255 If this box is not selected all the information in this Reference Satellite Section becomes irrelevant Longitude This field represents the Orbital slot Longitude of the Reference Satell...

Page 114: ...n Frequency 8 2 3 3 Modem Parameters Configurable parameters will differ depending on the type of modem service selected under the type field Fig 91 Configuration Modem Parameters Type The user must select the service in use from this drop down menu for proper modem to controller connectivity Interface The user may select the interface used for modem to controller communication establishment There...

Page 115: ...larization set in the satellite modem Hughes Net service only Tx Pol Transmit Polarization set in the satellite modem Hughes Net service only DVB Type The DVB S type of the modem on Hughes Ku HX Modems is required to be set to allow the modem to stay online after the TX enable command has been sent from the controller If the DVB S type on the modem is not set to the same as the controller default ...

Page 116: ...Service Type table and use the saved Beam data DVB Settings will be automatically be filled with the correct values associated with the selected Beam ID The Update Beam Table button is only required to be applied once as long as you continue to use same Service Type This option is only available with the HN_KA modem service and must be applied before correct Beam ID values appear in drop down Beam...

Page 117: ...ents the frequency that the Optional Beacon Receiver is programmed for The user may change this frequency to whatever Beacon is required for the target satellite 5 configurable Beacon frequency maybe configured with 5 configurable Satellites If the iNetVu Beacon Receiver is not used this field can be ignored ACQ Attenuation dB The 7000 Series controller software interfaces give the user flexibilit...

Page 118: ...Parameters IP Address The IP address assigned to the iNetVu 7000 Series Controller Subnet Mask The Subnet Mask IP Address used by the iNetVu 7000 Series Controller for PC and modem connectivity Default Gateway The Gateway IP address used by the iNetVu 7000 Series Controller DHCP The iNetVu 7000 Series Controller could obtain a dynamic IP address from a DHCP Server i e router modem etc if this opti...

Page 119: ...ay take up to 30 minutes to find and lock onto Satellite Selecting Full Search will auto select Override Compass and set the AZ Window to 180 or any other value 60 and above depending on the Platform type This value can be overridden to a more desirable range Override Compass can be selected without selecting Full Search but this does not hold true for the vice versa Override Compass Checkbox The ...

Page 120: ...nge is 60 on each side of the Target Point and the default Elevation Vertical range is 3 on each side of the Target Point Increasing the size of the Search Window will increase the ability to find the desired Satellite although increasing the Search Window will lengthen the search time Caution system may overshoot by 10 on AZ Window from the set window limits Direction The direction the front of t...

Page 121: ...erride Compass and Direction click on Save All Fig 95 Compass Full Search Configuration Parameters Fig 96 Compass Orientation and Approximate Values This end faces South This end is the reference for Vehicle Orientation this end faces North North 354 N West 265 South 176 East 87 W E S ...

Page 122: ...indow starting point b Set AZ Window Size to 170 if 45 is the starting point or center of the search window The antenna will add 170 to 45 215 Antenna will only rotate to a max 180 on either side and subtract 170 from 45 125 c The total area that will be searched is shown below Note See Appendix for Direction and System Ref AZ table South 0 Facing Antenna Reference East 90 West 90 North 180 Locati...

Page 123: ...ndant and different features will display depending on the type of modem selected in the modem configuration interface Transmit DC Enable iDirect only Allows user to disable the DC power supplied by the modem to the BUC after TX enable is sent to modem This allows power to be supplied by an external power source and hence bypassing the modem Transmit DC Enable is checked by default and by unchecki...

Page 124: ...ication is re established To Leave the TX enabled after communication is re established uncheck this option Unattended Operation This drop down menu represents the Unattended Operation Functionality for remote or stationary unmanned setup Unattended Operation should NOT be configured on units that will be mobile between different locations as the system will attempt to deploy as per set delay time...

Page 125: ...on will allow the system to maintain signal with an inclined orbital satellite The user may select the time difference between each re peak on the inclined orbital satellite without disabling the transmitter and maximizing on the signal strength This feature has been modified to support Ka platforms that shift off signal due to shifting ground and or environment conditions The inclined mode routin...

Page 126: ...te is enabled and default value set to 255 8 2 3 9 LNB LO 22KHz Tone Fig 98 LNB_LO and Tone section LNB_LO This drop down menu allows the user to change the LNB frequency settings to relock back onto satellite signal The Normal operation setting is 10 75 and the controller default setting will reflect this users should use the default setting at all times with carriers from table list or a carrier...

Page 127: ... baud rate of the modem must be entered as well from the BAUD drop down menu GPS_Out Used for GPS output data gathering BEACON Used to establish communication with the iNetVu BR300L Beacon Receiver GLONASS Used for External Glonass GPS option PC Used for COM serial port communication between the PC and Controller BAUD bps The user may define the bit rate of the serial communication interface 8 2 3...

Page 128: ...emonstrating the iNetVu Mobile System This feature is accessible from the Maintenance Window Test button Fig 99 Demo and Test Window Start Demo Angles Initial values for the test demo sequence End Demo Angles End values for the test demo sequence Speed Speed of the motor during the test demo sequence 4 lowest 9 highest ...

Page 129: ...Test Halts all test demo sequences Test Elevation Moves dish to the values set in the Start Angle and End Demo Angle fields Test Azimuth Moves dish to the values set in the Start Angle and End Demo Angle fields Test Polarization Rotates dish to the values set in the Start Angle and End Demo Angle fields Modem Test Command The user may enter certain modem commands and click send The 7000 Series Con...

Page 130: ...indow Software Version iNetVu Mobile Software version Build Date Date of software release Controller Firmware Version iNetVu Controller s firmware version For compatibility purposes Controllers are pre configured with the appropriate firmware for the accompanied software version Serial Number iNetVu Controller Serial Number ID This field is supported for iNetVu Controller Firmware 4 2 and higher ...

Page 131: ... 7000 Series Controller Revision Indicates the revision number of the current Controller Hardware version DVB Tuner Displays if a DVB Tuner is detected MAC Address Displays controllers MAC Address Platform Type Mobile Platform type Serial Number S N Mobile Platform serial number S N may have 4 or 5 digits newer controllers Version Platform Mechanical Version Fig 101 Platform Type and Serial Number...

Page 132: ...em currently communicating with the controller Firmware Satellite Modem s firmware version Serial Number Satellite Modem s Hardware ID or Serial Number Interface Modem Interface to the iNetVu 7000 Series Controller Satellite Longitude Modem target longitude value and hemisphere RX Polarity Modem Receive Polarity ...

Page 133: ...oggling between Four 6 languages and updates in real time the selected language Currently the available languages are English Chinese Simplified and Traditional Spanish Russian and Swedish with more to come Fig 102 iNetVu Controls Window in Chinese 8 2 6 Exit Close the running IMS 7000 Application ...

Page 134: ...r cycle is now possible without touching controller front panel via the web interface must be running minimum bootloader 7 5 3 0 version for reset feature The site name of the controller will appear in the browser tab if one is entered The Web Interface is similar to the 7000 Software the difference being that it is accessed through a web browser by entering the controllers IP i e 192 168 0 2 addr...

Page 135: ...t Controller Fig 103 Web Interface Upload Login Window There are 2 ways to get the controller in the upload status first method is from the controller front panel the second is from within the web GUI by clicking on the FW_U button Updating the Firmware or the SatParam Table or Resetting the Controller all of these can be accomplished by clicking the FW_U from the CONFIGURATION screen Fig 104 Web ...

Page 136: ...em operations and perform automatic as well as manual system functions The main difference between the web interface and iNetVu Application is that the Compass Calibration CP CAL Compass Test CP TEST Azimuth Calibration AZ CAL and Polarization Calibration PL CAL are all in the iNetVu Controls web page rather than the Maintenance menu Fig 105 Web Interface Controls Screen ...

Page 137: ...ew button RESET has been added which allows the user to reset the controller from within the Configuration window The Configuration menu allows users to set the Satellite s name and orbital slot and override parameters as well as putting the controller in updating mode The 7000 Series Controller Web Interface is similar to the iNetVu Software Configuration Menu See Software Configuration Menu Sect...

Page 138: ...Demos testing certain components of the system and for sending certain modem commands that have been integrated with the iNetVu 7000 Series Controller The 7000 Series Controller Web Interface System Test web page is similar to the iNetVu Software Test Screen Fig 107 Web Interface Test Window ...

Page 139: ...tems Inc Page 139 of 164 9 5 About The iNetVu About web page displays information to the user about various sub system components as well as contact information for support and feedback Fig 108 Web Interface About Screen ...

Page 140: ...ne Fig 109 Firmware Satellite Param Table update screen 4 Login by entering password You will receive a Login Successfully display 5 The options are now enabled and you may proceed and select the preferred task 6 This can also be accomplished from the front panel After establishing a proper network connection between the controller and the PC press the reset button on the 7000 Series Controller an...

Page 141: ...E link on the left panel The following screen should appear Fig 110 Firmware Update Window To update the firmware via web page 1 Browse to firmware s19 file and select it 2 Click on the Upgrade button 3 The status bar will appear and the Controller firmware should be updated within a minute Fig 111 Firmware Update Progress bar ...

Page 142: ...l of the web page after putting Controller in upload mode Follow previous steps in section 9 6 Fig 112 Satellite Parameter Table Update 2 Browse for the modified iNetVu7000_SatParam txt and click on the Upgrade button The controller should be updated within a few seconds Note Any of the upgrade processes can be cancelled by clicking the RESET CONTROLLER link forces the controller to power cycle be...

Page 143: ...ce your PC on the same network as the 7000 Series Controller and simply type in the IP address of the 7000 Controller into your web browser iNetVu 7000 Network Configurations Default IP Address 192 168 0 2 Default Subnet Mask 255 255 255 0 Default Gateway IP 192 168 0 1 Fig 113 Controller to PC Connectivity Fig 114 Controller to PC and Modem Connectivity via Network Interface iNetVu 7000 Series Co...

Page 144: ...ss 10 211 9 74 Subnet Mask 255 255 255 0 Gateway 10 211 9 73 Modem IP 10 211 9 73 Switch Computer IP Address 10 211 9 75 Subnet Mask 255 255 255 0 Gateway 10 211 9 73 Straight Crossover Network Cable Manufacturer Dependent IP Address 10 211 9 74 Subnet Mask 255 255 255 0 Gateway 10 211 9 73 Modem IP 10 211 9 73 Straight Network Cable Straight Network Cable iNetVu 7000 Series Controller IP Address ...

Page 145: ...ct Properties 2 Select Internet Protocol TCP IP and click Properties 3 Direct Network Connection Set your PC to the same subnet as the iNetVu 7000 Series Controller and the Default Gateway to the iNetVu 7000 Series Controller The screenshot depicts this configuration Network Connection via Router Switch Dependent on Network Configuration See previous section ...

Page 146: ...ASS receiver which is attached to controller via serial port interface The 7000C and 7024C controllers have NV08C CSM chip onboard and use the GLONASS GPS Antenna that is shipped with these units 11 2 Uplogix Remote Management The iNetVu Controller has been fully integrated with Uplogix Remote Management appliances This feature allows for out of band and in band remote access to the iNetVu Antenna...

Page 147: ...C COM Satellite Systems Inc Page 147 of 164 12 APPENDICES ...

Page 148: ...EADING ELEVATION 32 32 32 32 32 32 PLATFORM TYPES A0985A A0985B A0981A A0755A A0121 A0125A COMPASS READING ELEVATION 24 24 24 24 NA NA Table 1 Compass Reading Elevation Default Values Elevation Offset PLATFORM TYPES A1800A B C E A1200B A1500A B C E A0980 A0740 A0660 EL OFFSET 45 00 42 00 31 00 31 00 35 00 PLATFORM TYPES A1210A A1201A 1200Q A0121A A0125A EL OFFSET 60 5 17 11 15 5 15 5 A0985A A0985B...

Page 149: ...RO 205 4144 159 2832 197 22 131 79 131 79 131 79 212 4 Table 4 Polarization Potentiometer Default Values Note The A980A and A1200A Revision 3 0 Platforms as well as all New Gen platforms have replaced the PL Potentiometer with a PL Inclinometer Tilt Sensor 755A and 985A do not have movement on the PL axis thus the above table is not valid for these units See Table 5 for Tilt Sensor default values ...

Page 150: ...201A Ver 3 0 A0985A A0755A A0981A EL SLOW NA NA 6 8 3 3 3 EL CURRENT6 NA NA 2 0A 3 5A 7 5A 7 0A 7 0A EL CURRENT9 NA NA 2 5A 5 0A 10 0A 10 0A 10 0A AZ SLOW NA NA 6 9 3 9 9 AZ CURRENT6 NA NA 1 0A 1 8A 5 0A 5 0A 5 0A AZ CURRENT9 NA NA 1 5A 2 0A 7 5A 7 0A 7 0A PL SLOW NA NA 4 2 2 NA 2 PL CURRENT6 NA NA 0 7A 0 3A 0 3A NA 0 3A PL CURRENT9 NA NA 1 0A 0 5A 0 5A NA 0 5A PLATFORM TYPES A0121A A0125A A0985B ...

Page 151: ...90 90 North West NW 315 45 45 Note Antenna reference point is 0 which means the reflector is pointing south with reference to the back facing North The search window reference starting point will be the System Ref AZ value use above table and diagram to figure out which way the Antenna must be pointed System Ref AZ starting point in order to set the AZ Window Size if an area is required to be excl...

Page 152: ...AT and LONG Latitudinal and Longitudinal GPS Coordinates V Value GPS Velocity indication of moving vehicle H Value GPS Heading SM RF Search Mode RF mode status disabled or enabled N or Y first field RF Override RF override status disabled or enabled N or O second field RF Threshold RF Threshold value RF DVB status RF or DVB value with LNB and Signal N or L CP Status Compass Status i e Normal Overr...

Page 153: ...tudinal Value and Hemisphere S11 S2A DVB Carrier Type for target satellite O Offset Target Satellite Offset TP Number Transponder Number in Controller T0 T2 Horizontal Receive T3 T5 Vertical Receive FREQUENCY Satellite Transponder Frequency that DVB searches SYMBOL RATE Satellite Transponder Symbol Rate that DVB searches CODE RATE Satellite Transponder FEC Code Rate that DVB searches LNB Power LNB...

Page 154: ...uration Screen Access Password LO 22KHz Tone Enable or Disable 22KHz tone SG S_IP Address 7000 Controller Subnet IP Address G_IP Address 7000 Controller Gateway IP Address IP C_IP Address Controller IP Address M_IP Address Modem IP Address SR Service Service In Use iDirect Hughes Etc Interface Modem Communication Interface i e Telnet HTTP Console etc Password CD KEY Modem Password CD KEY if necess...

Page 155: ...tates the Firmware and Boot loader version respectively CC2 MA Address States the Controller MAC Address CONF_ID Value States the Controller Configuration ID for internal use DVB_D DVB States the DVB Mode in Use DVB_P DVB DVB Status information MOD SN Value States the modem Serial Number S Status States the status of the modem V Version States the Modem Firmware Version SYS1 Platform Type Platform...

Page 156: ...OL TX Satellite Modem VSAT 90 264VAC TX OUT SAT IN RG6 Coaxial Cable Network Cable Power Cable Sensor Cable Motor Control Cable SENSOR CABLE Computer Modem Example 70 232 247 49 Router WAN IP 70 232 247 50 SUB 255 255 255 0 LAN IP 192 168 1 1 SUB 255 255 255 0 PC DHCP OR Static IP 192 168 1 2 SUB 255 255 255 0 GW 192 168 1 1 7000 CTRL DHCP OR Static IP 192 168 1 3 SUB 255 255 255 0 GW 192 168 1 1 ...

Page 157: ...aunch iNetVu Mobile 7000 Software 3 Configure Application to use desired Platform i e A0755A or A0985A In Maintenance Window and Modem type In Configuration Window 4 Click Send ALL followed by Write EPROM 5 Reset recycle power on Controller Note The Tooway Look up Table must be uploaded to the Controller via the Application software before it can be used directly from the Controller LCD This proce...

Page 158: ... the Configuration Window click on Update Look up Table 7 This process will take approximately 6 10min depending on your system Status will be displayed on the bottom of the Configuration window Look up Table Upload Status Look up Table Upload Button ...

Page 159: ...th an OK once it finishes 9 Ensure Auto select Beam Color option is selected on the Application side in order to see which Beam color the auto selection is searching on 10 The Controller is now ready to do Auto Beam selection 11 Press FIND SAT the system will begin the Auto Beam search ...

Page 160: ...down the FIND SAT button for 3 seconds then let go Tooway menu will display which will allow the user to manually select the Beam Color they desire 13 Selecting SS4 will put system back into Auto Beam search mode BLU ORG PRP GRN SS4 TE TD AZC PLC CPC CR ...

Page 161: ...EPTACLE PIN SIGNAL Notes P1 1 DC In 2 Must have an Inline Fast Blow Fuse 15A 24VDC P1 2 DC In 2 P1 3 CHASSIS GND P1 4 NOT USED Note VDC Power Input feature is available in the 7000C and 7024C Models Only The correct external power source should be used with the correct controller type 7000C 12VDC 7024C 24VDC input The DC cable if assembled by end user must include INLINE FAST BLOW FUSE rated at 15...

Page 162: ...ctivity AMP CPC Plug Assembly Shell Size 11 Reverse Sex 4 Pin Contacts Series 1 206358 5 1 TEConnectivity AMP CPC Cable Clamp Size 11 66361 4 4 TEConnectivity AMP CPC Pin Contact Series 1 Wire 18 14 AWG 1 Heatshrink Adhesive 25mm Dia X 60mm Lg X External cable used should be a 3 wire 14 AWG 1 inline fast blow fuse at 15A 24VDC ...

Page 163: ...f Information Technology Equipment Manufacturers Name C COM Satellite Systems Inc Manufacturers Address 2574 Sheffield Road Ottawa Canada K1B 3V7 Importers Name optional Importers Address optional Type of Equipment Satellite Antenna Controller Model Number iNetVu Mobile System CE Marked 2005 Serial No Optional Year of Manufacture Optional 2004 I the undersigned hereby declare that the equipment sp...

Page 164: ...C COM Satellite Systems Inc Page 164 of 164 ...

Reviews: