background image

12 


FR 

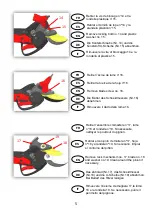
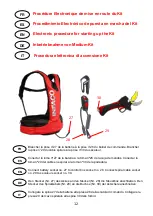
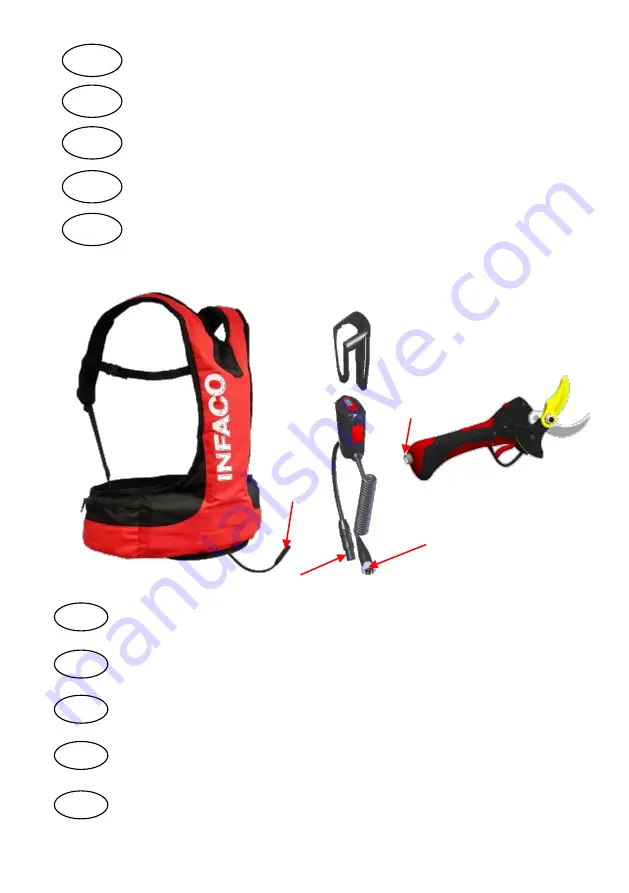
Procédure Electronique de mise en route du Kit 


ES 

EN 

DE 

IT 

29 

28 

27 

30 

FR 

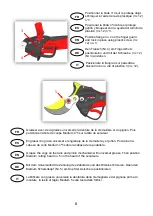
Brancher la prise n°27 de la batterie à la prise n°28 du boitier de commande. Brancher 
la prise n°29 du câble spiralé à la prise n°30 du sécateur. 

ES 

EN 

DE 

IT 

Procedimiento Electrónico de puesta en marcha del Kit


Conectar la toma nº27 de la batería a la toma nº28 de la caja de mandos. Conectar la 
toma nº29 del cable en espiral a la toma nº30 de la podadora. 

Electronic procedure for starting up the Kit 


Connect battery socket no. 27 to control box socket no. 28. Connect spiral cable socket 
no. 29 to secateurs socket no. 30. 

Inbetriebnahme von Medium Kit 


Den Stecker (Nr. 27) des Akkus an den Stecker (Nr. 28) die Steuerbox anschließen. Den 
Stecker des Spiralkabels (Nr. 29) an die Buchse (Nr. 30) der Astschere anschließen. 

Procedura elettronica di accensione Kit 


Collegare la spina 27 della batteria alla presa 28 della scatola di comando. Collegare la 
presa 29 del cavo spiralato alla spina 30 delle forbici. 

Summary of Contents for ELECTROCOUP MEDIUM KIT F3010

Page 1: ...1 Notice de Montage du Kit Medium Manual de Montaje del Kit Medium Medium Kit Assembly Instructions Montageanleitung des Medium Kit Guida per il montaggio del Kit Medium...

Page 2: ...N DE IT Para todas estas operaciones desconectar imperativamente la podadora Always disconnect the secateurs for all these operations F r all diese Arbeiten die Astschere unbedingt ausstecken Attenzio...

Page 3: ...ell N Bezeichnung 1 Senkschraube M3 x 6 x2 2 Fingerschutz 3 Kunststoff Senkschraube 3 x 12 x2 4 Flansch des Fingerschutzes 5 Scherenkopf MEDIUM SET 6 Flachkopfschraube mit Innensechskant M8 x 12 7 Sch...

Page 4: ...los n 12 de la tapa Retirar la tapa n 13 EN Dismantling the cutting head Make sure you keep all the parts Remove the two screws no 12 from the hood Remove hood no 13 DE Demontage des Scherenkopfs Denk...

Page 5: ...rio limpiar el contorno del pi n Remove locking bolt no 14 and plastic washer no 15 Remove blade screw no 16 Remove rack mechanism no 17 blade no 18 and washer no 19 Clean around the pinion if necessa...

Page 6: ...ente el tornillo Remove greasing bung no 20 Using Allen key no 9 and extension no 10 remove blade axis no 21 and bolt no 23 Then remove hook no 22 N B tighten the vice only moderately Rimuovere il tap...

Page 7: ...o n 2 y bloquear con ayuda del tornillo de pl stico 3 x 12 n 3 Assembling the Medium Kit Screw in the two screws M3 x 6 no 1 Position finger guard no 2 and lock in place using plastic screw 3 x 12 no...

Page 8: ...beza de la podadora Position flange no 4 on the finger guard and lock in place using plastic screw 3 x 12 no 3 Grease the cogs on the rack and pinion mechanism with universal grease Then position Medi...

Page 9: ...tornillo n 6 y n 7 al gancho Use the tube of glue no 8 to fill ONLY the thread of bolt no 6 with glue Remove any surplus N B Do not put glue on bolt no 7 Screw bolt nos 6 and 7 to the hook Mit der Kl...

Page 10: ...el tornillo n 6 a 30N m Use Allen key no 10 and extension no 9 to lock bolt no 7 tighten firmly and bolt no 6 tighten normally Use a torque wrench to lock bolt no 7 at 50N m and bolt no 6 at 30N m Mit...

Page 11: ...26 Then clip on shell no 11 supplied with the kit Auswechseln der Tr gerschale der Astschere Retirar el armaz n n 25 del soporte de la podadora n 24 presionando el bot n n 26 Enganchar el soporte n 1...

Page 12: ...l cable en espiral a la toma n 30 de la podadora Electronic procedure for starting up the Kit Connect battery socket no 27 to control box socket no 28 Connect spiral cable socket no 29 to secateurs so...

Page 13: ...ADE parpadea Reset control box ON OFF switch no 31 is displayed Press button no 32 for 5 seconds until P01 BLADE is displayed Then press button no 32 for another 3 seconds to enter the program P01 BLA...

Page 14: ...Start the secateurs by pressing trigger no 33 twice Press trigger no 33 until the blade closes completely then press trigger no 33 in short movements to obtain the required blade position Die Astscher...

Page 15: ...ntrol box for 3 seconds P01 BLADE OK is displayed Start the secateurs by pressing trigger no 33 twice Try a few cuts to check that the secateurs are working correctly If they are not working correctly...

Page 16: ...O S A S 81140 CAHUZAC SUR V RE FRANCIA FR Type KIT MEDIUM F3010 ES Tipo KIT MEDIUM F3010 EN Type MEDIUM KIT F3010 DE Art MEDIUM SET F3010 IT Tipo KIT MEDIUM F3010 INFACO S A S Bois de Rozi s 81140 CAH...

Reviews: