background image

Quanta 5

Quanta 5 Technical User Manual

49

AUX-ODU-LPU-G Mounting

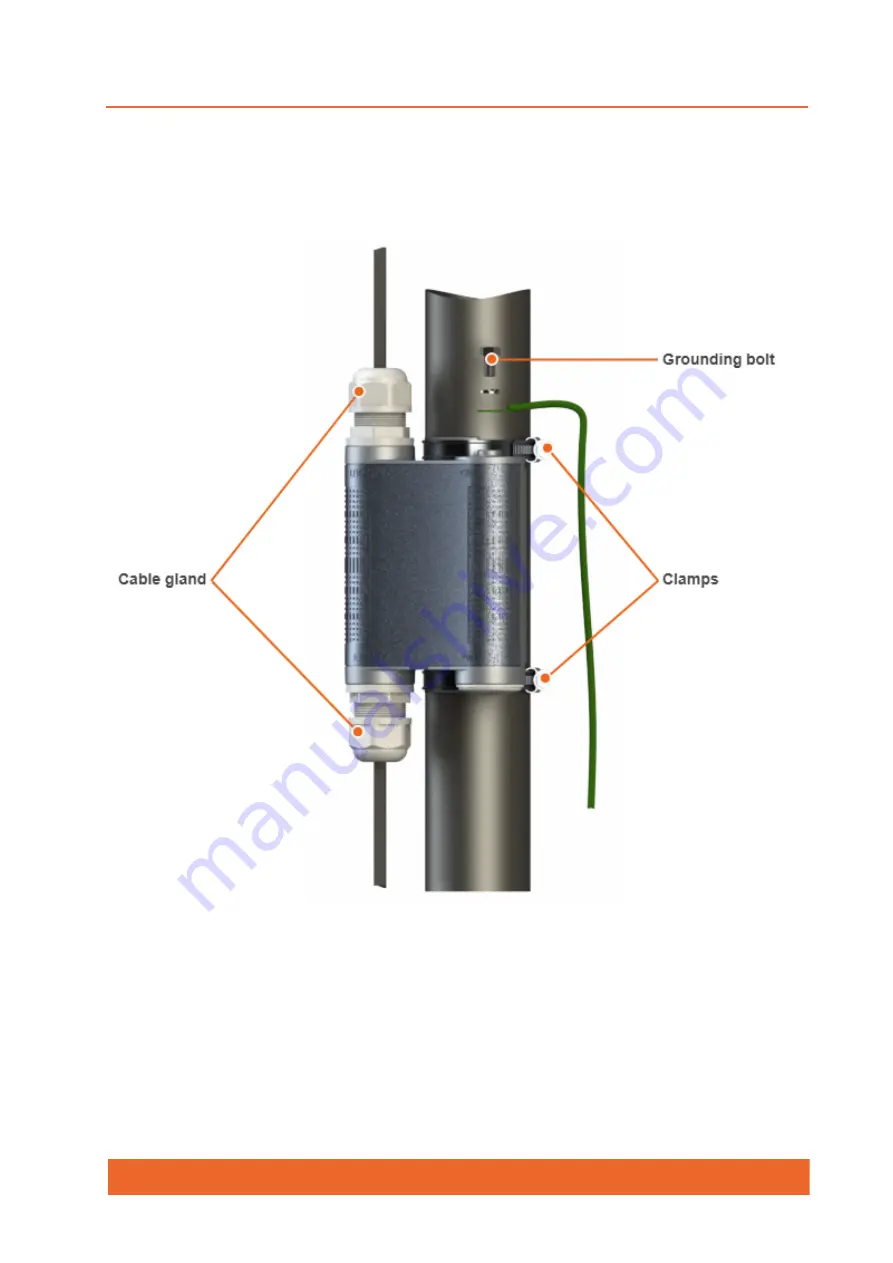
AUX-ODU-LPU-G can be installed on a pole, using hose clamps. Attach the grounding cable 

(min cross-section 2.5 mm ) to the case, using grounding bolt.

2


Figure - AUX-ODU-LPU-G Mounting

During AUX-ODU-LPU-G mounting it is necessary to provide a small loop of the FTP Cat5e 

cable that should be below the cable gland. These ensure that water is not constantly 

channeled towards the connectors. It will also serve as a cable compensator for the cable linear 

expansion as the temperature difference result.

Summary of Contents for Quanta 5

Page 1: ...Quanta 5 Technical User Manual ...

Page 2: ...8 3 3 1 Radio 9 3 3 2 Networking 10 3 3 3 Distance 10 3 3 4 Environment 10 3 3 5 Power 11 3 4 Hardware Platform 11 3 4 1 Wireless device 11 3 4 2 Power Supply 13 3 4 3 Lightning protection unit 17 3 4 4 Part number description 21 3 5 Packing List 22 4 Planning considerations 23 4 1 InfiPLANNER 23 4 1 1 Range and obstacles 23 4 2 Antenna Placement 24 5 Link Pre configuration in the lab 29 6 Install...

Page 3: ...moteUser Remove action menu on selected text AJS action menu link hide Remove comments section AJS comments section hide Find elements with inline comments var commentedElements Array from document getElementsByClassName inline comment marker If any found if commentedElements length 0 For each inline commented element clear data ref and class for var i 0 i commentedElements length i commentedEleme...

Page 4: ...comment marker If any found if commentedElements length 0 For each inline commented element clear data ref and class for var i 0 i commentedElements length i commentedElements i dataset ref commentedElements i className Else do nothing Network ports 74 7 7 2 QoS 75 7 7 3 VLAN based switching 75 7 8 Spectrum Analyzer 78 7 9 Antenna Alignment Tool 81 7 10 Maintenance 81 7 10 1 Device information 82 ...

Page 5: ...nformation for the family devices including Quanta 5 system specifications installation commissioning maintenance and troubleshooting The document is intended to be used by qualified RF engineers technicians and IT professionals Qualified personnel should have skills and experience with Outdoor indoor radio equipment installation Outdoor wireless networks TCP IP networking protocols Safety procedu...

Page 6: ...he software and the accompanying documentation InfiNet Wireless specifically disclaims all implied warranties of merchantability and fitness for a particular purpose and non infringement with respect to the software Units of product including all the software delivered to purchaser hereunder are not fault_ tolerant and are not designed manufactured or intended for use or resale in applications whe...

Page 7: ...tent permitted by applicable law in no event shall the liability for damages hereunder of InfiNet Wireless or its employees or agents exceed the purchase price paid for the product by purchaser nor shall the aggregate liability for damages to all parties regarding any product exceed the purchase price paid for that product by that party except in the case of a breach of a party s confidentiality o...

Page 8: ...ribes the actions to be taken during occured problems investigation 3 2 Document marks 3 3 Key Features Quanta 5 is a wireless point to point solution 460 with an impressive performance of up to Mbps in the 40 MHz bandwidth a packet perfomance is up to 900 000 pps Quanta 5 family is based on the newest InfiNet Wireless proprietary Octopus SDR hardware platform It operates in frequency range from 4...

Page 9: ...e link performance Hybrid FDD split frequency mode separate allocation of downlink and uplink channels to utilize the least congested frequency channel at each end of the link Automatic Repeat Request ARQ a technology which enables packet re transmission in case of previous unsuccessful delivery allows to achieve reliable connectivity even in highly congested spectrum Instant DFS a set of algorith...

Page 10: ... ensures that the most important data arrives with priority One of the network mechanisms to optimize bandwidth by reducing the share of overhead for service headers are Jumbo frames with size up to 9038 bytes 3 3 3 Distance Quanta 5 has a link budget of up to 168 dB This budget allows it to achieve reliable connectivity at up to 40 km in clear line of sight conditions as well as provides sufficie...

Page 11: ... 4 Hardware Platform 3 4 1 Wireless device An integrated wireless device contains the radio and networking electronics Implemented in a robust all weather metal enclosure this equipment can be used to create point to point wireless links at distances in excess of 40 Km depending on country regulations antenna types interference terrain climate zones etc There are several possible version of Quanta...

Page 12: ...igabit Ethernet Port RJ45 socket for connecting to power supply and network via the PoE power supply The network connection to the ODU is made via a 1000BaseT Gigabit Ethernet connection Power is provided to the ODU over the 1000BaseT Ethernet connection using a standard IEEE 802 3 at passive PoE power supply ...

Page 13: ...s wired connection appears and green when 1000 Mbps wired connection appears Other indicators are used to perform coarse antenna alignment The more indicators are on the better wireless connection is established The blinking indicator means an intermediate state The more often the indicator blinks the higher level connection is established 3 4 2 Power Supply ...

Page 14: ...Injector with lightning protection for Quanta 5 product family Parameter Description Size 110 40 30 mm L W H Weight 0 110 kg Connectors and Interfaces ETH IN Ethernet input Data only ETH OUT Ethernet output Data VDC PASSIVE PoE PWR AC Input Supported Ethernet Modes 10 100 1000Mbps ...

Page 15: ... Input Voltage 100 240 VAC AC Input Current 0 4A 100 VAC AC Frequency 50 to 60 Hz Consumption 15 4 W Garanteed Operating temperature range 10 С 50 С Operating humidity Maximum 95 Non condensing Storage temperature 40 85 С С Storage humidity Maximum 95 Non condensing Output Power Voltage 48 VDC ...

Page 16: ...a pair B 3 Data pair B 4 Data pair C 4 VDC Data pair C 5 Data pair C 5 VDC Data pair C 6 Data pair B 6 Data pair B 7 Data pair D 7 VDC Data pair D 8 Data pair D 8 VDC Data pair D Electromagnetic Emission Immunity FCC Part 15 Class B EN 55022 Class B EN 55024 VCCI Regulatory Compliance RoHS Compliant WEEE Compliant CE Energy Efficiency Level VI Safety UL IEC EN 60950 1 Table IDU BS G 60W Specificat...

Page 17: ...Quanta 5 Quanta 5 Technical User Manual 17 Figure IDU CPE G Front Panel Figure IDU CPE GRear Panel 3 4 3 Lightning protection unit ...

Page 18: ...lightning strikes It provides the same level of protection as AUX ODU INJ G Despite the fact every InfiNet Wireless unit has a built in lightning protection AUX ODU LPU G thanks to its superior GR 1089 grade protection greatly reduces the risk of replacing damaged devices operating in harsh environments or difficult to reach locations Parameter Description Size and Weight 34x94x121 mm 0 28 kg NOTE...

Page 19: ...s Gigabit Ethernet pass through Water and Dust Protection IP66 and IP67 Operating temperature range 55 C 60 ºC Ethernet Connectors Pin out ETH IN ETH OUT Pin Description Pin Description 1 Data pair A 1 Data pair A 2 Data pair A 2 Data pair A 3 Data pair B 3 Data pair B 4 Data pair C 4 Data pair C 5 Data pair C 5 Data pair C 6 Data pair B 6 Data pair B 7 Data pair D 7 Data pair D 8 Data pair D 8 Da...

Page 20: ...tion Lightning Protection In compliance with GR 1089 IEC 61000 4 2 ESD 15kV air 8kV contact IEC 61000 4 4 EFT 40A tp 5 50ns IEC 61000 4 5 Lightning L5 95A tp 8 20us ETSI ETS 300 386 Table AUX ODU LPU G Specification Packing list Figure Packing list AUX ODU LPU G ...

Page 21: ...scription Quanta 5 part number has the following structure Structure items are described below Item Description 1 Product family name Q Quanta 2 Frequency range 5 device in the range of 5 GHz 3 23 antenna gain in case of devices for an external antenna connection E ...

Page 22: ...stallation please make sure you have all necessary parts and accessories Outdoor unit Quanta 5 ODU Power supply Cable gland Shielded RJ 45 connector Unshielded RJ 45 connector Mounting kit universal assembling kit for mounting the ODU on standard pole wall or thick pipe vertical horizontal Power cord the model depends on the region according to the Purchase Order ...

Page 23: ...he antennas placement for a point to point link to achieve maximum range and performance between two antennas Perform a survey to identify all the obstructions such as trees or buildings in the path and to assess the risk of interference The radio beam is an invisible form of electromagnetic wave propagation and is not as thin as a laser beam for example The main energy in a radio beam is concentr...

Page 24: ...necessary to perform a precise analysis of the signal propagation path and possible obstructions that may cover the 1 Fresnel zone st 4 2 Antenna Placement General recommendations for antenna placement NOTE More detailed information about radio signal propagation is available at Wireless online course Networking Fundamentals ...

Page 25: ...ting surfaces should be considered buildings with reflective windows water surfaces or wet grounds These can be useful in NLOS situations if there is no direct clear path between the 2 antennas so the radio signal needs to be reflected off a surface However these can also decrease the signal quality when encountered along a clear LOS link because of fading caused by multipath When installing anten...

Page 26: ...erence to radio communications However there is no guarantee that interference will not occur in a particular installation If this equipment does cause harmful interference to radio or television reception which can be determined by turning the equipment off and on the user is encouraged to try to correct the interference by one or more of the following measures Reorient or relocate the receiving ...

Page 27: ...bile satellite systems for devices with detachable antenna the maximum antenna gain permitted for devices in the bands 5250 5350 MHz and 5470 5725 MHz shall be such that the equipment still complies with the e i r p limit for devices with detachable antenna the maximum antenna gain permitted for devices in the band 5725 5850 MHz shall be such that the equipment still complies with the e i r p limi...

Page 28: ...les dans le même canal pour les dispositifs avec une antenna détachable le gain d antenne maximal autorisé pour les dispositifs des bandes 5250 5350 MHz et 5470 5725 MHz doit être tel que l équipement soit toujours conforme à la norme e i r p limite pour les dispositifs avec une antenna détachable le gain d antenne maximal autorisé pour les dispositifs de la bande 5725 5850 MHz doit être tel que l...

Page 29: ... was established correctly Use the following instruction to assemble a test scheme Connect Gigabit Ethernet port at the ODU to the power supply port labeled as OUT Connect Ethernet port at the laptop to the power supply port labeled as IN Connect the power cord to power supply and plug it to AC mains NOTE A minimum set of requirements must be met during devices pre configuration in the lab Make su...

Page 30: ...et 10 10 10 10 with mask 255 255 255 0 Use any letters or numbers for the initial authentication on each unit for example Login login Password password After the first login let s configure a distinctive name for each unit and set a custom login and password Go to the Settings General section and configure NOTE We assume that each unit used in this setup has not been configured before and runs wit...

Page 31: ...Quanta 5 Quanta 5 Technical User Manual 31 Device Name e g Master Slave Go to the Settings Security section and configure Login e g admin Password e g admin ...

Page 32: ...rver ftp ftp infinet ru pub Firmware In the Maintenance section click the Select file button and set the path to the downloaded file or drug it to the specified area File will be uploaded to the device Changes will take force after reboot Step 4 Radio parameters configuration Let s configure the minimum needed radio parameters to establish the link At the unit named Master at step 2 above go to th...

Page 33: ...ge Link Planning Uplink center frequency 5200 MHz Power limit 5 dBm set the minimum value in the range as currently we are in the lab and we don t need high output power Channel width 20 MHz use value selected at the stage Link Planning Frame length 5 ms Guard interval 1 8 The rest of parameters remain with the default values ...

Page 34: ...a 5 Technical User Manual 34 At the unit named Slave at step 2 above go to the Settings General section and set the Link ID parameter it must be the same on both sides of the link Then to Radio and set this unit with ...

Page 35: ...cted at the stage Link Planning Power limit 5 dBm set the minimum value in the range as currently we are in the lab and we don t need high output power Channel width 20 MHz use value selected at the stage Link Planning Frame length 5 ms Guard interval 1 8 The rest of parameters remain with the default values ...

Page 36: ...anta 5 Technical User Manual 36 Step 5 Check the wireless link status Let s apply all settings described above for each unit and go to the Dashboard section and check if the device status has changed to Connected ...

Page 37: ...Quanta 5 Quanta 5 Technical User Manual 37 ...

Page 38: ...Quanta 5 Quanta 5 Technical User Manual 38 6 Installation Mounting kit Cable Gland Assembly Mounting Grounding and Lightning Protection Antenna Alignment ...

Page 39: ...rding to the scheme below of the unit with two axis adjustment The nut must be tightened until the spring washer clicks without over tightening Mounting is carried out on a pole with a diameter 30 85 mm There are also possible options for mounting on a wall or pole with a diameter more than 85 mm NOTE Clamps and other optional fasteners are not included in the Mounting kit MONT KIT 85 ...

Page 40: ...mponents are listed below Unshielded RJ 45 connector Shielded RJ 45 connector FTP Cat5e cable Cable gland Cable sealing nut Cable sealing grommet with rubber seal Cable gland case Crimping tool for RJ 45 connector NOTE The outside diameter value of the FTP Cat5e cable should not exceed 7 mm ...

Page 41: ...as shown on the figure Step 4 Crimp the standard RJ 45 connector onto the cable using crimping tool Pin out scheme T568B wiring standards Step 5 Insert the Rj 45 connector into the device socket until you hear a click Step 6 Screw the cable gland body into the port and tighten it Do not apply excessive force Step 7 Tighten the thread lock sealing nut Do not apply excessive force NOTE Do not use th...

Page 42: ...rray from document getElementsByClassName inline comment marker If any found if commentedElements length 0 For each inline commented element clear data ref and class for var i 0 i commentedElements length i commentedElements i dataset ref commentedElements i className Else do nothing Pre installation Reqiered tools Screwdriwer set Pliers pipe wrench Wrench set Additional equipment GPS receiver Hig...

Page 43: ...ation of the links although InfiNet Wireless devices can also operate in Near LoS or Non LoS conditions to achieve the best performance it s highly recommended to install the link in locations where Clear Line of Site and clear channels are available You performed link planning using the InfiPLANNER tool https infiplanner to determine the link path profiles radio equipment placement infinetwireles...

Page 44: ...Cat5e FTP cable with a shielded connector covered by a cap to the OUT port of the power supply having previously touched the power supply connector case with FTP cable connector case Perform the power supply grounding Connect the laptop using Cat5e FTP cable to the power supply IN port Connect the power cord to the power supply and then to the power circuit Make sure a small loop at least 10 cable...

Page 45: ...unding lightning protection and equipment location for the wireless device power supply and AUX ODU LPU G unit if installed CAUTION Electro magnetic discharge lightning damage is not covered under warranty The recommendations in this document when followed correctly give the user the best protection from the harmful effects of EMD However 100 protection is neither implied nor possible ...

Page 46: ... wireless device should be assembled with unshielded standard RJ 45 connector The power supply is grounded via a three conductor power cord and a grounded socket AUX ODU LPU G grounding is performed using grounding bolt Antenna pole and wireless device should be connected to the common ground ring Grounding cables should be no less than 10AWG thick and must use corrosion resistant connectors Speci...

Page 47: ...he bottom is to protect the IDU and customer equipment Use the lightning protection unit to protect all circuits for signal transmission and power supply video audio management signals Ethernet etc Regularly especially before the periods with high thunderstorm activity check the integrity of lightning protection units grounding elements and bonding conductors Make sure to install the two LPU devic...

Page 48: ...Quanta 5 Quanta 5 Technical User Manual 48 Figure AUX ODU LPU G Assembly Scheme ...

Page 49: ...to the case using grounding bolt 2 Figure AUX ODU LPU G Mounting During AUX ODU LPU G mounting it is necessary to provide a small loop of the FTP Cat5e cable that should be below the cable gland These ensure that water is not constantly channeled towards the connectors It will also serve as a cable compensator for the cable linear expansion as the temperature difference result ...

Page 50: ... LPU G Cable Ggland Assembly In order to ensure that the cable gland remains sealed under any environmental conditions please follow the assembly sequence according to the procedure below CAUTION Missing or bad grounding may leave the unit vulnerable to lightning damage ...

Page 51: ... 5 Insert the Rj 45 connector into the corresponding socket until you hear a click Step 6 Screw the cable gland body into the port and tighten it Do not apply excessive force Step 7 Tighten the thread lock sealing nut Do not apply excessive force CAUTION Make sure that the RJ 45 connector is well crimped A loose connector can damage the device Please note that such damage is not covered by the war...

Page 52: ...Quanta 5 Quanta 5 Technical User Manual 52 Figure AUX ODU LPU G Cable Gland Assembly Scheme ...

Page 53: ...mmendations It is recommended to have two teams prepared for alignment procedure each team with at least two members one should take the signal readings and communicate with the remote end the other should manipulate the antenna For rough alignment use the azimuth elevation angle and suspension height from InfiPLANNER report On the device case there is a scale indicating the received signal level ...

Page 54: ...Quanta 5 Quanta 5 Technical User Manual 54 ...

Page 55: ... displays the signal levels for both devices and both polarizations this makes an alignment process fast and accurate A green marker indicates the current signal level To achieve the best performance this marker should be as close as possible to the gray area values which displays the maximum calculated value possible for this link A gray marker indicates the maximum value that was reached on this...

Page 56: ...hnical User Manual 56 7 Operation Administration Web GUI Access Dashboard General settings Security settings Radio settings Network settings Switch Settings Spectrum Analyzer Antenna Alignment Tool Maintenance SNMP settings ...

Page 57: ...hboard This section is intended to provide the main information about the wireless unit operation The Dashboard displays a read only summary of the current link status information local and remote device signal strength capacity for downlink and uplink current values of the basic configuration settings and Ethernet network status NOTE By default any username and any password can be used to login Q...

Page 58: ...itored as well as duplex mode and traffic load for reception and transmission The wired interface statistic is available on the right side it can be reset by the Clear counters button Parametr Description Runt packets Packets less than 64 bytes in size Oversize packets Packets larger than 1518 bytes FCS errors Packets dropped due to checksum mismatch Port overflow errors Packets dropped due to por...

Page 59: ...displayed in the MCS subsection 7 2 3 Received signal strength indicator The RSSI indicator displays the received signal level for each channel uplink and downlink and both polarizations Available values 90 80 dBm close to the receiver sensitivity level only the lowest modulations are available 80 60 dBm average input range 60 40 dBm the recommended range for achieving best performance 40 dBm inpu...

Page 60: ...21 dB 7 2 5 Retries and Frame loss Retried and lost packets need also to be tracked Retries should tend to zero link with the retries value more than 5 should not be allowed to operation 7 3 General settings The General settings section allows to configure basic system parameters described in the table below This section includes two main csubsections NOTE Downlink the direction from Master to Sla...

Page 61: ...l be used by network administrators for unit identification It will be shown in Web GUI side panel Link ID Wireless link identificator used to avoid connecting a unit to a wrong peer if there are several co located units using the same center frequency Specify different ID values for different links Both ends of the same link must have the same ID Unit parameters description Figure Unit parameters...

Page 62: ...ch is may be needed to meet the local law requirements Each regulatory domain may limits the following parameters Range of available center frequencies Requirement of use LBT Listen Before Talk technique Maximum EIRP Equivalent Isotropically Radiated Power value Requirement of use radar detection technique Figure Regulatory domain settings ...

Page 63: ...SNTP Server Address The SNTP server IP address the SNTP service will synchronize the time on the device with The device must have network access to the SNTP server Time Zone The time zone at the place of device installation For example GMT 5 SNTP parameters description Figure SNTP settings 7 4 Security settings The Security settings section allows to configure device access and security settings T...

Page 64: ...tor access Here you may change system administrator account login and password to change the identification data click the Change admin password button We strongly recommend you to set a login and password after the first login to the device Figure Admin access ...

Page 65: ...ius server parameters description Figure RADIUS parameters 7 4 3 Command line interface Allows to enable disable remote device control by the command line using Telnet and SSH protocols SSH Secure Shell protocol provides secure remote control to network devices Its functionality is similar to the Telnet protocol but unlike Telnet SSH encodes all protocol messages including transmitted passwords By...

Page 66: ...th ends of the wireless link should authorize each other before link establishment Access key must be up to 64 characters long without spaces and must be the same at both ends of the link Unit parameters description 7 5 Radio settings The Radio settings section allows to configure radio parameters to establish wireless connection Radio settings are divided into the following categories 7 5 1 Radio...

Page 67: ...aster operates on Channel width should be the same and set manually on both units When a wireless link has been established Slave unit will continuously inherit radio frontend parameters from Master unit excluding frequency channel grids So if you change some values on Master they will be set on Slave automatically Fixed center frequency Available only on the Slave unit Enabled center frequency mu...

Page 68: ...ill be the same Power limit This parameter limits the transmitter power there are two modes Transmitter output power limits the power of transmitter to the set value EIRP limits the total system power calculated as Tx Power Antenna gain Cable loss Radio frontend settings description NOTE Downlink the direction from Master to Slave Uplink the direction from Slave to Master These directions are corr...

Page 69: ...Quanta 5 Quanta 5 Technical User Manual 69 Figure Radio frontend settings 7 5 2 Air frame ...

Page 70: ...tions If larger frames will be dropped the larger payload is lost and system performance is decreased significantly If smaller frames will be dropped the smaller payload is lost Guard interval Guard interval is intended for intersymbol interference elimination One of the intersymbol interference reasons is multipath propagation in which a wireless signal from a transmitter reaches the receiver via...

Page 71: ...Quanta 5 Quanta 5 Technical User Manual 71 Figure Air frame settings ...

Page 72: ...and thus increase the throughput Disabled disables automatic modulation control Automatic transmit power control ATPC allows to control transmitter output power automatically based on target RSSI value If actual RSSI level is lower then unit increases transmitter output power of the remote unit and vice versa ATPC could not set value that may exceed the Power limit value The Master unit manages th...

Page 73: ...ency selection will also be limited to the values indicated in the grid 7 6 Network settings This section allows to assign an IP address or several addresses to the wired interface the default gateway value can also be specified Click the Add IP address button to add a new address There are two ways to assign an IP address Automatically the IP address will be obtained automatically from the DHCP s...

Page 74: ...ument getElementsByClassName inline comment marker If any found if commentedElements length 0 For each inline commented element clear data ref and class for var i 0 i commentedElements length i commentedElements i dataset ref commentedElements i className Else do nothing Network ports Each Quanta 5 family device has 3 ports ge0 Gigabit Ethernet 1000BASE T port radio internal radio interface mgmt i...

Page 75: ...er transmission over radio interface frames with tags are sent to Ethernet Priorities may be adjusted manually if a VLAN based switching is enabled 7 7 3 VLAN based switching VLAN based switching allows to create list of allowed VLANs and their handling on the unit switch plane If VLAN based switching is enabled but no VLANs are added device ports will allow untagged traffic only Each entry of lis...

Page 76: ...ction must be enabled Port mode VLAN mode should be set for each of network ports Mode determines the way which VLAN tagged network packets will be handled by switch There are three ports modes Off denies all traffic of a specified VLAN If none of the modes is selected the port will be marked as Off Access operates as access port allows only untagged traffic Tagged operates as trunk port allows ta...

Page 77: ...Quanta 5 Quanta 5 Technical User Manual 77 ...

Page 78: ... the red one denied Traffic flow between ports is performed in accordance with VLAN modes set if the VLAN based switching is enabled 7 8 Spectrum Analyzer In the Spectrum Analyzer menu you can perform a deep analysis of the radio emissions in the environment where the unit is placed The unit scans the radio spectrum on all available frequencies In order to obtain the information as accurate as pos...

Page 79: ...Quanta 5 Quanta 5 Technical User Manual 79 Figure Spectrum analyzer result The following parameters are available in order to operate the Spectrum Analyzer ...

Page 80: ...pped and the radio interface will be back to its normal mode operation Estimated scan time Estimated scan duration Table Spectrum analyzer parameters Click on Start scanning button to start scanning You may stop scanning by clicking on appropriate button By clicking the Last Snapshot button you get the final scanning results The most common usage of this feature is when you perform a spectrum scan...

Page 81: ...ine and does not break the wireless connection Each side of the link local and remote has two similar test indicator sets corresponding to each antenna polarization This allows controlling the alignment process for each antenna polarization for the local and for the remote device simultaneously The main idea is to achieve the actual signal level green square is closer to the reference value pale a...

Page 82: ...l Firmware version and build date Device serial number Device part number Hardware platform version Time since last reboot Last reboot reason following values are possible Software fault Unexpected restart Manual restart Manual delayed restart Firmware upgrade SNMP managed restart Test firmware loaded Watchdog Panic System log ...

Page 83: ...ptions to upgrade firmware on the device Manually new firmware should be downloaded from official Infinet FTP server ftp ftp Click on Upload firmware button and choose a firmware file infinet ru pub Firmware Or you can drag and drop a file from your file manager into the dotted area Automatically coming soon firmware may be upgraded to the latest firmware version automatically Click on Update firm...

Page 84: ... manager into the dotted area 7 10 5 Diagnostic card In situation then helps of InfiNet Wireless technical support team is requiered the diagnostic card is necessary tool which helps to detect and solve an issue faster and more effective Click on Download button to create diagnostic card 7 11 SNMP settings SNMP allows the administrator to gather information about key device parameters and wireless...

Page 85: ...onitoring system provides data gathering from all agents in the network The monitoring system receives and processes events The information is passed through requests and replies with the use of the MIB The management station or monitoring system is responsible for decoding the SNMP packets and providing an interface to the administrator Figure SNMP configuration ...

Page 86: ...as a reference information about the physical device s location SNMP v1 v2c Enabled Enable disable the SNMP v 1 and v 2c support The first version of the SNMP protocol lacks security that hinders its use for network management so SNMP v 1 and v 2c operates in read only mode Enabled by default Community Set the community name for read only mode of SNMP v 1 and v 2c by default The community name pas...

Page 87: ...is lesson describes basic troubleshooting actions to be taken in case a problem occurs to the wireless link List of possible problems No access to the local unit No access to the remote unit Expected throughput is not met No data is being transferred Unit management is lost ...

Page 88: ...orks by using a laptop or ERConsole If the local connection is allowed after the authentication step in web interface check the operational status of the Ethernet port Enable the port if found disabled check the connectivity matrix and VLAN settings if used Reboot the unit at the Maintenance section Step 2 Report the problem to the InfiNet Wireless support team If you are unable to identify the ca...

Page 89: ...nit role Center frequency Channel width Maximum transmit power Frame length Guard interval Link ID Access key If some parameters have different values perform the modifications and check the wireless link establishment after unit reboot In case the wireless link is still down go on site to the location of the local unit and check the cables and connectors Step 2 Remote unit check ...

Page 90: ...ng radio parameters must be the same on both units Link ID Center frequency Channel width Frame length Guard interval Downlink Uplink ratio Access key Step 3 Path profile check If the wireless link is down after previous steps check the antennas alliagnment with two teams working simultaneously one at the remote side and the other one at the local side Also redo the radio planning to avoid the sit...

Page 91: ...e antennas alignment cables condition and obstructions in the first Fresnel zone or line of sight Proceed to the Radio section and check the frame length value if it is too small try to increase it Perform the antenna alignment with built in tool especially in case of low RSSI and EVM values Step 2 Check at the units location site Further actions should be done on the site of units location Check ...

Page 92: ...nectivity in the Switch section ge0 port must be connected with the radio port Check the operation status of the ge0 port Enable the port if it was disabled In case of using VLANs proceed to the Switch section and make sure that the VLAN configuration is correct the specific traffic VLAN ID is allowed to pass through the port If the port status is Up but no packets are received check the configura...

Page 93: ...ole can be used to reset the InfiNet Wireless units to the factory default configuration Software requirements ERConsole ftp ftp infinet ru pub Utils EmergenceRepairConsole ERConsole zip Java Runtime Environment http www java com en download It is recommended to turn off any anti virus or firewall running on your computer and to turn off all the network interfaces except the Ethernet interface con...

Page 94: ...t configuration the InfiNet Wireless unit should be rebooted 8 5 1 Access to the unit recovery If you have lost management to your unit proceed as follows Run the ERConsole Turn off the unit and then turn it on in a few seconds Wait for 30 seconds and the ERConsole screen should receive update from the unit The serial number number of unit reset cycles Sequence field IP address network mask and MA...

Page 95: ...ned or not to the unit IP address and net mask are assigned Configure on your PC an IP belonging to the same network and connect to the unit in order to perform the modifications and checking required If there is no IP displayed 0 0 0 0 proceed with the next step IP address and net mask are not assigned ...

Page 96: ...d network mask then click OK Turn off and on the unit Wait for 30 seconds until the IP is assigned Add an IP address from the same network subnet to your PC and access the unit ERConsole will not show newly assigned IP address Login to the unit using the new IP Do not reboot the unit until the new configuration has been saved because the additional IP address is temporary ...

Page 97: ...est must include the unit serial number and the value of Sequence field if it s non zero Obtain the unit IP address using the ERConsole as described in the section above Click on the button in the ERConsole application and a new window will appear Select Reset configuration option and enter the factory password to the Factory password field then click OK The password must be entered at the same fo...

Page 98: ...Quanta 5 Quanta 5 Technical User Manual 98 9 Glossary ...

Page 99: ...col H FDD Hybrid Frequency Division Duplexing IP Internet Ptotocol LBT Listen Before Talk LOS Line of Sight MAC Media Access Control MCS Modulation and Coding Scheme NLOS Non Line of Sight PHY Physical layer PoE Power over Ethernet QAM Quadrature Amplitude Modulation QoS Quality of Service QPSK Quadrature Phase Shift Keying RF Radio Frequency RSSI Received Signal Strength Indicator SDR Software De...

Page 100: ...Quanta 5 Quanta 5 Technical User Manual 100 ...

Reviews: