background image

LINEA PRO 7 PLUS USER MANUAL

10

Power On Linea Pro 7 Plus

After the iOS device is attached to the Linea Pro 7 Plus and the 
application software is installed, you can turn on the unit.

1. 

With the unit turned off, press one of the Scan buttons on the 
side of the unit. When the unit is active, the LED on the top side 
illuminates blue, based on the battery level.

2. 

Unlock the iOS device screen.  

Note 

When the Linea Pro 7 Plus is left idling for an extended period, the 
power is automatically turned off to preserve the charge on the internal 
battery pack. If turned off, the unit is in sleep mode immediately.

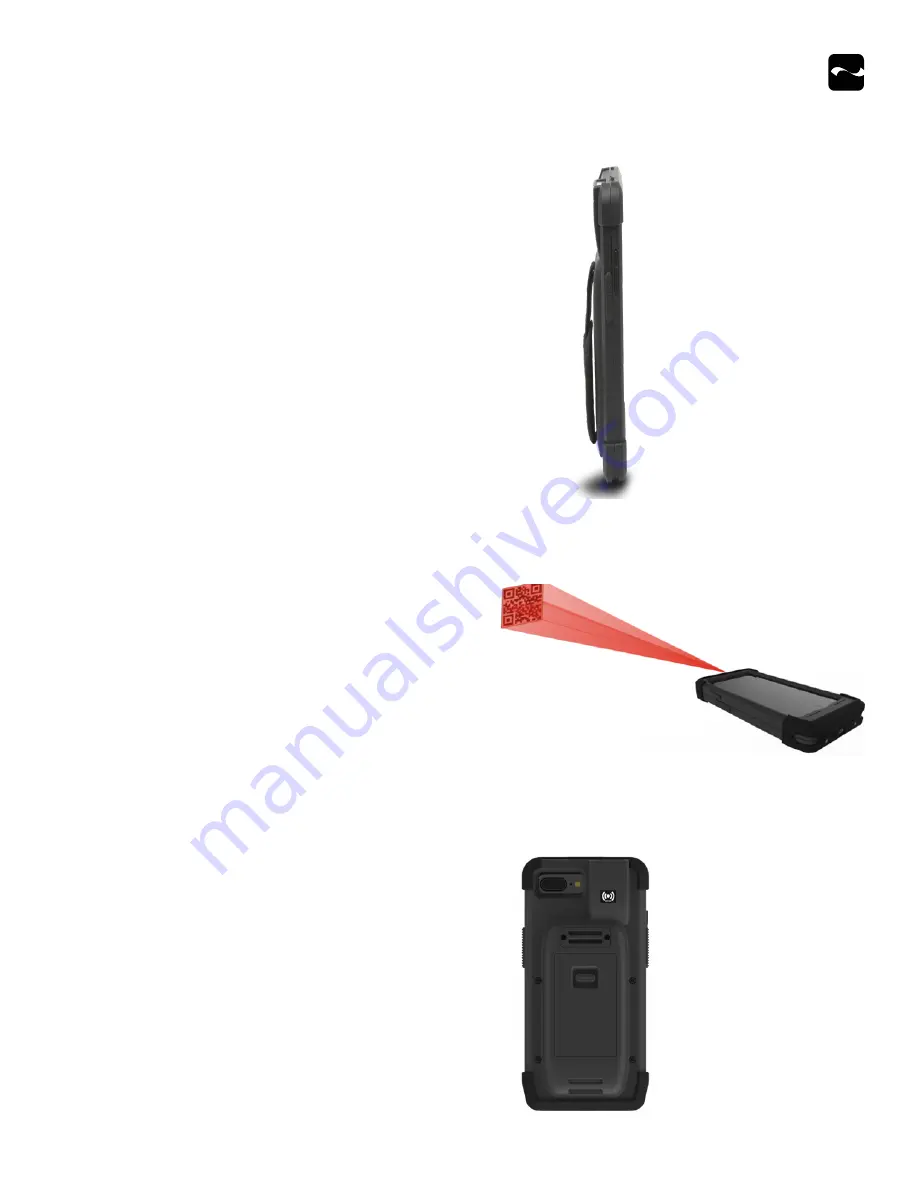
Scan Barcodes

The scan engine in the Linea Pro 7 Plus 1D model supports one-
dimensional (1D) barcode symbols. The 2D model scan engine 
supports one-dimensional (1D) and two-dimensional (2D) barcode 
symbols. The effective reading distance of the barcode reader varies 
based on the barcode size. For example, 15-20 cm (5.9-7.9 inches).
These types of scanning modes are supported:

• 

Single scan

• 

Multi-scan

• 

Motion detect

• 

Multi-scan without duplicates

To scan a barcode 

1. 

Press and hold the Scan button on either side of the unit to 
activate the Linea Pro 7 Plus.

2. 

Position the scan head as close to the center of the barcode 
label by aiming the illumination box over the outer edges of  
the barcode.

3. 

Pull the unit back slowly back or forth, increasing the distance 
between the barcode and scan head, until the barcode is read 
by the scanner. Data is displayed on the iOS device.

Read Contactless Cards 

(Optional)

The  contactless card reader incorporates several RFID formats 
depending on your Linea Pro 7 Plus  model.

To use the contactless card reader

1. 

Press the Scan button to activate the unit.

2. 

Place the RFID tag/card over the receiver/transmitter as 
indicated by the RFID label. 

Note 

Data is sent from the Linea Pro 7 Plus contactless card reader to the 
iOS device.

Summary of Contents for Linea Pro 7 Plus

Page 1: ...Linea Pro 7 Plus User Manual For iPhone 7 Plus 8 Plus Mobile Devices ...

Page 2: ... Pro 7 Plus Accessories 6 Developing Applications 6 Box contents 6 Linea Pro 7 Plus Layout 7 Assemble Your Linea Pro 7 Plus 8 Charge the Battery 9 Check Battery Status 9 Replace the Battery 9 Power On Linea Pro 7 Plus 10 Scan Barcodes 10 Read Contactless Cards Optional 10 Troubleshooting 11 Update Software 11 Warranty 11 Disclaimer 11 Product Returns and Servicing 12 Symbols 12 Federal Communicati...

Page 3: ...ith an iPhone may affect wireless performance iPad iPhone and iPod touch are trademarks of Apple Inc registered in the U S and other countries Lightning is a trademark of Apple Inc Made for these mobile digital devices iPhone 7 Plus iPhone 8 Plus Mobility Sales Technical Support Center Infinite Peripherals Inc 17681 Mitchell N Irvine CA 92614 1605 Toll Free 866 278 7860 Office 949 222 0300 Website...

Page 4: ... be read omni directionally Contactless card reader Built in tag card reader with read write capability at 13 56 MHz Reader incorporates many RFID formats depending on the model of your Linea Pro 7 Plus Bluetooth compatible Bluetooth 2 0 SPP compatibility for a Bluetooth peripheral such as a printer Syncing Enables your iOS device to be synced with iTunes Battery status View the battery status in ...

Page 5: ...ion DC 5V through dual charging station Indicators Audio via electromagnetic buzzer Optional Contactless Card Reader ISO IEC 14443 Type A MIFARE MIFARE MINI MIFARE CLASSIC 1K MIFARE CLASSIC 4K MIFARE ULTRALIGHT ULTRALIGHT C MIFARE PLUS 2K 4K MIFARE DESFire card Supports most contactless card cards tags ISO IEC 14443 Type B ISO 15693 Technical Specifications Mechanical Compatibility iPhone 7 Plus i...

Page 6: ...m support Ensure the battery is fully charged If the battery is fully discharged the charging time is approximately 3 hours and 30 minutes Linea Pro 7 Plus Accessories Contact your Infinite Peripherals account representative for information about current and future product accessory offerings Developing Applications Software Developers Kit Software is not automatically provided with your Linea Pro...

Page 7: ...code Engine 2 LED Battery Status Indicator 3 On Off Button for iOS device 4 Battery Cover 5 Left Right Scan Buttons 6 Opening for Strap 7 Volume Button on iOS device 8 Charging pads 9 Reset Button for unit 10 USB Type C Connector 11 Screws to Remove Front Cover ...

Page 8: ...out the top cover from the first two latches to remove it Note The top cover is easily removed because the latches are loosened when the first four screws were removed 3 For the remaining latches slide the cover forward instead of pulling the top up The Linea Pro 7 Plus top cover is removed Attach iOS Device 1 Attach the iOS device to the Lightning connector by firmly sliding it into place 2 Align...

Page 9: ...nd or battery use only the approved USB Type C charger cable Check Battery Status Four LEDs indicate the battery status LED Color Description Battery level is below 19 Battery level is above 20 Battery is charging via attachment to outside power from USB connector or charging pads No color Linea Pro 7 Plus power is turned off Replace the Battery Replace the Linea Pro 7 Plus battery only with a new...

Page 10: ...istance of the barcode reader varies based on the barcode size For example 15 20 cm 5 9 7 9 inches These types of scanning modes are supported Single scan Multi scan Motion detect Multi scan without duplicates To scan a barcode 1 Press and hold the Scan button on either side of the unit to activate the Linea Pro 7 Plus 2 Position the scan head as close to the center of the barcode label by aiming ...

Page 11: ...t our sole discretion will repair the Product using new or refurbished parts or replace the Product with a new or refurbished Product For purposes of this limited warranty refurbished means a product or part that has been substantially returned to its original specifications In the event of a defect these are your exclusive remedies Disclaimer NO WARRANTY This technical documentation is provided A...

Page 12: ...in the RMA Support Portal at http ipcmobile com support rma 2 Login to your user account and then click Create RMA Request 3 Read the instructions provided and complete the online request form 4 Note the assigned RMA number and write it clearly on your shipping carton 5 Ship your equipment back to us using the address provided Symbols Symbol Description Refer to the instructions before using Manuf...

Page 13: ... does cause harmful interference to radio or television reception which can be determined by turning the equipment off and on the user is encouraged to try to correct the interference by one or more of the following measures Reorient or relocate the receiving antenna Increase the separation between the equipment and receiver Connect the equipment into an outlet on a circuit different from that to ...

Reviews: