background image

10) Do not opérate reversing switch while fan blades are in motion. Fan must be turned off and blades 

stopped before reversing blade direction.

11) Avoid placing objects in the path of the blades.

12) Always disconnect the appliance before cleaning or doing maintenance. Do not use wáter or de-

tergents when cleaning the fan or fan blades. In order to not damage the product, it is advisable to use 

adapted equipment to the fragile surfaces and products slowing the wear on the appliance. A dry dust 

cloth or lightly dampened cloth will be suitable for most cleaning.

13) After making electrical connections, spliced conductors should be turned upward and pushed care-

fully up into outlet box. The wires should be spread apart with the grounded conductor and the equip-

ment-grounding conductor on one side of the outlet box. 

14) The supplier disclaims all liability for personal injury or property damage arising from incorrect use or 

installation of the fan. In doubt, call upon an electrician.

15) Children should be supervised to ensure that they do not play with the appliance.

16) This appliance can be used by children aged from 8 years and above and persons with reduced phy-

sical, sensory or mental capabilities or lack of experience and knowledge if they have been given super-

vision or instruction concerning use of the appliance in a safe way and understand the hazards involved. 

Children shall not play with the appliance. Cleaning and user maintenance shall not be made by children 

without supervision.

ENVIRONMENTAL PROTECTION:

WARNING!

Electrical products must not be thrown out with domestic waste. They must be taken to a communa 

collecting point for environmentally friendly disposal in accordance with local regulations. Contact your 

local authorities or stocklist for advice on recycling. The packaging material is recyclable. Dispose of the 

packaging in an environmentally friendly manner and make it available for the recyclable material co-

llection-service.

ASSEMBLING AND INSTALLATION:

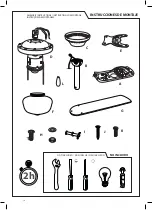
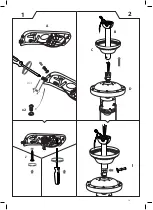
1) Verify all parts against part list and diagram.

2) Remove motor from packing. To avoid damage to finish assemble motor on soft padded surface or use 

the original packaging in motor box.

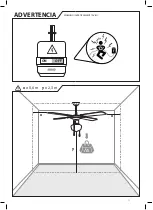
3) It is essential that the outlet box or structural member from which the far is to be suspended will safely 

support the fan. In view of the torque and weight factors involved some outlet boxes will require additio-

nal strengthening by securing more firmly to Wood beams of steel supports.

4) Attach the mounting bracket to the outlet box with the screws provided. Attached canopy into han-

ging bracket with fan unit and ball joint hang below the canopy and secured with 4 setscrews.

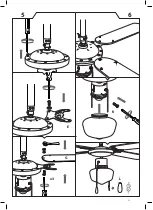
5) Making sure the ball is properly seated with molded Groove engaged with the tab on canopy be cer-

tain that hanging ball is fully locked into position.

6) Attach blades to the blade brackets using screws, nuts and washers. The three screws per blade are 

protruded from bottom of the blade bracket, through the blade bracket into the blade. Then place the 

washer and nut on top of the screw, holding the nut, thread the screw to tighten the blade and the blade 

bracket. Repeat instruction for fixing all blades to blade brackets.

7) Secure the blades to the fan motor with screws and washers.

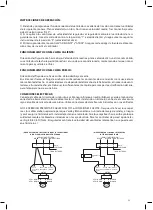
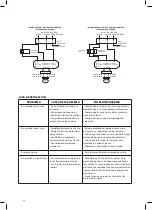
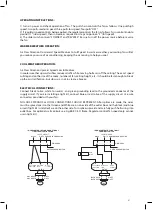
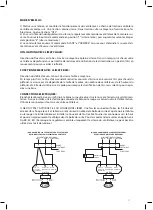
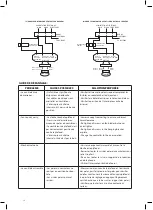
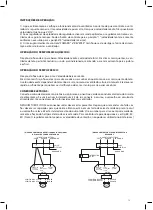
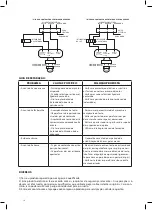
8) Make the power wire connections with wires black to black, white to white and green to green or bare 

wire(ground).Make sure that fan is properly grounded. Carefully push all wiring inside wiring box after 

splices are made. The blue wire is provided for the connection of optional light kit. Do not connect this 

wire if light is not installed.

06

Summary of Contents for 8436546190189

Page 1: ...Installation instructions Instructions d installation Instruções de instalação INSTRUCCIONES DE INSTALACIÓN ...

Page 2: ...E 1 5 9 13 17 18 INSTRUCCIONES DE INSTALACIÓN INSTALLATION INSTRUCTIONS INSTRUCTIONS D INSTALLATION INSTRUÇÕES DE INSTALAÇÃO ADVERTENCIA WARNING AVERTISSEMENT AVISO INSTRUCCIONES DE MONTAJE ASSEMBLY INSTRUCTIONS INSTRUCTIONS DE MONTAGE ...

Page 3: ...izadoolamodificacióntécnicadelaparatopuedeocasionarunpeligroparalavidaylasalud 3 Este aparato no está diseñado para ser usado por personas incluyendo niños con capacidades físicas sensoriales o mentales reducidas o por falta de experiencia y conocimiento a menos que hayan recibido supervisión o instrucciones sobre el uso del aparato por una persona responsable de su seguridad 4 Este aparato es sól...

Page 4: ...o ambiente y póngalo a disposición para el servicio de recolección de material reciclable MONTAJE E INSTALACIÓN 1 Verifique todas las piezas según la lista de piezas y el diagrama 2 Retire el motor del embalaje Para evitar daños en el acabado monte el motor sobre una superficie acolchada suave o utilice el embalaje original en la caja del motor 3 Es esencial que la caja de salida o elemento estruc...

Page 5: ...ápido para romper la estratificación del aire pero lento para no crear una brisa CONEXIONES ELÉCTRICAS Conecte el cable del circuito de suministro a cable negro blanco a neutro blanco y verde al conductor conectado a tierra del circuito de alimentación Si está instalando un kit de luz conecte el color azul o rojo a el cable del circuito de suministro Utilice conectores de alambre suministrados con...

Page 6: ...as conexiones de los cables de línea al ventilador Comprobar la posición del regulador de velocidad El ventilador hace ruido Embellecedor tocando el techo Afloje los tornillos de las palas del ventilador Ventilador no asegurado correctamente contra el techo Controlador de velocidad incorrecto Baje el embellecedor desde el techo para asegurar una separación mínima de 3 mm Vuelva a apretar todos los...

Page 7: ...nd split pin are in place and both setscrews on downrod are tighte ned securely before operation To reduce the risk of fire or electric shock do not use this fan with any solid state speed control device IMPORTANT SAFETY PRECAUTIONS 1 Check if the electrical specifications of the appliance are compatible with your installation 2 Unauthorized use or technical modification to the appliance can lead ...

Page 8: ...rdance with local regulations Contact your local authorities or stocklist for advice on recycling The packaging material is recyclable Dispose of the packaging in an environmentally friendly manner and make it available for the recyclable material co llection service ASSEMBLING AND INSTALLATION 1 Verify all parts against part list and diagram 2 Remove motor from packing To avoid damage to finish a...

Page 9: ...but slow so as not to créate a breeze ELECTRICAL CONNECTIONS Connect black to live white to neutral and green grounding lead to the grounded conductor of the supply circuit If you are installing a light kit connect blue or red to live of the supply circuit Use wire connectors provided with your fan NO LOOSE STRANDS or LOOSE CONNECTIONS SHOULD BE PRESENT After splices are made the wires must be spr...

Page 10: ... Mechanical noise Allow at least for 8 hours setting in period Fan wobbles Fan blades are not horizontal to ceiling Blade screws are loose Measure from ceiling to tips of blades the rotate fan so all blades are checked for equal height from ceiling not ajustments may be made by slight pressure up or down on blade holders Make sure all screws are securely fastened REPAIR GUIDE SUPPLY CIRCUIT SUPPLY...

Page 11: ...ette instruction peut être particulièrement dangereuse pour les utilisateurs AVERTISSEMENT Assurez vous que la goupille de pivotement et la goupille fendue sont bien en place et que les deux vis de fixation de la barre inférieure sont bien serrées avant l opération Pour réduire le risque d incendie ou de choc électrique ne pas utiliser ce ventilateur avec un dispositif de contrôle de vitesse à sem...

Page 12: ...TTENTION Les produits électriques ne doivent pas être jetés avec les ordures ménagères Ils doivent être transportés vers un point de collecte commun pour une élimination écologique conformément aux réglementations locales Contactez les autorités locales ou regardez la liste des matériaux pour obtenir des conseils sur le recyclage Le matériau d emballage est recyclable Éliminer l emballage de maniè...

Page 13: ...air mais ralentir pour ne pas créer une brise CONNECTIONS ELECTRIQUES Branchez le câble d arrivée sur le fil noir le blanc sur neutre et vert sur la mise à la terre du circuit d alimen tation Si vous installez un kit d éclairage connectez le bleu ou le rouge sur celui du circuit d alimentation Utilisez les connecteurs fournis avec votre ventilateur IL NE DOIT PAS Y AVOIR DE FILS OU CONNEXIONS LIBR...

Page 14: ...rer toutes les vis des pales du ventilateur sans serrer trop fort Resserrer toutes les vis du support de suspension ou de la plaque Utiliser l interrupteur à chaîne fourni Le ventilateur tremble Les pales du ventilateur ne sont pas en position horizon tale Les vis des pales sont mal serrées Mesurer la distance entre le plafond et l extrémité des pales puis faire tourner les pales pour vérifier qu ...

Page 15: ...das exclusivamente por técnicos qualificados que utilizem peças sobressalentes originais Qualquer violação desta instrução pode ser particularmente perigosa para os usuários ADVERTÊNCIA Certifique se de que o pino de articulação e o pino de divisão estejam no lugar e que ambos os parafusos de fixação no tubo inclinado estejam firmemente apertados antes da operação Para reduzir o risco de incêndio ...

Page 16: ...vem ser feitas por crianças sem supervisão PROTEÇÃO AMBIENTAL TENÇÃO Os produtos eléctricos não devem ser jogados fora com o lixo doméstico Devem ser levados a um ponto de recolha de comuna para eliminação respeitadora do ambiente de acordo com os regulamentos locais Entre em contato com as autoridades locais ou com a lista de estoque para obter conselhos sobre recicla gem O material de embalagem ...

Page 17: ...te para quebrar a estratificação do ar mas lento para não criar uma brisa CONEXÕES ELÉTRICAS Conecte o cabo de aterramento preto ao vivo branco ao neutro e verde ao condutor aterrado do circuito de alimentação Se você estiver instalando um kit de luz conecte o azul ou o vermelho ao circuito de alimentação Use conectores de fio fornecidos com seu ventilador NENHUMTUBOS LOOSE ou conexões soltas deve...

Page 18: ...stão ma apertados Medir a distancia entre o tecto e a extremidade das pás em seguida fazer girar as pás para veri ficar se estão todas à mesma distancia do tecto não fazer a regulação empurrando ligeiramen te para cima ou para baixo os suportes das pás Verificar se todos os parafusos estão correcta mente apertados GUIA DE REPARAÇÃO C PARA O CONTROLE DO VENTOINHA DA PAREDE D PARA O CONTROLE DO VENT...

Page 19: ...17 WARNING AVERTISSEMENT AVISO ADVERTENCIA x 0 6 m y 2 3 m x y x ON OFF Kg 34 5 ...

Page 20: ...18 A B C D E F G H I J K L INSTRUCCIONES DE MONTAJE NO INCLUIDO NOT INCLUDED NON INCLUS NÃO INCLUÍDO 2h ASSEMBLY INSTRUCTIONS INSTRUCTIONS DE MONTAGE INSTRUÇÕES DE MONTAGEM ...

Page 21: ...I B C D STOP x2 A 1 2 J 19 ...

Page 22: ...L N 220 240V 3 4 20 ...

Page 23: ...G x3 L K E 5 6 21 ...

Page 24: ... nuestro servicio técnico oficial SAT MEGAEXIT S L tel 34 954 087 169 REPARACIONES rma megaexit com www megaexit com TECHNICAL SERVICE SAT If you have any further questions about the device please contact us at info infiniton es And on our website www infiniton es You can also contact our official technical service SAT MEGAEXIT S L tel 34 954 087 169 REPAIRS rma megaexit com www megaexit com ...

Page 25: ...SE FAZ O PEDIDO POR FAVOR NOTE QUE SÓ COMEÇARÁ A CONT AR O PRAZO DE REPARAÇÂO APÓS A ENTREGA DEST A CÓPIA DA FACTURA 3 Marca do equipamento a reparar 4 Modelo do equipamento a reparar 5 Nome do cliente final e ou indicação de STOCK de loja 6 Morada completa do cliente ou loja se for equipamento de STOCK 7 CONT ACTO do cliente ou loja se for equipamento de STOCK 8 Breve DESCRIÇÃO DA AVARIA tem de v...

Page 26: ...rlamento Europeo y del Consejo de 9 de Marzo de 1999 traspuesta a la legislación española mediante el Real Decreto 1890 2000 de 20 de Noviembre Para más información relacionada con las declaraciones y certificados de conformidad póngase con nosotros a través del correo info infiniton es Síguenos en nuestras redes sociales y accede a contenido exclusivo ...

Page 27: ...ve 99 05 EC of the European Parliament and of the Council of March 9 1999 transposed into Spanish legislation by means of Royal Decree 1890 2000 of 20 of November For more information related to declarations and certificates of conformity please contact us at info infiniton es Follow us on our social networks and access exclusive content ...

Page 28: ...tiva 99 05 CE do Parlamento Europeu e do Conselho de 9 de março de 1999 transposta para a legislação espanhola por meio do Real Decreto 1890 2000 de 20 de novembro Para mais informações relacionadas a declarações e certificados de conformidade entre em contato conosco em info infiniton es Siga nos em nossas redes sociais e acesse conteúdo exclusivo ...

Reviews: