background image

SAFETY HINTS 

Do not use the oven unless you are wearing something on your feet. Do not touch the oven
with wet or damp hands or feet.

For oven: Oven door should not be opened often during the cooking period.

The appliance must be installed by an authorized technician and put into use. The producer is
not responsible for any damage that might be caused by defective placement, and installation
by unauthorized personnel.

When the door or drawer of oven is open do not leave anything on it, you may unbalance your
appliance or break the door.

Some parts of appliance may keep its heat for a long time; it is required to wait for it to cool
down before touching onto the points that are exposed to the heat directly.

If you will not use the appliance for a long time, it is advised to plug i  off.

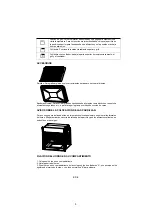
FITTING THE OVEN INTO THE KITCHEN UNIT  

Fit the oven into the space provided in the kitchen unit; it may be fitted underneath a work top or into 
an upright cupboard. Fix the oven in position by screwing into place, using the two fixing holes in the 
frame. To locate the fixing holes, open the oven door and look inside. To allow adequate ventilation, 
the measurements and distances adhered to when fixing the oven. 


IMPORTANT 

If the oven is to work properly, the kitchen housing must be suitable. The panels of the kitchen unit 
that are next to the oven must be made of a heat resistant material. Ensure that the glues of units 
that are made of veneered wood can with stand temperatures of at least 120 ºC. Plastics or glues 
that cannot withstand such temperatures will melt and deform the unit, once the oven has been 
lodged inside the units, electrical parts must be completely insulated. This is a legal safety 
requirement. All guards must be firmly fixed into place so that it is impossible to remove them without 
using special tools. Remove the back of the kitchen unit to ensure an adequate current of air 
circulates around the oven. The hob must have a rear gap of at least 45 mm. 

DECLARATION OF COMPLIANCE


When you have unpacked the oven, make sure that it has not been 
damaged in any way. If you have any doubts at all, do not use it: contact a 
professionally qualified person. Keep packing materials such as plastic 
bags, polystyrene, or nails out of the reach of children because these are 
dangerous to children.   

t

EN-5

Summary of Contents for 8436546193234

Page 1: ...Horno el ctrico modelo HORNO Manual del usuario 818LB...

Page 2: ......

Page 3: ...reducidas o con falta de experiencia y conocimientos a menos que sea bajo supervisi n o siguiendo indicaciones sobre su uso de forma segura y de que comprendan los peligros relacionados Deber asegura...

Page 4: ...ocarse debajo de una superficie de trabajo o en un armario vertical Fije el horno en su lugar mediante dos tornillos utilizando los dos agujeros de fijaci n situados en el marco del horno Para acceder...

Page 5: ...ones L mpara de horno Permite controlar el progreso da cocci n sin tener que abrir la puerta del horno Descongelaci n La circulaci n de aire a temperatura ambiente permite la descongelaci n r pida de...

Page 6: ...icen ni se caigan FIJACI N DEL HORNO EN SU COMPARTIMIENTO 1 Coloque el horno en su compartimiento 2 Abra la puerta del horno 3 Fije el horno en su compartimiento de la cocina con los dos fijadores A q...

Page 7: ...interruptor de alimentaci n de corriente 2 Desenrosque la cubierta de vidrio y sustituya la bombilla por otra del mismo tipo 3 Vuelva a enroscar la cubierta de vidrio en su sitio ABERTURAS DE VENTILA...

Page 8: ...INSTALACI N NOTA El n mero de accesorios incluidos depender del modelo de horno que haya adquirido L N 7 CONEXI N DEL HORNO ES 7 575m m 595mm 595mm 560mm 570mm min 560mm 606mm 600mm 80 250 100...

Page 9: ...la salud humana que podr an derivarse de una manipulaci n incorrecta del mismo Este s mbolo en el producto indica que no debe desecharse junto con los residuos dom sticos Debe ser depositado en un pu...

Page 10: ...model User Manual Electric Oven HORNO 818LB...

Page 11: ...90 minutes to clean oil impurities inside the cavity During the first use it is completely normal that there will be a slight smoke and odors If it does occur you merely have wait for the smell to cle...

Page 12: ...to avoid the possibility of electric shock The means for disconnection must be incorporated in the fixed wiring in accordance with the wiring specifications Children should be supervised to ensure tha...

Page 13: ...metal scrapers to clean the oven door glass since they can scratch the surface which may result in shattering of the glass A steam cleaner is not to be used The appliances are not intended to be opera...

Page 14: ...e the fixing holes open the oven door and look inside To allow adequate ventilation the measurements and distances adhered to when fixing the oven IMPORTANT If the oven is to work properly the kitchen...

Page 15: ...produce etc Grill small This cooking method is normal grilling utilizing the inner part only of the top heating element which directs heat downwards onto the food Double grill The inner heating eleme...

Page 16: ...shelf For grill dishes cake pan with items for roasting and grilling Universal pan For cooking large quantities of food such as moist cakes pastries frozen food etc or for collecting fat spillage and...

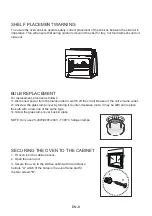
Page 17: ...in place NOTE Only use 25 40W 220V 240V T300 C halogen lamps SHELF PLACEMENT WARNING To ensure the oven shelves operate safely correct placement of the shelves between the side rail is imperative Thi...

Page 18: ...nclude the power switch or socket VENTILATING OPENINGS CONNECTION OF THE OVEN Ventilating openings L N When cooking is finished if the temperature of ventilating openings is over 70 degree the cooling...

Page 19: ...eel parts Do not use a high pressure cleaner for cleaning the unit The baking pans may be washed in mild detergent CLEANING AND MAINTENANCE This appliance is marked according to the European directive...

Page 20: ......

Reviews: