background image

11

12

In ON status, the USB port can be used for charging
a mobile device. Do not move a mobile device during
charging. 

1

2

3

1

2

3

4

4

5

1

2

Step 5

.

Restore the Chair.

Plug the power cord into the hole on the power

box as shown in the right picture.
Connect the power cord to a properly-fitted outlet.

Turn on the switch behind the power box.
("O/I" is on/off switch; Press I down to turn on.)
Toggle on/off  button on the control twice to 
restore the chair to its initial state. Select the
massage function by remote, or by the smart 
phone or tablet app. Enjoy your relaxing and
pleasant massage. 

Step 4. Attaching the Back Seat Cushion

,

 Head Pad, and Remote Control Pocket


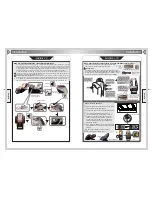
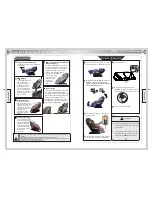
 Lift the front side of the armrest and plug it into the rotating stand on the side of chair body. 

 Connect 

the air hose of the armrest with the air tubes on the side of chair body securely. The black air tube should 
be connected with the air hose marked as No. 1, and the gray air tube with the air hose marked as No. 2. 


 Insert the rear fixed 

Plug the power cord on the side of chair body into the socket of the armrest.


plate into the fixed hole behind the chair body, and press the armrest downwards gently to install. 

  Remove the rubber cap from the inner plate of the armrest. Fasten the screws inside the hole, then 

re-insert the rubber cap. 

 Assemble the other armrest according to the above steps. Don't squeeze air 

tube or power cord during the installation procedure.

How to Disassemble the Armrest

 Adjust the backrest to the lowest setting and restore the leg-rest 

before disassembly. 

② 

Remove the rubber cap inside the armrest and loosen the screw inside the hole. 

 Tilt the armrest a little upwards and disconnect the air tubes and power cord. 

 Continue to tilt the 

armrest upwards to dismantle it. 

 Re-insert the rubber plug into the round holes inside the armrest. 

Power Box Socket

Chair's Initial State

Installation

Installation 

(

3

)

Installation 

(

4

)

Installation

Installation

Installation

Step 3 How to Assemble the Left and Right Armrests 

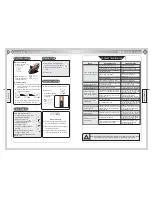
Make sure the switch is OFF before
connecting the chair to power.

Connect the back 
seat cushion to the
upper backrest with
the zipper.

Connect the pillow 
to the backrest 
with the Velcro.

Connect the back
seat cushion to the
two sides of the
backrest with the
zipper.

Put the back seat cushion and head pad onto the backrest 
and connect the two parts with zipper and Velcro.

Usage Tips 


To allow the chair to accurately scan your body, make sure 

  when you sit on the chair that the bottom rim of the head pad 
  is flush with your ears before zippering parts together. This
  will provide the most effective and comfortable massage.

Back Seat Cushion

Head Pad

Backrest

Head Pad

Back Seat 
Cushion

Assembly Steps

Rotating Stand on 
Side of Chair Body

Inner Plate of Armrest

Power cord

Rubber Cap

Fixed Hole

Fixed Panel

Air Tube

USB Charging 
Port

Insert the Velcro of the 
control pocket into the


upper part of right side


inner armrest airbag 
and connect it to the
matching Velcro

.

Connect the 
backrest cushion 
to the seat and leg
part with the zipper.

OK

3D

-

3D

+

Air 

Intensity


Hot 

Rocks

On

/

Off

Auto

Menu

Zero

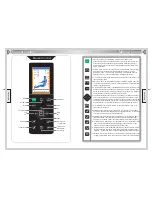
Set function by pressing Menu key.

Speed

Width

Intensity

3D

20 

min

Remote Control
Pocket

When installing the back
seat cushion, be sure to
align the middle part of 
the back cushion with
the middle part of 
the backrest.

Summary of Contents for Presidential

Page 1: ...Please read SAFETY INSTRUCTIONS carefully before using the chair User s Manual Presidential Massage Chair ...

Page 2: ...vitality 11 The armrests are also equipped with pulsating air pressure massage functions to promote blood circulation and total relaxation through your fingertips 12 The waist and hip areas also include multiple air bags to assist with spinal correction and loosen muscular tension in the lumbar region 13 With Chinese medicinal heating on the waist the Presidential promotes blood circulation to rel...

Page 3: ... the chair into a suitable and properly grounded outlet only Make sure the plug is completely inserted into the outlet to reduce risk of short circuit or fire When not in use stop all massage functions turn all controls to the OFF position and unplug Ensure there are no obstacles under behind or in front of the chair when reclining extending or retracting it During operation if at any point you ex...

Page 4: ...back rest arm rest or leg rest Don t stand on the chair during operation Don t move the chair during operation Don t pull out the plug or turn off the power during operation Don t put extremities between or beneath the leg rest Don t use the massage chair while wearing hair ornaments Empty pockets before every massage Don t sit or press on the backrest when the chair is in the reclined position Do...

Page 5: ...r Back Air Bag Arm Air Bag Side Seat Air Bag Calf Air Bag Foot Air Bag Foot Roller Preparation 靠背 Fuse holder Power Cord Socket Power Switch Power Case Backrest Remote Control Pocket Right Shoulder Air Bag Massager Seat Back Seat Cushion Right Armrest Legrest Footrest LED light Left Shoulder Air Bag Massager Left Armrest Base Head Cushion Right Speaker USB Port Lumbar Heat LED Light ...

Page 6: ...actuator Legrest and footrest assembly Left armrest convert frame assembly Shoulder device assembly RK08 massage machine Back cover assembly B Backrest assembly Mechanical Components Diagram NO Q ty Name Mechanical Components List Explosion Diagram Preparation Preparation Mechanical Components List Q ty Name NO Right armrest assembly Right side fender Left side fender Left amrest assembly Power ca...

Page 7: ...t Device Remove the left and right armrests from the armrest box Hold each side of an armrest and take it out slowly one piece at a time Please note The armrest is placed upside down in the box Place the armrest box on a table or on level ground be careful to avoid scratching either armrest Step 2 How to Assemble the Leg Rest Axis cover Hanger Bolt Socket Air nozzle Axis Power line plug Air tube L...

Page 8: ...the rubber cap inside the armrest and loosen the screw inside the hole Tilt the armrest a little upwards and disconnect the air tubes and power cord Continue to tilt the armrest upwards to dismantle it Re insert the rubber plug into the round holes inside the armrest Power Box Socket Chair s Initial State Installation Installation 3 Installation 4 Installation Installation Installation Step 3 How ...

Page 9: ...cts 2 Confirm there is sufficient space for the chair to fully extend Chair Operation Recommendations Adjustment Before Massage Safely Moving Your Massage Chair Adjusting the ChairBeforeYourMassage Caution Do not move the chair during operation in case of accidents or damage Chair Operation How to Move Your Chair Bind the cables and put them on the seat to avoid damage while moving the chair Do no...

Page 10: ...tting 3 In the ON status press this key to adjust the air intensity either in auto mode or in the air massage program 3D 3D 3D 3D Air Intensity Hot Rocks On Off Auto Menu Zero Set function by pressing Menu key Speed Width Intensity 3D 20 min Manual Control Manual Control Up Down Right Leg Rest Up Backrest Down On Off Auto Confirm Button Leg Rest Down Zero Gravity Menu Manual Control Chair Operatio...

Page 11: ...elief Stretch Music Sync Renew Calming Special Select by the navigation keys Auto Manual Airbag Roller Heating Timer Settings Stop Refresh Energy Revive Active Relax Healing Menu Press the Menu button in the main interface to switch to the Menu interface Here you can set all massage functions Press the Menu button in the Menu interface to exit and return to the Main interface Mode Position Width S...

Page 12: ...power switch on the bottom of the back of chair after the rollers return to the storage position Unplug the power cord from the outlet 1 Before using lift the pillow back cushion etc to check if the PU material is broken If there is damage please stop using unplug the chair and contact our tech support for repair 2 Only plug into a grounded outlet Warning Attention 1 Before sitting down make sure ...

Page 13: ...ricity from the outlet Attention Hold the plug properly and pull as illustrated below Do not pull by the cord Clean the chair if necessary Attention After using press ON OFF to end all massage functions and wait for the chair to return to its original position Turn off the power and unplug the chair from the outlet Keep the chair away from moisture dirt and old insulation to prevent damage Restora...

Page 14: ...massage chair to rest for at least half an hour before next use Re connect the electricity to power The plug is not properly inserted into the electrical outlet This is the sound of the air pump motor and mechanical parts Normal wear and tear on inner parts after much use The massage chair suddenly becomes much louder during operation Remove the obstacles turn off the power and allow the massage c...

Page 15: ...del Input voltage Safety design AC120V 60Hz AC220V 50 60Hz AC240V 50Hz Class NW GW Packing size Power Main body 253 302 lbs Armrest 32 43 lbs Legrest footrest 66 76 lbs Main body 59 8 31 38 Armrest 38 5 15 5 28 Legrest footrest 23 20 24 L W H Presidential ...

Reviews: