background image

PS210W, PS212W (120V)

that the RCA cable from the source to subwoofer (wired connection) or
transmitter (wireless connection) is functioning properly and that it is
fully inserted at both ends, or that the Transmitter ID-Code Selector 

and the Subwoofer ID-Code Selector 

¢

are set to the same channel.

Once you have a green or orange LED on the subwoofer, turn your
Subwoofer-Level Control 

up halfway so that the knob indicator

points up. You should now be hearing bass information coming from
the subwoofer.

Adjust Level

Set the overall volume control of the preamplifier or stereo to a com-
fortable level. Adjust the Subwoofer-Level Control 

until you obtain 

a pleasing blend of bass. Bass response should not overpower the
room but rather be adjusted so there is a harmonious blend across 
the entire musical range. Many users have a tendency to set the sub-
woofer volume too loud, adhering to the belief that a subwoofer is
there to produce lots of bass.This is not entirely true. A subwoofer is
there to enhance bass, extending the response of the entire system 
so the bass can be felt, as well as heard. However, overall balance 
must be maintained or the music will not sound natural. An experienced
listener will set the volume of the subwoofer so that its impact on bass
response is always there but is never obtrusive.

Phase Control

The Phase Switch 

ª

determines whether the subwoofer speaker’s 

piston-like action moves in and out with the main speakers, 0˚, or 
opposite the main speakers, 180˚. Proper phase adjustment depends 
on several variables such as room size, subwoofer placement and 
listening position. Adjust the phase switch to maximize bass output 
at the listening position.

Crossover Adjustment

The Crossover Adjustment Control 

determines the highest frequency

at which the subwoofer reproduces sounds. If your main speakers can 
comfortably reproduce some low-frequency sounds, set this control 
to a lower frequency setting, between 50Hz and 100Hz. This will con-
centrate the subwoofer’s efforts on the ultradeep bass sounds required
by today’s films and music. If you are using smaller bookshelf speakers
that do not extend to the lower bass frequencies, set the Crossover
Adjustment control to a higher setting, between 120Hz and 150Hz.

NOTE

: This control will have no effect if the LFE Input 

£

is used

(wired connection) or if the Low-Pass Selector 

§

is in the “Off”

position (wireless connection). If you have a Dolby Digital or DTS
processor/receiver, the Low-Pass Frequency is set by the processor/receiver.
Consult your owner’s manual to learn how to view or change this setting.

ID Codes

In the unlikely event that you experience interference when operating
the system, or if you have more than one set of subwoofer transmitters
and receivers in operation, you may change the channel in which the
system operates. On both the transmitter module and the subwoofer,
there is a four-position ID-Code Selector.Try setting both selectors to 
a different position. Make sure that the Transmitter ID-Code Selector 

and the Subwoofer ID-Code Selector 

¢

are set to the same position;

the system won’t function properly unless the positions match.

A maximum of two subwoofers, at least 10' apart, can be operated
using the same transmitter. Simply set the channel selector on the
transmitter and on the two subwoofers to the same channel.

O

PERATION

Power On

Connect your signal source (such as an A/V receiver or preamplifier) to
the transmitter (if using a wireless connection) or to the subwoofer (if using
a wired connection).Two single-RCA cords are provided. While you would
ordinarily use the short cable to connect to the transmitter, or the long 
one to connect to the subwoofer, either cable can be used, depending on
proximity to the signal source.There is no need or benefit gained from
connecting the same source to both the transmitter and the subwoofer.
However, you could connect two separate sources to the subwoofer by 
utilizing both its wired and wireless connections. Both signals will essentially
be mixed and output by the subwoofer.

Plug your transmitter’s (if using a wireless connection) and subwoofer’s AC
cord into a wall outlet. Do not use the outlets on the back of the receiver
for the subwoofer.

Initially set the Subwoofer-Level Control 

to the “Min”position.

Turn on your sub by pressing the Power Switch 

¡

on the rear panel.

Turn on your entire audio system and start a CD or movie soundtrack 
at a moderate level.

Auto On/Standby

Transmitter (Wireless Connection Only):

The Status LED (not shown)

will be lit in red when the unit is in Standby mode. When the transmitter
receives an audio signal from the source, it will immediately turn on
and the LED will turn to blinking green or solid green:

RED = STANDBY (No signal detected, transmitter off) 
GREEN (BLINKING) = Transmitter is ON but has not established 
a link with the wireless sub
GREEN (SOLID) = Transmitter is ON and has already established 
a link with the wireless sub 

The transmitter will automatically enter Standby mode after approxi-
mately 10 minutes when no signal is detected from your system.

Subwoofer:

With the Power Switch 

¡

in the “On”position, the Status

LED 

on the back panel will remain lit to indicate the On/Standby

mode of the subwoofer.

RED = STANDBY (No signal detected, Amp Off) 
GREEN = SUB ON (Wired signal detected, Amp On) 
ORANGE = SUB ON (Wireless link with transmitter active) 

The subwoofer will automatically enter Standby mode after approximately
10 minutes when no signal is detected from your system.The subwoofer
will then power on instantly when a signal is detected. During periods
of normal use, the Power Switch 

¡

can be left on. You may turn off

the Power Switch 

¡

for extended periods of nonoperation, e.g., when

you are away on vacation.

Getting Started

Confirm that the Status LED on the transmitter is on (red or green),
the Status LED 

on the subwoofer is on (red, orange or green) and

an RCA cable is connected from a source unit to either the LFE Input
of the subwoofer 

£

or transmitter 

or L and R inputs 

on the

subwoofer. Play a CD or video. Use a selection that has ample bass
information. If using a wireless connection, the Status LED on the
transmitter should be lit solid green, and the Status LED 

on the

subwoofer should turn orange if connected wirelessly. If the LED on
the transmitter is blinking green and the LED on the subwoofer is 
in red or green, a wireless link has not been established between the
transmitter and the subwoofer. If connecting directly to the subwoofer
without using the wireless link, the Status LED 

on the subwoofer

should be lit green. If the LED on the subwoofer remains red, check

PS212W.PS210W.OM  5/28/08  4:48 PM  Page 6


PS212W 

subwoofer 


7

Summary of Contents for PS212W

Page 1: ...PS212W Wireless Powered Subwoofer Service Manual Infinity Systems Inc 250 Crossways Park Dr Released 2008 Woodbury New York 11797 Rev0 8 2008 Discontinued XXXX...

Page 2: ...e when activated Driver 12 305mm MMD RF Operating Frequency 2 4GHz Operating Range Up to 75 23m depending upon conditions Subwoofer Dimensions H x W x D 18 x 14 3 8 x 18 3 4 457mm x 365mm x 476mm Subw...

Page 3: ...r Residual Noise Floor 1 5 mVrms max 2 5 Volume max w A P Swept Bandpass Measurement Line freq harmonics BW 20 KHz Line level inputs must be terminated using 1KOHM Input Impedance Line Input L R LFE 1...

Page 4: ...ated holder SYSTEM PERFORMANCE USING WIRELESS Tx THD 1 Watt 0 2 0 3 22K filter Tx Input Impedance Line Input LFE 7 3K ohms n a Nominal 1KHz System Sensitivity Using Tx Input Frequency 50 Hz 50 Nominal...

Page 5: ...PACKAGING PS212W subwoofer 4...

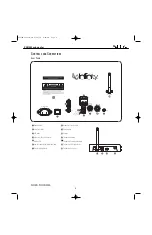
Page 6: ...ub In On Off LFE Min Max Power Switch Line Level Input LFE Input Subwoofer ID Code Selector Status LED Low Pass Selector Wireless Input Only Crossover Adjustment Subwoofer Level Control Phase Switch A...

Page 7: ...on the transmitter Step 2 Plug the transmitter module into the wall outlet and connect the included power supply and power cord to the transmitter Make sure theTransmitter Antenna is extended upward S...

Page 8: ...tter Simply set the channel selector on the transmitter and on the two subwoofers to the same channel OPERATION Power On Connect your signal source such as an A V receiver or preamplifier to the trans...

Page 9: ...PS212W subwoofer 8...

Page 10: ...PS212W subwoofer 9...

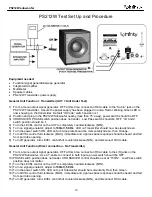
Page 11: ...h ON LED on Sub Amp plate should be momentarily Green then Orange 7 Turn LEVEL control full clockwise MAX immediate and vigorous bass response should be heard and felt from port tube opening 8 Turn of...

Page 12: ...d test Driver Function 1 Remove woofer from cabinet detach and wire clips 2 Check DC resistance of woofer it should be 3 3 ohms 10 3 Connect a pair of speaker cables to driver terminals Cables should...

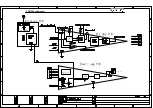
Page 13: ...5V mute mute 15V 15V Power regulator circuit Class_d Amp model Relay To speaker protection 12 288MHz signal input signal input protection Wireless PCB Power amp PCB Crossover control U102 Pre amp PCB...

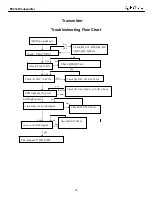
Page 14: ...t power noise OK Check pre board power board Vcc 15V etc Test frequency Response OK Check U102 uR133 C121 R135 C122 etc Test input sensitivity OK Check U101 R117 R112 R114 etc Test protection OK Check...

Page 15: ...out check VD 17VDC Check VA 15VDC Check 12VDC 3 6VDC Check D1 L01 D05 Q04 D0 3 Q03 Q01 Q02 etc The Amp ass Y OK END Check MD01WH4924 Check Q06 Q05 etc Check Q07 D08 U01 D10 U02etc LED light green or r...

Page 16: ...Flow Chart no yes yes yes no yes yes no yes AMP no signal out Check 3 7VDC Check R505 U501 D501 L5 01 L502 U01 etc The Amp ass Y OK END Check MD01 RX 11G Check LAUNCHER signal Check MD01 LRCK signal C...

Page 17: ...PS212W subwoofer 16...

Page 18: ...PS212W subwoofer 17...

Page 19: ...2 1 3 2 1 3 PS212W subwoofer 18...

Page 20: ...PS212W subwoofer 19...

Page 21: ...PS212W subwoofer 20...

Page 22: ...PS212W subwoofer 21...

Page 23: ...PS212W subwoofer 22...

Page 24: ...6W 5 CF 26mm RoHS 4 R213 R217 R219 R222 110 16473J26 E Resistor 47K 1 6W 5 CF 26mm RoHS 1 R221 Capacitors 130 2b102k503 e Capacitor 1000P 50V 10 RoHS 1 C165 130 3F104Z503 E Capacitor 0 1U 50V 80 20 R...

Page 25: ...0805 1 10W 22K 1 RoHS 2 R141 R148 118 08052202J E SMD Resistor 0805 1 10W 22K 5 LF 1 R404 118 08052212F E SMD Resistor 0805 22 1K 1 RoHS 2 R204 R206 118 08052262F E SMD Resistor 0805 22 6K 1 RoHS 4 R2...

Page 26: ...197 0S4148WSP E SMD Diode LL4148WSP 0805SHAWELL 10 D400 199 6200039D E Diode 3 9VBZ52 C3V9S SOD 323 RoHS 1 D130 192 153J111 E FET J111 FAIRCHILD RoHS 1 Q107 195 443391EV E Bipolar LED 339 1EVGW 339 1...

Page 27: ...pF 50V 10 1206SMT NPO RoHS 1 C5 141 C0561K50 E SMD Capacitor 560pF 50V 10 1206 NPO RoHS 1 C6 141 C5104M50 E SMD Capacitor 1206 Y5V 0 1uF50V 20 RoHS 8 C2 C3 C7 C8 C9 C10 C11 C15 141 C7103K50 E SMD Capa...

Page 28: ...ductors 190 145008MMS E SMD IC LM5008MM NOPB NATIONAL RoHS High Voltage 100V Step Down Switching Regulator 1 U501 190 19HCT165S E SMD IC 74HC HCT165 RoHS PHILIPS 8 bit parallel in serial out shift reg...

Page 29: ...170x5x1t RoHS 2 333 EVA 00220 0BAE EVA 225 15 1t UL RoHS 1 333 EVA 00866 0BAE Fireproof EVA 48 18 1 5T RoHS 1 333 EVA 05782 0BAE EVA 90 5 1mm RoHS 1 333 SPG 00860 0BAE Fireproof damping material 450...

Page 30: ...lude Ther mal Shutdown VCC under voltage lockout Gate drive under voltage lockout and Max Duty Cycle limiter Features n Integrated 100V N Channel buck switch n Internal VCC regulator n No loop compens...

Page 31: ...or The regulation threshold is 2 5V 6 RON SD On time set pin Ton 1 25 x 10 10 RON VIN A resistor between this pin and VIN sets the switch on time as a function of VIN The minimum recommended on time i...

Page 32: ...input to be used as an active LOW clock enable CE input The pin assignment for the CP and CE inputs is arbitrary and can be reversed for layout convenience The LOW to HIGH transition of input CE shou...

Page 33: ...t active LOW 7 Q7 complementary output from the last stage 9 Q7 serial output from the last stage 2 CP clock input LOW to HIGH edge triggered 8 GND ground 0 V 10 Ds serial data input 11 12 13 14 3 4 5...

Page 34: ...e LOW to HIGH clock transition q lower case letters indicate the state of the referenced output one set up time prior to the LOW to HIGH clock transition X don t care LOW to HIGH clock transition OPER...

Page 35: ...luding digital interpolation fourth order delta sigma digital to analog conversion digital de emphasis and switched capacitor analog filtering The advantages of this architecture include ideal differe...

Page 36: ...o gain access to extra de emphasis modes Internal Serial Clock Mode In the Internal Serial Clock Mode the serial clock is internally derived and synchronous with the master clock and left right clock...

Page 37: ...STM810 812 140ms RESET PULSE WIDTH MIN LOW SUPPLY CURRENT 6 A TYP GUARANTEED RST RST ASSERTION DOWN TO VCC 1 0V OPERATING TEMPERATURE 40 C to 85 C Industrial Grade LEAD FREE SMALL SOT23 and SOT143 PAC...

Page 38: ...re 2 Logic Diagram STM809 810 Note 1 For STM810 Figure 3 Logic Diagram STM811 812 Note 1 For STM812 Table 2 Signal Names Note 1 STM810 812 only 2 STM811 812 only Figure 4 SOT23 3 Connections Figure 5...

Page 39: ...with any SPI supporting device I2 S left or right justified including ADCs DACs digital audio streams such as S P DIF or USB A development kit is required to modify the DASI port and or to modify appl...

Page 40: ...eneral Purpose IO port PC7 13 PC6 PC6 PC6 General Purpose IO port PC6 14 PC5 PC5 PC5 General Purpose IO port PC5 15 PC4 PC4 PC4 General Purpose IO port PC4 16 PC0 MCLK PC0 MCLK General Purpose IO port...

Page 41: ...ation can be performed at the time of production or during product assembly The following two diagrams and two tables describe how to configure the WHAM2 for different operations by changing jumpers a...

Page 42: ...output Edge pin 18 J7 DNP J8 0R Pin 18 is AN1 XInC2 muxed analog input 1 Input voltage range of ADC is 0V to 1 8V J9 0R J10 DNP Pin 19 is FW selectable as either GPIO port pin PI1 or baseband unit 1 d...

Page 43: ...PS212W subwoofer 42...

Page 44: ...Green Red D401 LED_5DIA PS212W subwoofer 43...

Page 45: ...P106 5 6 7 TL074 U106 B 3 2 1 TL074 U106 A VEE U106 F VDD U106 E 10 9 8 TL074 U106 C 12 13 14 TL074 U106 D PS212W subwoofer 44...

Page 46: ...VDD U105 C VEE U105 D 6 5 7 U105 B TL072 2 3 1 TL072 U105 A PS212W subwoofer 45...

Page 47: ...EE U103 D 5 6 7 TL074 U102 B 3 2 1 TL074 U102 A 2 3 1 TL 072 U108 A 6 5 7 TL 072 U103 B VDD U101 C VEE U108 D VDD U102 E 12 13 14 TL074 U102 D 2 3 1 U101 A TL 072 6 5 7 TL 072 U108 B VDD U103 C 2 3 1...

Page 48: ...104z VEE U109 D VDD U109 C 220R R333 220R R332 JK1 C332 100P 5K1 R321 100P C318 R330 10K C320 104z 100R R315 5K1 R318 5K1 R322 2 3 1 TL 072 U109 A 5K1 R316 100P C319 22u C312 5K1 R317 5K1 R319 6K8 R3...

Page 49: ...L01 56R 2 1 PS212W subwoofer 48...

Page 50: ...C501 47u 100V 100n C104 R503 120R 1 R504 240R 1 C508 470u P501 R505 10R 1 4W MO 103 C505 LM5008 U501 470u C506 L501 220u C507 1 R501 330K R502 270K 2 1 D501 10BQ100 22u L502 C503 1 100V PS212W subwoof...

Page 51: ...PS212W subwoofer 50...

Page 52: ...PS212W subwoofer 51...

Page 53: ...PS212W subwoofer 52...

Page 54: ...PS212W subwoofer 53...

Page 55: ...PS212W subwoofer 54...

Reviews: