operation is completed, tap the encoder
to exit the menu and maintain the
adjusted state. If there are parameters
that need to be saved, there will be a
prompt on the interface.
When the automatic blanking is turned
on, the menu will automatically exit after
30s if you do not touch any button or
knob under any menu. (The blanking
function is invalid under reset preset and
zero calibration mode).
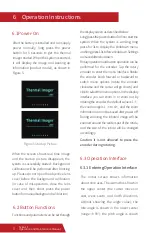
The initial screen shows information
about nine axes. The azimuth is shown in
the upper center (the cursor moves in
east, west, south, and north directions,
without showing the angle value); the
role angle is shown in the lower center
(range: ±90°); the pitch angle is shown
Figure 6 Main Menu
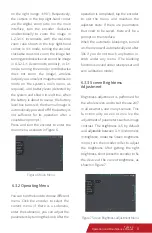
Figure 7 Screen Brightness Adjustment Menu
6.3.2 Operating Menu
You can turn the knob to choose different
menu. Click the encoder to select the
current menu (if there is a submenu,
enter the submenu), you can adjust the
parameters by turning the knob. After the
6.3.3 Screen Brightness
Adjustment
Brightness adjustment is performed for
the whole screen and to suit the use 24/7
in all weathers, and in any scenario. This
functionality does not involve the
adjustment of parameters such as image
contrast. The brightness is 5 by default
and adjustable between 0‒9 (0=dimmest;
9=brightest). Under the Screen brightness
menu, turn the encoder roller to adjust
the brightness. After getting the right
brightness, short press the encoder to fix
the device at the current brightness, as
shown in Figure 7.
on the right (range: ±90°). Respectively,
the cursors in the top right-hand corner
are the digital zoom ratio (on the main
interface, turn the encoder clockwise
unidirectionally to zoom the image in
1-2-3-4× increments, with the real-time
zoom ratio shown in the top right-hand
corner; in 4× mode, turning the encoder
clockwise does not zoom the image but
turning anticlockwise can zoom the image
in 4-3-2-1× decrements; similarly, in 1×
mode, turning the encoder anticlockwise
does not zoom the image), wireless
output (you can select image transmission
mode on the system's main menu, as
required), and battery level (detected by
the system and shown in real time; when
the battery is about to use up, the battery
level box turns red; the thermal imager is
automatically powered off if the battery is
not sufficient for its operation, after a
countdown prompt.)
Press and turn the encoder to enter the
main menu, as shown in Figure 6.
2
Tyke-L3
Operation and Maintenance Manual
6
Tyke-L3
Operation and Maintenance Manual


