background image

36

M

a

i

n

t

e

n

a

n

c

e


&


T

r

o

u

b

l

e

s

h

o

o

t

i

n

g

F

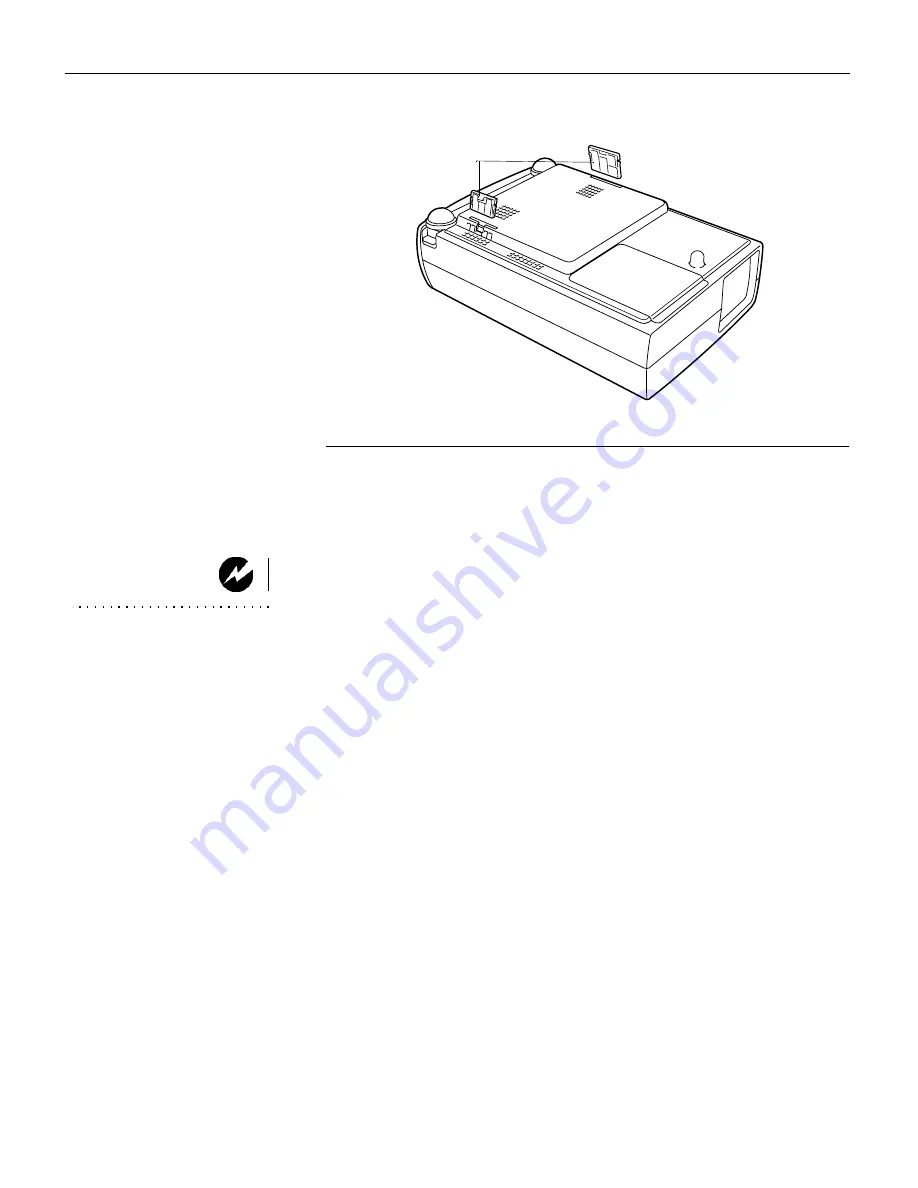
IGURE

 15

Removing the air filters

3

Clean the filters with a brush.

4

Replace the filters, being sure they are fully inserted.

Replacing the Projection Lamp

WARNING:

 To avoid burns,

allow the projector to cool for at

least 45 minutes before you open

the lamp module door. Never

extract the lamp module while the

projector is operating.

The Lamp Replacement indicator lights yellow when the lamp 
needs to be replaced. You can order new lamp modules from 
your InFocus dealer. See “Accessories” on page 44 for informa-
tion.

Follow these steps to replace the projection lamp:

1

Turn off the projector and unplug the power cord. 

2

Wait 45 minutes to allow the projector to cool thoroughly.

3

Invert the projector on a soft flat surface, then remove the 
screw on the lamp cover and lift the cover off.

air filters

Summary of Contents for LP260

Page 1: ...USER S GUIDE ...

Page 2: ...Copyright 2000 by InFocus Corporation Wilsonville Oregon All rights reserved ...

Page 3: ...armful interference to radio communi cations Operation of this equipment in a residential area is likely to cause harm ful interference in which case the user will be required to correct the interference at his own expense Canada This Class A digital apparatus complies with Canadian ICES 003 Cet appareil numérique de la classe A est conforme à la norme NMB 003 du Can ada Safety Certifications UL C...

Page 4: ... A2 EN 61000 3 2 1995 A1 A2 EN 61000 3 3 1995 EN 50082 1 1992 Directive 73 23 EEC Amended by 93 68 EEC Safety EN 60950 1992 A1 A2 A3 A4 1997 November 2000 Australian Certification C tick mark Trademarks Apple Macintosh and PowerBook are trademarks or registered trademarks of Apple Computer Inc IBM and PS 2 are trademarks or registered trademarks of International Business Machines Inc Microsoft Pow...

Page 5: ...ector 10 Using the Projector 11 Adjusting the Image 11 Using the Remote Control 13 Using the Keypad and Remote Buttons 15 Using the On Screen Menus 17 Computer Adjustments 18 Video Adjustments 26 Maintenance Troubleshooting 35 Cleaning the Lens 35 Cleaning the Fan Intake Filters 35 Replacing the Projection Lamp 36 Replacing the Batteries in the Remote Control 38 Troubleshooting 39 Appendix 43 Spec...

Page 6: ...ii T a b l e o f C o n t e n t s ...

Page 7: ...sage of a feature please refer to the User s Guide Warning Hot surface Do not touch An arrow pointing to the lamp door on the projector Safety Terms Warning Don t look directly into the lens when the lamp is turned on Warning To replace the lamp turn the projector off by unplugging the power cord To avoid burns wait 45 minutes before opening the lamp door Follow all instructions provided in this U...

Page 8: ...ring that may block the vents In the unlikely event of the bulb ruptur ing thoroughly clean the area behind the projector and discard any edible items placed in that area Customer Service If you need assistance call InFocus Customer Service directly at 1 800 799 9911 Support is free between 6 a m and 6 p m PST Monday through Friday Support is available in North America after hours and weekends for...

Page 9: ...ideo devices including IBM compatible computers including laptops up to 1280x1024 resolution Apple Macintosh and PowerBook computers up to 1280x1024 resolution Most standard VCRs DVD players HDTV sources camcord ers and laser disc players Unpacking the Projector The projector comes with the items shown in Figure 1 Check to make sure all are included Contact your InFocus dealer imme diately if anyt...

Page 10: ...e and quick start card 9 AV Audio cable 4 Power cords 10 Composite video cable 5 Remote control 11 S video cable 6 Macintosh adapter 12 Control cable for PS 2 port 13 Control cable for ADB port 14 Control cable for serial port co mp me nu vo lum e mu te sta nd by br igh tne ss fre ez e he lp lig ht sc rib ble vid eo lite sh ow 1 2 3 4 5 6 7 8 9 10 11 14 13 12 ...

Page 11: ...ws of the projector connector panel speaker focus ring zoom ring power cord connector keypad foot latch IR receiver exhaust vent air intake vent air intake vent lamp cover adjustable foot adjustable foot air filters ...

Page 12: ...l Be sure to check the guidelines in Troubleshooting on page 39 Or check the Service and Support section of our website at http www infocus com service You ll find a Technical Library FAQs and support contacts including a technical support e mail form If those sources don t answer your question call your InFocus dealer You can also call InFocus Customer Service directly at 1 800 799 9911 Call betw...

Page 13: ...ens of the projector to the screen and the zoom setting determine the size of the projected image Figure 3 and Table 1 show projected image sizes FIGURE 3 Projected image sizes 3 Make sure the projector and the computer are turned off 4 6 1 4m 7 8 2 4m 13 1 4 0m 19 7 6 0m 26 3 8 0m 150 200 167 H2 125 100 83 50 60 36 30 H1 Max Zoom Min Zoom Table 1 Image Size Width and Height Screen Size W x H mm 3...

Page 14: ...jector is 6 feet or less FIGURE 4 Connector panel NOTE Pressing the reset button with a pen causes the projector to shut down and restart Only press this button if the projector has locked up NOTE In the following figures an asterisk indicates the cable is not supplied with the projector S video composite video Audio in video S video computer PC control audio OUT computer IN reset AV audio IN Y Pb...

Page 15: ...able if you want to connect an external speaker not included FIGURE 5 Connecting the projector to a computer Now you re ready to power up the projector and your computer Skip to Powering up the Projector and Adjusting the Image on page 9 video S video computer PC control audio OUT computer IN reset AV audio IN Y Pb Cb Pr Cr 13 MODE 640 x 480 16 MODE 832 x 624 19 MODE 1024 x 768 OFF ON ON ON ON ON ...

Page 16: ...cable FIGURE 6 Connecting the projector to a video source The projector is compatible with these major broadcast video standards NTSC NTSC 4 43 PAL PAL M PAL N and SECAM It automatically adjusts to optimize its performance for the incoming video Speakers Amplifier Audio input PC audio cable Audio out Video AV audio in Y Pb Cb Pr Cr S video S video Video cable Composite video out Component video ou...

Page 17: ...er may display a message stating that new hardware was found The Add New Hardware Wizard may appear Use the Wiz ard to load the correct driver the computer considers the projector a Plug and Play Monitor The fans start to run the Lamp indicator dims and the Preparation screen appears This screen counts down from 30 seconds then the image from the active source appears 4 If you connected a video pl...

Page 18: ...n screen menus To open the menus press the menu button on the keypad or remote then select the desired menu For more information about the menus see page 17 Turning Off the Projector If you want to turn off the image for a short period of time press the Blank button on the remote This blanks the screen but keeps the projector running To exit Blank mode press the Blank button again or any other fun...

Page 19: ...ithout affecting focus Turn the ring in the Wide direction to make the image larger and in the Tele direction to make the image smaller FIGURE 7 Focus ring and zoom ring The projector is equipped with self locking quick release eleva tor feet Figure 8 To raise the projector 1 Lift the front of the projector and lift the feet lock latches on both sides of the projector Figure 8 2 Raise the projecto...

Page 20: ...ne up down button on the remote or select Key stone in the Screen menu see page 16 for details on the menu The message Keystone appears 2 Press the keystone up button or the point up button to reduce the upper part of the image and press the keystone down but ton or the point down button to reduce the lower part FIGURE 9 Adjusting the keystone foot latch increasing keystone decreasing keystone ...

Page 21: ... Point the remote control at the projection screen or at the front of the projector not at the computer The range for opti mum operation is about 16 feet and 60 degrees from the front of the projector see Figure 10 If you point the remote at the projec tion screen the distance to the screen and back to the projector must be less than or equal to 16 feet For best results point the remote directly a...

Page 22: ...click select and point buttons to navi gate through your presentation while in Slide Show mode To configure PowerPoint for this choose Options from the Tools menu click the View Tab de select the Popup Menu on Right Mouse Click option in the Slide Show section then click OK Then when you re in PowerPoint s Slide Show mode a left click advances to the next slide and a right click returns to the pre...

Page 23: ...menus See Using the On Screen Menus on page 17 Power Press this to turn the projector on and off See page 9 for the power up sequence and page 10 for the power off sequence Menu Press the menu button to open the on screen menus Press menu again to close the menus For more information about the on screen menus see page 17 Normal This feature restores the projector s factory set default settings It ...

Page 24: ...e sound To restore the sound to its previous level press the mute button again or the volume button P timer button This feature allows you to set a timer Press the p timer button to display and start the timer Press it again to stop the timer Press it again to remove the timer from the display Blank When you press blank the display and audio turn off and a blank screen is displayed until you press...

Page 25: ... item press the select button on the remote or keypad FIGURE 13 Computer menus FIGURE 14 Keypad and remote navigation and selection buttons To change a menu setting use the up and down point buttons to move the cursor up and down to the item you want to change the pointer changes to a red arrow then use the left and right point buttons or the select buttons to adjust a setting All changes are save...

Page 26: ...tor automatically adjusts to most incoming computer signals and projects the image without any user interaction If a problem is encountered the message Go to PC adj may appear and the settings must be input manually If the message No sig nal appears verify the connections between the projector and the computer See Troubleshooting on page 39 for more informa tion To select the computer system manua...

Page 27: ...e image without any user interaction However some computers employ unique signal formats that the projector cannot handle properly These images may flicker or appear non synchronized The PC adjustment feature allows you to specify parameters to match the unique signal formats and save and restore five different unique settings 1 Select the PC Adjust menu The Where to reserve menu appears 2 Select ...

Page 28: ... press the select button The parameter is memorized in the selected mode 5 To activate the mode select it in the System Select menu see System Menu on page 18 Total Lines The number of vertical lines Horiz Size The number of dots in one horizontal period H Position V Position The left right and up down position of the image Clamp The clamp level If the image has dark bars use this adjustment ...

Page 29: ...ou can select the resolution from a list or adjust the value with the left and right point buttons Full Screen Select On to resize the image with a 4x3 aspect ratio After adjusting the settings press Save to save the settings press Reset to recall the saved settings press Mode Free to clear the previously saved settings and press Quit to close the menu ...

Page 30: ...the point buttons to adjust the number of dots in one hori zontal period Color Balance Red Green Blue Press the point left button to lighten the color and the point right button to deepen the color from 0 to 63 Contrast Press the point left button to decrease the contrast and the point right button to increase the contrast from 0 to 63 Brightness Press the point left button to darken the image and...

Page 31: ...ect Auto Image in the menu The Auto Adjust Image menu appears 2 Move the arrow to the desired parameter using the up and down point buttons 3 Press select to turn the automatic adjustments on and off Fine sync and Horiz Size See page 22 for instructions on setting these manually Position See the following section for instructions on setting this manually Press Save to store the on off settings pre...

Page 32: ...mage up down left and right using this menu 1 Select the Position menu The Position menu appears 2 Use the point buttons to adjust the position Press the select button to chose a position To cancel this adjust ment press any button except the point buttons position menu ...

Page 33: ...lution of SVGA 800x600 are automatically modi fied to fit the screen in the initial mode To adjust the image size or pan a computer image select Digital Zoom The menus disappear and the message D Zoom appears The projector also enters digital zoom mode when the d zoom button on the remote is pressed To expand the image size press the d zoom up button or the select button The image is magnified by ...

Page 34: ... menu then press the select button The Video Source menu appears 2 Press the point down button and position the red arrow by the desired source NOTE When both the Video and S Video jacks are connected the S video jack input is displayed When both the Y Pb Cb Pr Cr and S Video jacks are connected the Y Pb Cb Pr Cr jack input is displayed Auto In this mode the projector automatically detects the inc...

Page 35: ... source When the video signal is from the Video or S Video jack Auto In this mode the projector automatically detects the incoming video source and adjusts itself to optimize performance When the video system is PAL M or PAL N select the system manually PAL SECAM NTSC NTSC4 43 PAL M PAL N If the projector can t display the proper video signal select the broadcast signal format from the menu system...

Page 36: ...Pb Cb Pr Cr jacks Auto In this mode the projector automatically detects the incoming video source and adjusts itself to optimize performance Component Video Signal Format If the projector can t display the proper video signal select the component signal format from the menu ...

Page 37: ...video image size with 4x3 aspect ratio Wide Screen Resizes the image for wide screen size with 16x9 aspect ratio Keystone This option helps to keep the image square as the angle of projec tion is changed When you select Keystone the menus disappear and the message Keystone appears Adjust the keystone using the keystone up down buttons on the remote or the point up down buttons on the keypad See pa...

Page 38: ...e from black and white to fully saturated color Press the point left button to decrease the amount of color in the image press the point right button to increase the amount of color in the image Tint The tint adjusts the purple green color balance in the projected image Press the point left button to increase the amount of purple in the image press the point right button to increase the amount of ...

Page 39: ...ar whiter Brightness Adjusting the brightness changes the intensity of the image Press the point left button to darken the image press the point right but ton to lighten the image Sharpness This setting adjusts the sharpness of a video image Press the point left button to decrease the sharpness press the point right button to increase the sharpness Gamma Press either the point left or right button...

Page 40: ...turn a setting on and off press the select button Volume NOTE Changing the volume using the menu is the same as changing it using the remote Press the point left button to decrease the volume press the point right button to increase the volume Mute Set to On to mute the sound To restore the sound to its previ ous level set Off or press the mute button or the volume but ton on the remote Blue Backg...

Page 41: ...ture preserves lamp life by automatically turning the lamp off after no signal has been detected for five minutes 1 When the input signal is interrupted the message No signal appears with a counter that starts at 5 and counts down to 0 2 After the counter reaches 0 the lamp is turned off the Ready indicator turns off and the fans run for 90 seconds During this cool down time the lamp cannot be tur...

Page 42: ... English French German Spanish Italian or Japanese 1 Press the menu button navigate to the Language menu then press the select button The Select Language menu appears 2 Press the point down button and position the red arrow by the desired language then press the select button language menu ...

Page 43: ...cleaners solvents or other harsh chemicals might scratch the lens 2 Lightly wipe the cleaning cloth over the lens in a circular motion 3 If you don t intend to use the projector immediately replace the lens cap Cleaning the Fan Intake Filters The fan intake filters on the bottom of the projector catch dust and particles in the air If the filters become clogged the projector does not cool properly ...

Page 44: ...Never extract the lamp module while the projector is operating The Lamp Replacement indicator lights yellow when the lamp needs to be replaced You can order new lamp modules from your InFocus dealer See Accessories on page 44 for informa tion Follow these steps to replace the projection lamp 1 Turn off the projector and unplug the power cord 2 Wait 45 minutes to allow the projector to cool thoroug...

Page 45: ...n when removing the lamp module FIGURE 16 Removing the lamp cover CAUTION Never operate the projector with the lamp door open or removed This disrupts the air flow and causes the projector to overheat 4 Remove the two screws on the outside of the module then grasp the handle and pull the module out Figure 17 Dispose of the lamp module in an environmentally proper manner FIGURE 17 Removing the lamp...

Page 46: ...mp replace monitor reset appears Select Yes to reset the timer See Using the On Screen Menus on page 17 for details menu navigation Replacing the Batteries in the Remote Control The life of the batteries depends on how often and how long you use the remote Symptoms of low battery charge include erratic responses when using the remote and a reduced range of opera tion Follow these steps to replace ...

Page 47: ...d See Replacing the Projection Lamp on page 36 Problem Only the start up screen displays Verify that the cables are connected correctly See page 7 and page 8 for connection procedures Make sure that the cables do not have any bent pins Verify that the proper input source is connected See Source keypad only or Computer and Video remote only on page 16 You might need to turn everything off and power...

Page 48: ...tered on the screen Move the projector to reposition the image Reposition the image using the menu Refer to H Position V Position on page 20 Be sure the projector is at a 90 degree angle to the screen Problem Image is too wide or narrow for screen Adjust the zoom or projector placement Adjust the resolution of your video card if it s greater than 1280x1024 Problem Image is out of focus Turn the pr...

Page 49: ...ferent computer Problem Projected colors don t match the computer or video player s colors Just as there are differences in the displays of different moni tors there are often differences between the computer image and the projected image Adjust the brightness tint and or contrast from the Display menu See Brightness on page 22 Tint on page 30 and Contrast on page 31 Problem Lamp seems to be getti...

Page 50: ...for assis tance please have the following information available the projector s serial number located on the projector s label the resolution of your computer Call InFocus Technical Support at 1 800 799 9911 between 6 a m and 6 p m PST Monday through Friday Service is available in North America after hours and on weekends for a fee at 1 888 592 6800 In Europe call InFocus in The Netherlands at 31 ...

Page 51: ...g 14 to 140 F 10 to 60 C Humidity Operating and non oper 80 relative humidity non condensing Dimensions 7 4 x 2 9 x 11 4 inches 18 9 x 7 5 x 29 0 cm Weight 5 5 lbs 2 5 kg unpacked Altitude Operating 0 to 7 500 feet 2 286 meters Optics Focus Range 4 6 26 feet 1 4 8 m Lamp Type 120 watt or 132 watt UHP lamp Input Power Requirements 100 120VAC 2 2A 50 60Hz 200 240VAC 1 1A 50 60Hz ...

Page 52: ...r Cord North American 210 0195 xx Power Cord European 210 0196 xx VGA computer cable 210 0200 xx Composite Video Cable 210 0197 xx Computer Audio Cable 210 0194 xx AV Audio Cable 210 0198 xx S video Cable 210 0199 xx Control Cable for PS 2 Port 210 0202 xx Control Cable for ADB Port 210 0201 xx Control Cable for Serial Port 210 0203 xx Macintosh Adapter 515 0052 xx Remote Control 590 0381 xx Batte...

Page 53: ...Pro RF Remote Control HW RF GPRO RemotePoint RF Remote Control w Laser Pointer HW RF REMLSR GyroMouse Presenter RF Remote Control HW RF GPRES Executive Remote IR Receiver HW EXRCVR PC Guardian Projector Cable Lock SP LOCK 40 Portable Projection Screen HW PORTSCR40 50 Portable Projection Screen HW PORTSCR50 60 Deluxe Insta Theatre Screen HW DLXSCRN 84 Pull Down Screen HW WALLSCR84 Deluxe Wheeled Pr...

Page 54: ...ideo port pressing it again activates both the external and internal ports and pressing it a third time activates the internal port Refer to your computer s documentation for details on your specific model Computer Key command to activate port Key command to de activate port Acer Ctrl Alt Esc for setup Ctrl Alt Esc for setup AST FN D or Ctrl D FN D or Ctrl D Ctrl FN D Ctrl FN D FN F5 FN F5 type fr...

Page 55: ...al Ctrl Alt Command Ctrl Alt Command Data General Walkabout 2 CRT X at DOS prompt reboot Datavue Ctrl Shift M Ctrl Shift M DEC FN F5 FN F5 FN F4 FN F4 Dell Ctrl Alt Ctrl Alt Ctrl Alt F10 Ctrl Alt F10 FN F8 CRT LCD FN F8 FN D FN D FN F12 FN F12 Digital automatic reboot FN F2 FN F2 Dolch dip switch to CRT dip switch to LCD Epson dip switch to CRT dip switch to LCD Everex setup screen option setup sc...

Page 56: ...ro boot up monitor plugged in unplug monitor Kris Tech FN F8 FN F8 Leading Edge FN T FN T Mac Portable 100 no video port not compatible Mac PowerBook 140 145 150 170 no video port requires a 3rd party interface 160 165 180 520 540 5300 Control Panel folder Pow erBook Display folder Activate Video Mirroring warm reboot 210 230 250 270 280 2300 requires Apple Docking Station or Mini Dock Magitronic ...

Page 57: ...tion Sharp dip switch to CRT dip switch to LCD Sun SPARC Dataview Ctrl Shift M Ctrl Shift M Tandy Ctrl Alt Insert Ctrl Alt Insert setup screen option setup screen option Tangent FN F5 FN F5 Texas Instru ments setup screen option setup screen option Top Link setup screen option setup screen option FN F6 FN F6 Toshiba Ctrl Alt End Ctrl Alt Home FN End FN Home FN F5 FN F5 setup screen option setup sc...

Page 58: ...o to the external CRT port when some type of display device is attached These manufacturers offer more than one key command depend ing on the computer model FN F1 FN F1 Zeos Ctrl Shift D FN F1 Ctrl Shift D FN F1 Computer Key command to activate port Key command to de activate port ...

Page 59: ...ors control panel again When using video mirroring and high color graphics such as slide shows the projected image occasionally might turn black and white If this happens perform the following steps 1 Turn off video mirroring 2 Open the Monitors control panel 3 Move the white menu bar to Monitor 2 to set the projector as the primary monitor 4 Restart the PowerBook Using SimulScan Some newer PowerB...

Page 60: ...52 A p p e n d i x ...

Page 61: ... match monitor colors 41 not displayed 40 compatibility IBM compatible 1 Macintosh 1 computers connecting 7 computers compatible 1 connecting computers 7 power cord 9 video player 8 D displaying on screen menus 15 E elevator button foot 11 F focusing the image 11 H HDTV 8 height adjustment 11 I IBM compatible computers compatibility 1 image adjusting 9 colors don t match computer s 41 focusing 11 ...

Page 62: ...onnecting 9 ordering 44 power up sequence 10 39 PowerPoint slides advancing with the remote 14 R remote control advancing PowerPoint slides with 14 controlling the computer with 13 replacing the batteries 38 using 13 15 replacing projection lamp module 36 resolution 1 S safety guidelines iii security lock 45 SimulScan using with PowerBooks 51 specifications 43 T Technical Support in Europe 4 in Si...

Page 63: ...duct When sending your unit in for repair please ship your unit in its original packing material or an InFocus approved ATA Shipping Case or have a professional packaging com pany pack the unit Please insure your shipment for its full value A return authorization number issued by the InFocus customer service department must also be clearly displayed on the outside of the shipping carton containing...

Page 64: ...ENUES OR LOST SAVINGS THE PRICE STATED FOR THE PRODUCT IS A CONSIDERATION IN LIMITING INFOCUS LIABILITY NO ACTION REGARDLESS OF FORM ARISING OUT OF THE AGREEMENT TO PURCHASE THE PRODUCT MAY BE BROUGHT BY PURCHASER MORE THAN ONE YEAR AFTER THE CAUSE OF ACTION HAS ACCRUED SOME STATES DO NOT ALLOW THE EXCLUSION OR LIMITATION OF INCIDENTAL OR CONSEQUENTIAL DAMAGES SO THE ABOVE LIMITATION OR EXCLUSION ...

Reviews: