background image

4

I

n

t

r

o

d

u

c

t

i

o

n

Usage Guidelines

Do not look directly into the projection lens when the projector 
is turned on. The bright light may harm your eyes.

Do not block the grills on the projector. Restricting the air flow 
can cause it to overheat and turn off. If this happens, you must 
wait a minute before attempting to turn it back on.

Handle the projector as you would any product with glass 
components. Be especially careful not to drop it.

Avoid leaving the projector in direct sunlight or extreme cold 
for extended periods of time. If this happens, allow it to reach 
room temperature before use.

This projector is not intended for use in a mainframe computer 
room as defined in the Standard for the Protection of Electronic 
Computer/Data Processing Equipment, ANSI/NFPA 75.

Transport the projector in a vendor-approved hard or soft case. 
Part numbers for these cases are listed on page 34. Call your In 
Focus dealer to order.

If You Need Assistance

The first place to look for help is in this manual. Be sure to check 
the guidelines in “Troubleshooting” on page 29. 

If this manual doesn’t answer your question, call your In Focus 
dealer. You can also call In Focus Customer Service directly at

1-800-799-9911

. Customer Service is free between 5 a.m. and 

5 p.m. PST, Monday through Friday. Service is available in North 
America after hours and on weekends for a fee at 

1-888-592-6800

.

In Europe, call In Focus in The Netherlands at 

(31) 35 6474 010

. In Singapore, call 

(65) 332-0659

. Or, send us an 

e-mail at 

techsupport@infocus.com

Our World Wide Web address is


http://www.infocus.com.

Warranty

This product is backed by a limited two-year warranty. The 
details of the warranty are printed at the back of this manual. 
Longer term warranties can be purchased from your In Focus 
dealer. Refer to page 34 for part numbers.

Summary of Contents for LP740B

Page 1: ...USER S GUIDE ...

Page 2: ...USER S GUIDE ...

Page 3: ...Copyright 1998 by In Focus Inc Wilsonville Oregon All rights reserved ...

Page 4: ...nce at his own expense DOC Canada This Class A digital apparatus meets all requirements of the Canadian Interfer ence Causing Equipment Regulations Cet appareil numerique de la classe A respecte toutes les exigences du Reglement sur le materiel brouilleur du Canada Safety Certifications UL CUL TÜV EN 55022 Warning This product is intended for use in a commercial industrial or educational envi ronm...

Page 5: ...lian Certification C tick mark Trademarks Apple Macintosh and PowerBook are trademarks or registered trademarks of Apple Computer Inc IBM and PS 2 are trademarks or registered trademarks of International Business Machines Inc Microsoft PowerPoint and Windows are trademarks or registered trademarks of Microsoft Corporation HP is a trademark or registered trademark of Hewlett Packard Company Sun Mic...

Page 6: ...g a Video Player 8 Powering up the Projector and Adjusting the Image 9 Turning Off the Projector 10 Using the Projector 11 Basic Image Adjustment 11 Adjusting the Projector 11 Using the Remote Control and Keypad Buttons 13 Using the On Screen Menus 16 Image control 19 Custom setup 21 Information 22 Maintenance Troubleshooting 25 Cleaning the Lens 25 Cleaning the Fan Intake Filter 25 Replacing the ...

Page 7: ...C o n t e n t s Appendix 33 Specifications 33 Accessories 34 Portable and Laptop Activation Chart 35 Using Video Mirroring with a PowerBook Computer 40 Projected Image Size 41 RS 232 Terminal Specifications 43 Index 45 ...

Page 8: ...he power off and unplug the power cord To avoid burns wait 30 minutes before opening the lamp door Follow all instructions provided in this User s Guide Warning Please use the power cord provided Connect the power cord to a receptacle with a protective safety earth ground terminal Warning Refer all service to qualified service personnel Ser vicing your own projector will void the warranty See the ...

Page 9: ... of the projector Customer Service If you need assistance call In Focus Customer Service directly at 1 800 799 9911 Support is free between 5 a m and 5 p m PST Monday through Friday Support is available in North America after hours and weekends for a fee at 1 888 592 6800 Or send us an e mail at techsupport infocus com In Europe call In Focus in The Netherlands at 31 35 6474 010 In Asia call 65 33...

Page 10: ...INTRODUCTION ...

Page 11: ...t the horizontal and vertical position of the image using the Image Conrol menu see page 18 If your computer s screen resolution is 640x480 800x600 or 1024x768 you can resize the image to 1280x1024 by pressing the Resize button on the keypad or remote Compatibility The projector is compatible with a wide variety of computers and video devices including IBM SUN SGI and selected HP and DEC workstati...

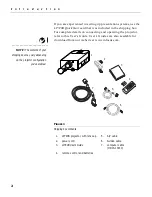
Page 12: ...r refer to this User s Guide User s Guides are also available for download from our website at www infocus com NOTE The contents of your shipping box may vary depending on the projector configuration you ve ordered FIGURE 1 Shipping box contents 1 LP740B projector with lens cap 5 A V cable 2 power cord 6 S video cable 3 LP740B User s Guide 7 computer cable HD15 13W3 4 remote control and batteries ...

Page 13: ...3 FIGURE 2 Side view of projector FIGURE 3 Back view of projector 5 lens cap foot adjuster buttons speakers keypad handle power cord connector vent fan connector panel IR receiver ...

Page 14: ...tor in a vendor approved hard or soft case Part numbers for these cases are listed on page 34 Call your In Focus dealer to order If You Need Assistance The first place to look for help is in this manual Be sure to check the guidelines in Troubleshooting on page 29 If this manual doesn t answer your question call your In Focus dealer You can also call In Focus Customer Service directly at 1 800 799...

Page 15: ...SETTING UP THE PROJECTOR ...

Page 16: ...ector 2 Position the projector the desired distance from the screen The distance from the lens of the projector to the screen deter mines the size of the projected image Figure 5 shows three projected image sizes For more information about image size see Projected Image Size on page 41 3 Make sure the projector and your computer are turned off FIGURE 5 Projected image size 3 5 f t 1 5 f t 6 1 f t ...

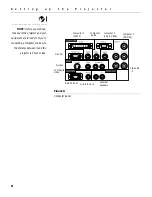
Page 17: ...pment are turned off If you re connecting a computer make sure the distance between it and the projector is 6 feet or less FIGURE 6 Connector panel S video composite video wired remote L R audio in monitor computer 2 external speakers computer audio RS 232 input computer 1 computer 3 5 BNCs 15 pin VESA 13W3 ...

Page 18: ... 15 pin VESA is designated Com puter 2 and the 5 BNC connector is designated Computer 3 NOTE Many laptop computers do not automatically turn on their external video port when a projec tor is connected Activation com mands for some laptop computers are listed in the Appendix of this manual on page 35 FIGURE 7 Connecting the projector to a computer Do you want to display the image on your computer s...

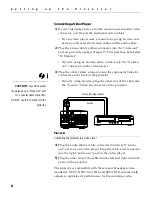
Page 19: ...r on the back of the projector CAUTION Your video player may also have a Video Out port for a coaxial cable connection DO NOT use this to connect to the projector If you re using S video plug the other end of the cable into the S video Video In connector on the projector FIGURE 8 Connecting the projector to a video player 4 Plug the audio cable s white connector into the left audio out port on you...

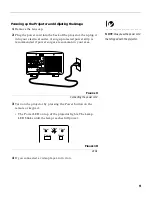
Page 20: ... your electrical outlet A surge protected power strip is recommended if power surges are common in your area FIGURE 9 Connecting the power cord 3 Turn on the projector by pressing the Power button on the remote or keypad The Power LED on top of the projector lights The Lamp LED blinks until the lamp reaches full power FIGURE 10 LEDs 4 If you connected a video player turn it on Power Power Source L...

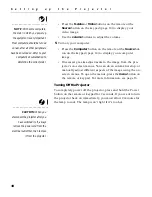
Page 21: ...ge 14 to display your computer image If necessary make adjustments to the image from the pro jector s on screen menus You can do an automatic setup or manually adjust different aspects of the image using the on screen menus To open the menus press the menu button on the remote or keypad For more information see page 16 Turning Off the Projector To completely power off the projector press and hold ...

Page 22: ...USING THE PROJECTOR ...

Page 23: ...zoom adjust the height of the projector page 12 or center the image by adjusting its horizontal or vertical position page 19 Be sure the projector is at a 90 degree angle to the screen 3 If the image is out of focus rotate the outer focus ring page 11 4 If the image appears to shimmer or if it has blurry vertical bars after you have adjusted the focus adjust the Sync or Tracking page 19 5 If the c...

Page 24: ...2 They can vary in length from 0 to 50mm allow ing you to adjust the angle of projection To raise the projector 1 Press and hold the foot adjuster buttons Figure 12 2 Raise the projector to the height you want then release the buttons to lock the feet into position FIGURE 12 Adjusting the height of the projector 2 ...

Page 25: ...he projector The range for optimum operation is 30 feet Power Power Source Resize Track Sync Volume Menu Enter Lamp Check MODEL LP740 RC 01 03151 S N 000001 Made in JAPAN Power Auto Resize Computer S Video Video Track Sync Bright Zoom Zoom Enter Point Menu Mask Restore Volume Mute InFOCUS these 2 buttons are for future expansion and are not used at this time ...

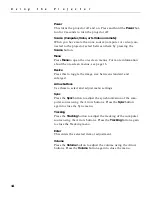
Page 26: ...16 Resize Press this to toggle the image size between standard and enlarged Arrow buttons Use these to select and adjust menu settings Sync Press the Sync button to adjust the synchronization of the com puter source using the Arrow buttons Press the Sync button again to close the Sync menu Tracking Press the Tracking button to adjust the tracking of the computer source using the Arrow buttons Pres...

Page 27: ...he Zoom button Press the Restore button to unzoom the image or use the Zoom button NOTE You cannot use the Point feature while the image is zoomed or masked Point This puts a crosshair cursor on the screen Use the Arrow buttons to move the cursor Press Point again to remove the cursor Mask This allows you to cover the image with a mask or curtain then reveal the image by moving the mask to the lef...

Page 28: ...ess the Enter button to display that menu If the word More appears at the bottom of the menu move the cursor down past it using the down arrow button to see additional menu options If the word Submenu appears opposite the selected sub menu press the Enter button to open a new submenu If a scale bar or On or Off appear opposite the selected menu you can adjust the setting If arrows appear on both s...

Page 29: ...to Cancel and press the Enter button Auto setup start Auto Adjust OFF ON Sync 25 Track 1234 Contarst 5 Brightness 5 Resize OFF ON Save Exit Exit More IMAGE CONTROL COMP 1 2 More H Position V Position H Size V Size Color Balance Submenu Save Exit Cancel IMAGE CONTROL COMP 2 2 Color 65 Tint 2 Sharpness OFF ON Signal Type NTSC Brightness 5 Contrast 5 Color Balance Submenu Save Exit Exit IMAGE CONTROL...

Page 30: ... Composite Color Tint Sharpness Signal type Brightness Contrast Color Balance Audio Control Adjusts quality of sound Volume Mute Right Left Balance Bass Treble Sound mode Custom setup Enables various projec tor modes and settings Menu position View Source Image mode Serial Set Special Sync Smooth Mode Remote Information Displays projector infor mation Lamp timer Input Signal System ver sion H sync...

Page 31: ... Contrast Adjusts contrast Brightness Adjusts brightness Resize Changes the image size to standard size or full size H Position Adjusts the horizontal position of the image V Position Adjusts the vertical position of the image H Size Adjusts the horizontal size of the image V Size Adjusts the vertical size of the image Color Balance R Contrast Adjusts the red contrast G Contrast Adjusts the green ...

Page 32: ...Treble Adjusts the treble Sound mode Stereo enhance modes Enhances the audio source Linear Normal stereo without extra pro cessing Spatial Simulates 3D space feeling from a stereo source Mono Mixes the mono audio source to the left and right channels Pseudo Creates a stereo like effect from mono inputs Volume 24 Mute Balance 0 Bass 0 Treble 0 Sound Mode LINEAR Save Exit Exit More AUDIO CONTROL OFF...

Page 33: ...ON Save Exit Cancel IMAGE MODE SUB MENU me mn212 SUBMENU FUNCTION Menu Posi Adjusts the menu s position on the screen from upper left or right to lower right or left View Source Displays the active source Computer Video or S Video Image Mode Rear Reverses the image for rear projection Ceiling Reverses the image for ceiling mounted projection Remote Indicates if the remote is wired to the projector...

Page 34: ...puter 1 2 or 3 or Video or S Video Rev Shows the revision of software in the projector H Sync Shows the Horizontal sync frequency of the input source V Sync Shows the Vertical sync frequency of the input source Resolution Shows the image resolution of the computer source Signal Type Shows either NTSC PAL or SECAM video source only Lamp Timer 1H Input Signal Computer 1 Rev 1 05 H Sync 75 00kHz V Sy...

Page 35: ...ght arrow to move to the next space and enter another character 4 Move the cursor using the right arrow button to Save Exit when you are finished then press Enter 5 Confirm your selection by choosing Yes or No then press Enter Users memory Load This option sends saved settings to the projector 1 Use the Arrow buttons to move the cursor to Users Memory Load then press Enter 2 Move the cursor to the...

Page 36: ...MAINTENANCE AND TROUBLESHOOTING ...

Page 37: ...chemicals might scratch the lens 2 Lightly wipe the cleaning cloth over the lens 3 If you don t intend to use the projector immediately replace the lens cap Cleaning the Fan Intake Filter The fan intake filter on the bottom of the projector catches dust and particles in the air If the filter becomes clogged the projector does not cool properly and may malfunction To prevent this clean the filter a...

Page 38: ...hours the lamp has been in use The LP740B uses a metal halide bulb These types of bulbs deteriorate over time Replace the lamp when the brightness is no longer acceptable The lamp LED blinks slowly after 950 hours after 1000 hours a lamp replace message appears on the screen You can order new lamp modules from your In Focus dealer See Accessories on page 34 for infor mation Follow these steps to r...

Page 39: ...operate the projector with the lamp door open or removed This disrupts the air flow and causes the projector to overheat 5 Loosen the two non removable screws on the outside of the module 6 Remove the module Figure 17 FIGURE 17 Removing the lamp module ...

Page 40: ... outside of the module 10 Re install the lamp door 11 Plug in the power cord 12 To reset the lamp hour timer in the menus press and hold the Track and Sync buttons then press the Power button while still holding down the other buttons for 3 seconds Verify that the timer was reset by pressing the menu button navigating to the Information menu and viewing the Lamp Timer setting see page 22 WARNING D...

Page 41: ...on Lamp on page 26 Make sure that the cables do not have any bent pins Problem Color or text not being projected You might need to adjust the brightness up or down until the text is visible Refer to Bright on page 15 for more informa tion Problem The screen resolution is not right Make sure the computer s video card is set for a resolution of no greater than 1600x1200 Problem Image isn t centered ...

Page 42: ...n program group 2 Verify that the Display setting is 1600x1200 or less If you re using Windows 95 1 Open My Computer icon the Control Panel folder and then the Display icon 2 Click the Settings tab 3 Verify that the Desktop area is set to 1600x1200 or less Also check the following Does your computer have a compatible video board The pro jector isn t CGA or EGA compatible Is your computer s video p...

Page 43: ...15 for more information Check the projection lens to see if it needs cleaning Problem no sound Adjust volume Verify audio input connections Adjust audio source Problem Image is noisy or streaked Adjust the synchronization and tracking manually to find an optimal setting See Sync and Tracking on page 18 The problem could be with your computer s video card If possible connect a different computer Pr...

Page 44: ... Turn the projector off wait at least 2 minutes then turn it back on Before calling your dealer or In Focus Technical Support for assis tance please have the following information available the projector s serial number located on the bottom label the resolution of your computer Call In Focus Technical Support at 1 800 799 9911 between 5 a m and 5 p m PST Monday through Friday Or send us an e mail...

Page 45: ...APPENDIX ...

Page 46: ... to 95 relative humidity non condensing Dimensions 13 4 x 17 5 x 8 7 inches 34 x 44 5 x 22 cm Weight 29 1 pounds 13 2 kg unpacked Altitude Operating 0 to 10 000 feet 3 048 meters Non operating 0 to 40 000 feet 12 192 meters Optics Focus Range 5 6 80 feet Lamp Type 270 watt metal halide Input Power Requirements 100 125VAC 4 5A 50 60 Hz 200 240VAC 2 2A 50 Hz Remote Control Batterry Two 2 AA alkaline...

Page 47: ...10 0053 xx S video Cable 210 0129 xx Computer Cable 210 0130 xx North American Power Cord 210 0023 xx Australian Power Cord 210 0027 xx UK Power Cord 210 0028 xx European Power Cord 210 0029 xx Danish Power Cord 210 0030 xx Swiss Power Cord 210 0031 xx Soft Case CA C135 ATA Shipping Case CA C138 Ceiling Mount LiteMount 740 SP CEIL LM740 LiteMount False Ceiling Plate SP LTMT PLT LiteMount Pipe Tubi...

Page 48: ...e external and internal ports and pressing it a third time activates the internal port Refer to your computer s doc umentation for details on your spe cific model Computer Key command to activate port Key command to de activate port Acer Ctrl Alt Esc for setup Ctrl Alt Esc for setup AST FN D or Ctrl D FN D or Ctrl D Ctrl FN D Ctrl FN D FN F5 FN F5 type from A IVGA CRT type from A IVGA CRT FN F12 F...

Page 49: ...omatic automatic Alt F for screen setup option Alt F for screen setup option Data General Ctrl Alt Command Ctrl Alt Command Data General Walkabout 2 CRT X at DOS prompt reboot Datavue Ctrl Shift M Ctrl Shift M DEC FN F5 FN F5 FN F4 FN F4 Dell Ctrl Alt Ctrl Alt Ctrl Alt F10 Ctrl Alt F10 FN F8 CRT LCD FN F8 FN D FN D FN F12 FN F12 Digital automatic reboot FN F2 FN F2 Dolch dip switch to CRT dip swit...

Page 50: ...1 select choice FN F5 select choice PS 2 SC select choice CRT LCD etc Infotel FN F12 FN F12 Kaypro boot up monitor plugged in unplug monitor Kris Tech FN F8 FN F8 Leading Edge FN T FN T Mac Portable 100 no video port not compatible Mac PowerBook 140 145 150 170 no video port requires a 3rd party interface 160 165 180 520 540 5300 Control Panel folder PowerBook Display folder Activate Video Mirrori...

Page 51: ...ic FN F2 FN F2 Prostar Ctrl Alt S at bootup Ctrl Alt S at bootup Samsung setup screen option setup screen option Sanyo setup screen option setup screen option Sharp dip switch to CRT dip switch to LCD Sun SPARC Dataview Ctrl Shift M Ctrl Shift M Tandy Ctrl Alt Insert Ctrl Alt Insert setup screen option setup screen option Tangent FN F5 FN F5 Texas Instru ments setup screen option setup screen opti...

Page 52: ...rers offer more than one key command depend ing on the computer model Twinhead FN F7 FN F7 FN F5 FN F5 Automatic Automatic WinBook Ctrl Alt F10 Ctrl Alt F10 Wyse software driven software driven Zenith FN F10 FN F10 FN F2 FN F2 FN F1 FN F1 Zeos Ctrl Shift D FN F1 Ctrl Shift D FN F1 Computer Key command to activate port Key command to de activate port ...

Page 53: ... Monitors control panel again When using video mirroring and high color graphics such as slide shows the projected image occasionally might turn black and white If this happens perform the following steps 1 Turn off video mirroring 2 Open the Monitors control panel 3 Move the white menu bar to Monitor 2 to set the projector as the primary monitor 4 Restart the PowerBook Using SimulScan Some newer ...

Page 54: ... 19 Projected image size Table 1 Image Size Width and Height for lens at Maximum Image Size Distance to Screen feet Diagonal inches Width inches Height inches 5 6 42 33 26 10 73 57 46 15 109 85 68 20 144 113 90 25 180 141 112 30 216 169 135 35 252 197 157 40 287 225 179 45 323 253 202 50 359 281 224 ...

Page 55: ...and Height for lens at Minimum Image Size Distance to Screen feet Diagonal inches Width inches Height inches 5 6 29 23 18 10 51 40 32 15 76 60 48 20 101 79 63 25 126 99 79 30 151 118 94 35 176 138 110 40 201 157 126 45 226 177 141 50 251 197 157 ...

Page 56: ...All commands consist of 3 alpha characters followed by a request all enclosed in parentheses An example AAA where NOTE To assure the projector can process a command wait 3 seconds before entering the next command starts the command AAA denotes the command denotes the value to be written leading zeros not necessary ends the command Setting Value Bits per second 192000 9600 Data bits 8 Parity None E...

Page 57: ...C 1 Phase Up 0 Phase Down Sync SYC 1 Sync Up 0 Sync Down Bright BRT 1 Bright Up 0 Bright Down Resize RES 1 Expansion On 0 Expansion Off Source SRC 0 Computer 1 1 Computer 2 2 Computer 3 3 S video 4 Video Menu MNU 1 Menu On 0 Menu Off Zoom ZOM 1 Zoom 0 Zoom Point PNT 1 Pointer On 0 Pointer Off Mask MSK 1 Mask On 0 Mask Off Cursor CSR 0 Up 1 Down 2 Right 3 Left ...

Page 58: ...INDEX ...

Page 59: ... composite video cable connecting 8 computers compatible 1 connecting IBM compatible computer 7 power cord 9 video player 8 connector panel 6 connectors 13W3 6 7 15 pin VESA 6 7 5 BNC 6 7 Custom Setup 21 D displaying Information 22 displaying on screen menus 14 F filter cleaning 25 I IBM compatible computers compatibility 1 connecting 7 icons on the projector 6 image adjusting 9 11 auto adjusting ...

Page 60: ...match 31 O on screen menus Audio Control 19 Custom Setup 21 displaying 16 Image Control 19 Information 22 users memory load 23 users memory save 23 P pointer using 15 power cord connecting 9 ordering 34 power switch 10 power up sequence 10 30 R replacing projection lamp module 26 resetting lamp hour timer 28 resizing the image 14 resolution 1 restoring settings 23 restoring the image 15 RS 232 con...

Page 61: ...32 temperature limits 33 test pattern 29 text not visible 29 timer lamp 22 troubleshooting 29 turning off the projector 10 turning on the projector 9 V vertical lines displayed 31 VESA connector 6 video mirroring on a PowerBook 40 Volume button 14 volume adjusting 14 W warranty 34 Z zooming the image 15 ...

Page 62: ... pack the unit Please insure your shipment for its full value A return authorization number issued by the In Focus customer service department must also be clearly displayed on the outside of the shipping carton containing the Product WARRANTY LIMITATION AND EXCLUSION In Focus shall have no further obligation under the foregoing limited warranty if the Product has been damaged due to abuse misuse ...

Page 63: ...Part Number 010 0199 00 ...

Reviews: