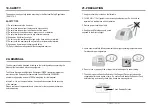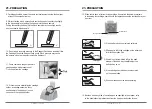
STEP 3. Press or to select one or the other and or press .
CLOVER A1c Self • 43 •
14. OPTIONS
When printer is in manual mode
STEP 1. Press the printer button after the result is displyed.
STEP 2. LCD will displayed ‘Current’ and ‘ALL’
14.2 Printing Test Results with the Thermal Printer
Connect the thermal printer to the analyzer with the interface cable(RS-232C).
The analyzer should be in stand-by mode.
The printer is already pre-set to either manual or automatic printing.
Please refer to page 15.
• Automatic :
Prints automatically after every test.
• Manual :
Prints only when printer button pressed.
On/Off
9V
USB Código de barras
Impressora
• Current :
Only that result will print.
• ALL :
Every result in memory will print.
CLOVER A1c Self • 42 •
14. OPTIONS
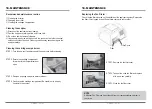
STEP 7.
The analyzer will display the blood glucose test result..
STEP 8.
Once the test is complete, slide the ejector button forward to remove
the glucose test strip from the glucose test module.
You don’t want more glucose test, disconnect the glucose test module
from the
CLOVER A1c™ Self
analyzer.
STEP 6.
Collect the sample blood using the lancing device and apply it on the
glucose test strip.
or
3
5
123
mg/dl
Summary of Contents for CLOVER A1c Self
Page 33: ...65 CLOVER A1c Self 64 ...


