IIn
ns
stta
alllla
attiio
on
n
Installing a Hard Drive in the Enclosure
Use caution when installing a hard drive in the enclosure. Excessive shock or force
could damage the drive and/or the enclosure, resulting in data loss.
CAUTION:
Always ensure that you are properly grounded when handling a hard drive or
the enclosure tray, since electronic components can be damaged by static electricity. If
an anti-static mat or similar product is not available, ground yourself by touching a
computer case or other metal surface for several seconds before handling any
components.
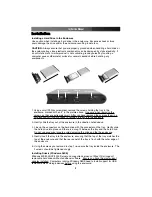
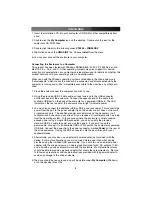
1. Using a small Phillips screwdriver, remove the screws holding the tray in the
enclosure, marked with an “x” in the picture above. Use care when removing the
screws, as they are extremely small. After you have removed them, place them in a
safe location until you are ready to re-insert the tray into the enclosure.
2. Gently slide the tray out of the enclosure in the direction noted above.
3. Line up the connectors on the hard drive with the connector on the tray. Gently slide
the hard drive into place until there is a snug fit between the tray and the hard drive.
Do not use excessive force to avoid damaging the drive and the the enclosure.
4. Gently insert the tray into the enclosure, ensuring that the top of the tray matches the
top of the enclosure and that the rear panel of the tray is flush with the outer edge of
the enclosure.
5. Using the screws you removed in step 1, re-secure the tray inside the enclosure. The
2 screws should be tightened snugly.
Installing Drivers (Windows 98SE)
Windows ME/2000/XP/2003 Server and supported versions of Mac OS all support
removable hard drives without additional software. Ensure you have the most current
updates installed. Computers running Windows 98SE need to install support for USB
removable mass storage devices before using the enclosure:
Instruction Manual
2
X
X
Power Adapter
USB Data
One-Button Backup
Power/Activity LED

