background image

6.  If another auto-program is desired, press the PRESET button until the desired food: 

  BEEF, PORK, CHICKEN or STEW illuminates. The auto-programmed TIME and LOW, 

  HIGH temperature will be displayed on the screen. (See Figure 6C.)

7.  As some recipe ingredients are cooked at different times, and reheating to serve 


foods does not require as much cook time, the target cook time may be adjusted 

  at any time while the Slow Cooker is cooking. For example: to change the 

  CHICKEN cook time to 3-1/2 hours, first press the TIME button. Press the DOWN 

  arrow until the target cook time (03:30) is displayed. (See Figure 6C.)

8.  After 5 seconds, the Slow Cooker will begin operation or press POWER button to 

  begin cooking immediately.

9.  The COOK (cooking pot) icon and CLOCK icon will illuminate (See Figure 6D.); 


the timer will count down to 00:00; 3 audible beeps signal cook time is complete.

10. Temperature will automatically drop to WARM and 04:00 (4 hours) will appear 

  on the display. When WARM time counts down to 00:00 the Slow Cooker will 

  automatically turn OFF and the display will turn blank. 

NOTE:

 Press the POWER 

  button at any time to turn the Programmable Slow Cooker OFF.

11. Press front lid lock, then use the lid knob to lift the hinged Slow Cooker lid.

12. Allow a few seconds for all steam to escape. Inspect and test food for doneness 

  and adjust seasonings if needed.

13. If cooking is completed before the timer reaches 00:00, press the MODE button 

  until WARM is illuminated. 04:00 (4 hours) will appear on the display. Continue to 

  press the UP or DOWN arrows until the target WARM TIME is displayed.

14. Slow cooked food can be served directly from the aluminum pot, if desired.

 NOTE: 

When serving from the Programmable Slow Cooker, always place a trivet 

  or protective padding under the slow cooker body before placing it on a table 

  or countertop.

TO PROGRAM YOUR SLOW COOKER

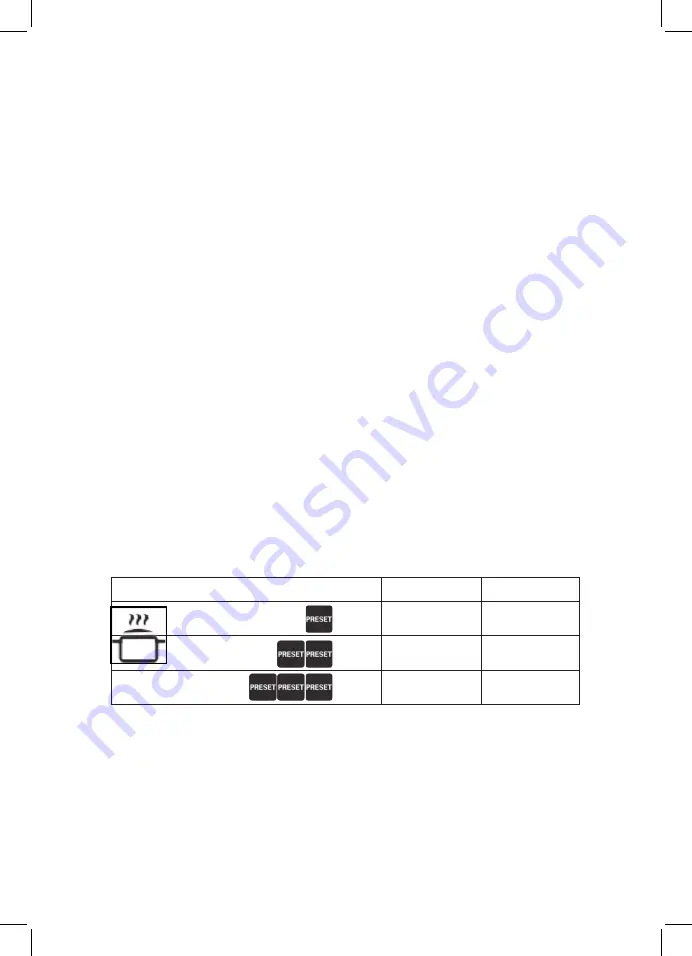
1.  The chart below: Temperatures & Times (Figure 7), lists LOW, HIGH or WARM 

temperatures and corresponding default cooking times.

Press MODE Button

Temp

Default Time

1 time

HIGH

4:00

2 times

LOW

8:00

3 times

WARM

4:00

Figure 7

2.  Plug cord into a 120V AC outlet. An audible beep will sound; the blue backlit 

screen will illuminate; all numbers and icons on the screen begin to flash. After 60 

seconds of inactivity, the slow cooker will turn OFF.

3.  Press the POWER button. The default screen (4:00 hours, HIGH) will begin to flash. 

  (See Figure 8A ).

8

Summary of Contents for Lorena Garcia Lorena Bella

Page 1: ...TM SLOW COOKER INSTRUCTION MANUAL ...

Page 2: ...y manner Bring it to a qualified technician for examination repair or electrical or mechanical adjustment 7 The use of accessory attachments not recommended by the appliance manufacturer may cause injuries 8 Do not use outdoors 9 Do not let cord hang over edge of table or counter or touch hot surfaces 10 Do not place on or near a hot gas or electric burner or in a heated oven 11 Extreme caution mu...

Page 3: ...ll outlet 7 Do not use this appliance in an unstable position 8 Never use the aluminum pot on an open flame 9 Lift lid carefully to avoid scalding and allow water to drip into aluminum pot 10 Use care when removing the lid Make sure it is fully cooled before touching 11 Never leave the aluminum pot unattended when searing foods on the stovetop Take care to watch foods so that they brown not burn 1...

Page 4: ...appliance and the finish of the counter top or table top Failure to do so may cause the finish to darken permanent blemishes may occur or stains can appear Lid Knob Front lid lock release button Tempered glass lid Lid handle Aluminum pot handles with silicone Ceramic coated aluminum pot Slow cooker side handles with plastic Control panel with blue backlit screen Slow cooker body Polarized plug Hin...

Page 5: ...ramelize all surfaces of the meat It is ideal for cooking family size meals and large cuts of meat Take the guesswork out of slow cooking Built in programs for beef pork poultry and soup stew offer auto programmed cooking times and temperatures Slow cook food safely on LOW all day or night up to 20 hours your Programmable Slow Cooker automatically shifts to WARM for 4 hours before shutting itself ...

Page 6: ...nt lid lock release button Grasp the lid knob and lift the lid 15 Located on the backside below the hinge are 2 lid lock tabs Squeeze the lid lock tabs together then lift the lid off the aluminum pot See Figure 4 Figure 3A 3B 3C 16 Wearing oven mitts grasp the aluminum pot handles lift and remove it from the slow cooker body empty the water CAUTION The aluminum pot and aluminum pot side handles wi...

Page 7: ...tion while searing Use protective oven mitts Keep hands and face away from the aluminum pan opening Avoid contact with hot oil as it may sputter and spit CAUTION Use protective oven mitts when removing aluminum pot from stovetop to bring back to slow cooker body 6 After all food is browned it may be necessary to de fat the cooking liquid Use a slice of bread a spoon or a straining spoon to skim of...

Page 8: ... time BEEF HIGH 4 00 2 times BEEF LOW 8 00 3 times PORK HIGH 4 00 4 times PORK LOW 8 00 5 times CHICKEN HIGH 4 00 6 times CHICKEN LOW 7 00 7 times STEW HIGH 5 00 8 times STEW LOW 10 00 Figure 5 Auto Program Foods Temps Times 2 Plug cord into a 120V AC outlet An audible beep will sound the blue backlit screen will illuminate all numbers and icons on the screen begin to flash After 60 seconds of ina...

Page 9: ...utton at any time to turn the Programmable Slow Cooker OFF 11 Press front lid lock then use the lid knob to lift the hinged Slow Cooker lid 12 Allow a few seconds for all steam to escape Inspect and test food for doneness and adjust seasonings if needed 13 If cooking is completed before the timer reaches 00 00 press the MODE button until WARM is illuminated 04 00 4 hours will appear on the display...

Page 10: ... blank NOTE Press the POWER button at any time to turn the Programmable Slow Cooker OFF 9 Press front lid lock then use the lid knob to lift the hinged Slow Cooker lid 10 Allow a few seconds for all steam to escape Inspect and test food for doneness and adjust seasonings if needed 11 If cooking is completed before the timer reaches 00 00 press the MODE button until WARM is illuminated 04 00 4 hour...

Page 11: ...ooker The exceptions to this rule would be rice and soups Remember liquids can always be added at a later time if necessary If a recipe results in too much liquid at the end of the cooking time remove the aluminum pot from the slow cooker body Skim any excess fat and boil the sauce on the stovetop until it thickens and the desired consistency is achieved Foods cut into uniform pieces will cook fas...

Page 12: ... cooked on food 6 Rinse and dry thoroughly 7 Wipe the interior and exterior of the slow cooker body with a soft slightly damp cloth or sponge Never use abrasive cleansers or scouring pads to clean the slow cooker body as they may damage the surfaces 8 Replace the locking lid Place the hinge into the rear housing Lower the front lid An audible click can be heard as the lid locks into position See F...

Page 13: ... brown bits are incorporated 5 Replace aluminum pot into slow cooker body CAUTION Be sure to use protective oven mitts when returning aluminum pot to slow cooker body as the the aluminum pot and the aluminum pot handles will be very hot and may cause injuries such as burns 6 Add all remaining ingredients into the aluminum pot and mix well Add short ribs 7 Close the lid 8 Program the Slow Cooker fo...

Page 14: ...he sliced peppers to the hot pan Brown well Drain veggies on brown paper Wipe the aluminum pot down to remove all sausage grease 4 Replace aluminum pot into slow cooker body CAUTION Be sure to use protective oven mitts when returning aluminum pot to slow cooker body as the the aluminum pot and the aluminum pot handles will be very hot and may cause injuries such as burns 5 Add the remaining raw ve...

Page 15: ... and stir for 3 minutes Remove mushrooms 5 Add chicken broth and wine to deglaze 6 Replace aluminum pot into the slow cooker body CAUTION Be sure to use protective oven mitts when returning aluminum pot to slow cooker body as the the aluminum pot and the aluminum pot handles will be very hot and may cause injuries such as burns 7 Add the chicken and mushrooms drained tomatoes sweet pepper onion ca...

Page 16: ...rom the date of original purchase with receipt The manufacturer s obligation shall be limited to repairing or replacing FOB N Y any part of the product that is defective Such warranty shall not apply to damages resulting from accidents abuse or misuse This warranty is valid only for first quality goods purchased from an authorized selling agent of IDL 15 Ingenious Designs LLC 2060 9th Avenue Ronko...

Reviews: