background image

25

General Disassembly

The following instructions provide the necessary information to
disassemble, inspect, repair, and assemble the winch. An
exploded drawing of the winch is provided in the Parts Section
to assist part identification. If a winch is being completely
disassembled for any reason, follow the order of the topics as
they are presented. It is recommended that all maintenance work
on the winch be performed in a clean dust free work area.
In the process of disassembling the winch, observe the
following:
1.

Never disassemble the winch any further than is necessary
to accomplish the needed repair. A good part can be
damaged during the course of disassembly.

2.

Never use excessive force when removing parts. Tapping
gently around the perimeter of a part with a soft hammer
should be sufficient to loosen the part.

3.

Do not heat a part with a flame to free it for removal, unless
the part being heated is already worn or damaged beyond
repair and no additional damage will occur to other parts.

In general, the winch is designed to permit easy disassembly and
assembly. The use of heat or excessive force should not be
required.

4.

Keep the work area as clean as practical, to prevent dirt and
other foreign matter from getting into bearings or other
moving parts.

Winch Disassembly (chain driven winches)

Refer to Drawing MHP0255.
Disconnect all power to the winch before starting disassembly.
Remove wire rope and limit switches if equipped.
1.

Remove capscrews (15), screws (16), washers (18) and nuts
(24) and lift off guard (3).

2.

Remove chain (6).

3.

Loosen setscrews (32) and remove sprocket (5) and key
(31) from motor and reducer assembly output shaft.

4.

Remove capscrews (17), lockwashers (21), washers (12)
and nuts (22). Using an overhead hoist with sufficient
capacity to adequately support the weight of the motor and
reducer assembly remove the motor and reducer assembly
from frame (1).

5.

Remove capscrews (9) and lockwashers (25) and lift off
caps (8).

6.

Remove adjusting screws (11) and nuts (20) from frame (1).

7.

Support the drum (2) using an overhead hoist with
sufficient capacity to adequately handle the weight of the
drum. Remove nuts (19) and lockwashers (13). Pull
bearings (7) from drum spigots.

8.

Lift drum (2) from frame (1) and carefully set in an area
which will not cause damage to the sprocket teeth.

9.

Remove bolt locks (4) and capscrews (14) from frame (1).

Winch Disassembly

15,000 - 25,000 lb winches
Refer to Drawings MHP0255 and MHP0278.
1.

Remove capscrews (15), screws (16), washers (18) and nuts
(24) and lift off guard (3).

2.

Remove chain (6).

3.

Loosen setscrews (32) and remove sprocket (5) and key
(31) from motor and reducer assembly output shaft.

4.

Remove capscrews (45), lockwashers (46) and nuts (47)
from bearing (40).

5.

Remove capscrews (17), lockwashers (21), washers (12) and
nuts (22). Using an overhead hoist with sufficient capacity to
adequately support the weight of the motor and reducer
assembly remove the motor and reducer assembly from frame
(1). Slide bearing (40) from motor and reducer assembly.

6.

Remove adjusting screws (11) and nuts (20) from frame (1).

7.

Remove capscrews (41), washers (42), lockwashers (48)
and nuts (43) from bearings (39).

8.

Lift drum (2) from frame (1) and carefully set in an area
which will not cause damage to the sprocket teeth. Pull
bearings (39) from drum spigots.

Winch Disassembly (direct drive winches)

Refer to Drawing MHP0260.
1.

Remove nuts (60) and lockwashers (59). Pull bearing (58)
from drum hub.

2.

Remove nuts (53), lockwashers (54) and capscrews (56)
from motor and frame (50).

3.

Slide the motor and drum assembly away from bearing (58)
until drum spigot is clear of the frame (50).

4.

Remove drum (51) from reducer assembly drive shaft.

Limit Switch Disassembly (optional feature)
Refer to Drawings MHP0263 and MHP0579.
1.

Remove screws (74) and lockwashers (73). Lift limit switch
(72) from bracket (71).

2.

Remove nuts (19) and lockwashers (13) from extension
studs (70). Remove bracket (71) and extension studs (70).

3.

Tap pin (75) out of drum only if it requires replacement.

On 15000B20 and 25000B25 winches, bracket (71) can only be
removed after capscrews (41), washers (42), lockwashers (48)
and nuts (43), that retain bearing (39), have been removed.

Cleaning, Inspection and Repair

Use the following procedures to clean, inspect, and repair the
components of the winch.

Cleaning
Clean all winch component parts in solvent. The use of a stiff
bristle brush will facilitate the removal of accumulated dirt and
sediments on the sprockets, frame and drum. Dry each part using
low pressure, filtered compressed air.

Inspection
All disassembled parts should be inspected to determine their
fitness for continued use. Pay particular attention to the
following:
1.

Inspect sprockets for worn, cracked, or broken teeth.

2.

Inspect all bearings for wear, scoring, or galling. Check for
freeness of rotation. Replace bearings if rotation is rough or
bearings are excessively worn.

3.

Inspect shafts for ridges caused by wear. If ridges caused
by wear are apparent on shafts, replace the shaft.

4.

Inspect all threaded items and replace those having
damaged threads.

5.

Check guard for damage and that it provides suitable
protection from the roller chain and sprockets.

6.

Inspect chain to ensure it is clean and free from rust. Refer
to “LUBRICATION” section for information on cleaning
and lubricating chain.

Summary of Contents for 10000B20

Page 1: ...ied out by personnel certified by Ingersoll Rand or by Ingersoll Rand Authorized Service Centers Contact the Factory if in doubt about installation operation inspection and maintenance instructions Us...

Page 2: ...tion Make this manual available to all persons responsible for the operation installation and maintenance of these products WARNING Do not use this winch for lifting supporting or transporting people...

Page 3: ...nce Brake Adjustment 23 Chain Adjustment 24 Torque Limiter Adjustment 24 Limit Switch Assembly Adjustment 24 General Disassembly 25 Winch Disassembly 25 Cleaning Inspection and Repair 25 Winch Assembl...

Page 4: ...and the hazards and or results of each method If operation or maintenance procedures not specifically recommended by the manufacturer are conducted it must be ensured that product safety is not endan...

Page 5: ...d carefully 25 Do not operate the winch with the guard removed or improperly installed The following warnings and operating instructions have been adapted in part from American National Safety Standar...

Page 6: ...r vent plug is installed Label part number 7106529 is attached to the winch frame LABELS AND TAGS Each winch is supplied from the factory with the labels and tags shown If one of the labels or tags is...

Page 7: ...0 12 10000B20 10000 4545 20 6 1374 625 1400B40 10000B40 15 40 12 1600 727 1600A90 1600 727 5 90 27 540 245 15000B20 15000 6818 12 20 6 2850 1295 1600B90 25000B25 25000 11364 25 25 7 5 3550 1614 Notes...

Page 8: ...ch Options D Drum Divider Flange and additional wire rope anchor G Drum Grooving H Heater in Motor P Marine 812 Top Coat S Rotary Limit Switch T Torque Limiter Z Sandblast Carbozinc Starter Options M1...

Page 9: ...inch carefully inspect it for possible shipping damage Winches are supplied from the factory with the correct grade and quantity of lubricating oil Before operation check oil levels and adjust as nece...

Page 10: ...rque specifications Safe Installation Procedures 1 Do not use wire rope as a ground earth for welding 2 Do not attach a welding electrode to winch or wire rope 3 Never run the wire rope over a sharp e...

Page 11: ...ll cause damage to wire rope use a sheave Refer to wire rope manufacturer s handbook for proper sizing use and care of wire rope Refer to instruction 5 under MOUNTING for allowable wire rope fleet ang...

Page 12: ...phase motors refer to Dwgs MHP1087 or MHP1088 Contact your nearest distributor or the factory for recommendations on specific applications 5 3 2 1 BG BGE Brake Coil V B R BL W Fast Brake Action Auxili...

Page 13: ...12 DRUM SWITCH CONNECTION DIAGRAMS Dwg MHP0201...

Page 14: ...13 230 Volt Single Phase 60 Hz Dwg MHP0271 WIRING DIAGRAM...

Page 15: ...14 WIRING DIAGRAMS Dwg MHP1086...

Page 16: ...15 Dwg MHP1087 WIRING DIAGRAM 208 575 Volt Three Phase 50 or 60 Hz 22 Amp and smaller...

Page 17: ...16 WIRING DIAGRAM Dwg MHP1088 208 575 Volt Three Phase 50 or 60 Hz 22 Amp and larger...

Page 18: ...tor and Reducer Charts When operating the winch avoid unnecessary jogging of the controls Brake Operation Brakes are supplied with a hand operated release mechanism This allows opening of the brake wi...

Page 19: ...s ASME B30 7 WARNING All new altered or modified equipment should be inspected and tested by personnel instructed in safety operation and maintenance of this equipment to ensure safe operation at rate...

Page 20: ...s and for proper setting of the spring load Clean and adjust as required 13 GUARD Verify fasteners are tight and in good condition Ensure guard is not damaged and is in good condition Repair or replac...

Page 21: ...on for general inspection criteria Also refer to appropriate National Standards and Codes of practice If in doubt about an existing condition contact the nearest Ingersoll Rand Distributor or the fact...

Page 22: ...ve motor oil SAE grade 20 or 30 DO NOT USE GREASE Oil should be applied liberally with a brush or oil can at least once every eight hours of operation WARNING Do not lubricate chain while winch is run...

Page 23: ...start or starts sluggishly Motor is not connected for correct voltage Check wiring diagrams and correct wiring Large voltage and or frequency fluctuation at starting Ensure stable power supply is avai...

Page 24: ...BM8 BM31 0 012 0 047 0 4 1 2 Prolonged use of the brake will wear the brake disc lining This wear increases the air gap When the air gap approaches its maximum value the brake must be readjusted To r...

Page 25: ...just torque limiter Always back off the capscrews until the spring force is relieved before tightening or loosening the adjusting nut For best results the torque limiter should be adjusted under condi...

Page 26: ...ve chain 6 3 Loosen setscrews 32 and remove sprocket 5 and key 31 from motor and reducer assembly output shaft 4 Remove capscrews 45 lockwashers 46 and nuts 47 from bearing 40 5 Remove capscrews 17 lo...

Page 27: ...position with lockwashers 59 and nuts 60 4 Install capscrews 56 from underneath frame 50 Install nuts 53 and washers 54 on capscrews 56 and torque to specifications Repair Actual repairs are limited...

Page 28: ...rews 74 and lockwashers 73 4 Tighten capscrews 41 Torque Limiter Assembly Refer to Drawings MHP0583 and MHP0854 Ensure the clutch plate motor sprocket driving plate and friction plates are free of oil...

Page 29: ...08 1 2 20 90 122 65 88 120 160 90 122 9 16 12 110 150 80 108 150 203 110 150 9 16 18 120 160 90 122 170 230 130 176 5 8 11 150 203 110 150 220 298 170 230 5 8 18 180 244 130 176 240 325 180 244 3 4 10...

Page 30: ...29 ELECTRIC WINCH ASSEMBLY PARTS DRAWING 15 000 lb and 25 000 lb winches only Frame 1 shown is for a 25 000 lb winch Dwg MHP0278...

Page 31: ...30 1 300 lb to 10 000 lb winches ELECTRIC WINCH ASSEMBLY PARTS DRAWING Dwg MHP0255 Note Appearance of motor and reducer assembly 26 and 27 will vary depending on winch model...

Page 32: ...51712 11 Screw 4 53545 12 Flat Washer 8 71293005 13 Lockwasher 8 50200 14 Capscrew 4 71109862 15 Capscrew 2 50919 16 Screw 3 51818 17 Capscrew 4 71126742 52008 50892 18 Washer 3 51676 19 Nut 8 51982...

Page 33: ...6 12 Flat Washer 8 71064844 71293005 13 Lockwasher 8 50181 51008 14 Capscrew 4 52008 50892 54894 15 Capscrew 2 53972 54101 51014 16 Screw 3 51818 71061675 51818 17 Capscrew Parallel Drive 4 51010 5496...

Page 34: ...9 Nut 8 54661 20 Nut See 50205 6 50159 4 52255 4 21 Lockwasher 4 54953 71086722 52251 22 Nut 4 53366 51492 54841 23 Nut 4 52265 71061584 24 Nut 3 53548 50852 51682 25 Lockwasher 4 50181 26 Motor Paral...

Page 35: ...34 Note Appearance of motor and reducer assembly 27 will vary depending on winch model Dwg MHP0260 DIRECT DRIVE ELECTRIC WINCH ASSEMBLY PARTS DRAWING...

Page 36: ...1600A90 and 1600B90 2000A60 and 2000B60 3500B80 27 Motor 1 Refer to Motor Chart 33 Nameplate 1 71106967 R 34 Drive Screw 4 50915 35 Warning Label 1 71060529 50 Frame 1 7473 12 11564 12 7566 51 Drum 1...

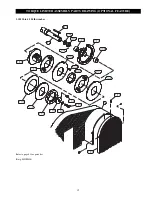
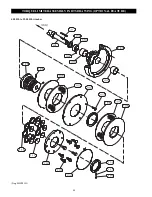
Page 37: ...P0579 Dwg MHP0263 15 000 lb and 25 000 lb winches only 7 0 1 3 1 9 7 1 7 2 7 3 7 4 7 5 4 1 4 2 7 5 7 2 7 1 7 3 7 4 4 8 4 3 LIMIT SWITCH ASSEMBLY PARTS DRAWING OPTIONAL FEATURE 200 lb through 10 000 lb...

Page 38: ...ems 13 and 19 Chain Drive Winches ITEM NO DESCRIPTION OF PART TOTAL QTY PART NO 1300A20 1300B20 1400 40 2000A20 2000B20 2000A40 2000B40 3000B40 4000A20 4000B20 4500B50 Limit Switch Assembly incl s ite...

Page 39: ...81 Lockwasher 4 51801 82 Starter Assembly 1 Refer to Winch Controls Section 83 Nut 4 53039 84 Remote Control 1 Refer to Winch Controls Section 85 Connector 45o 1 71149983 86 Connector 1 53816 87 Cord...

Page 40: ...39 1 300 lb to 4 500 lb winches TORQUE LIMITER ASSEMBLY PARTS DRAWING OPTIONAL FEATURE Dwg MHP0854 Refer to page 41 for parts list...

Page 41: ...40 6 000 lb to 25 000 lb winches TORQUE LIMITER ASSEMBLY PARTS DRAWING OPTIONAL FEATURE Dwg MHP0583...

Page 42: ...10 Spring See 145501 8 16 145475 10 111 Spring Plate See 106873 8 8 106799 10 112 Load Plate 1 See Note 1 108661 108853 113 Adjusting Bolt See 106884 8 8 106798 10 114 Wire 1 106903 106908 115 Nut 1 S...

Page 43: ...ion Contact your nearest distributor or Ingersoll Rand Material Handling Office for part number information Direct Drive Winches item 27 Winch Model Number Motor HP Motor Mount Position Reducer Gear R...

Page 44: ...4281 M 71044028 71044036 M 4000A20 3 P 71304125 71000970 SP 2 4000B20 3 P 73 1 1 6 05 4 3 71044085 71044093 M 71044119 M 71044101 RA 85 6 1 53549 54958 P 96 1 4500B50 7 5 P 28 8 1 14 2 9 6 54968 71044...

Page 45: ...7 5 8 71044044 71044051 4000A20 3 P 4000B20 3 P 73 1 1 5 2 3 45 71044127 71044135 RA 85 6 1 P 96 1 71044143 71044150 4500B50 7 5 P 28 8 1 11 6 71044226 71044234 7 7 71044200 71044218 6000B20 5 P 70 1...

Page 46: ...o 4500B50 Models 6000B20 to 25000B25 33 Nameplate 1 71106967 R 34 Drive Screw 4 50915 35 Warning Label 1 71060529 151 Warning Label 1 71107130 152 Caution Tag 1 71107148 153 Notice Tag 1 71107155 154...

Page 47: ...1 General Purpose M1 3 4 2 hp 380 24759 1 4 1 3 hp 115 71028088 3 5 hp 24760 1 4 3 4 hp 230 71029243 7 1 2 15 hp 24761 1 2 1 hp 115 71028088 25 hp 24639 1 2 hp 230 71029243 1 1 2 2 hp 115 52588 575V...

Page 48: ...s Check the nameplate attached to the motor for appropriate Reducer assembly type A typical part number may be similar to R70DT90L4BMHR where the first letter represents the reducer type For additiona...

Page 49: ...arts are for current production Eurodrive BM series brakes The last four letters of the motor nameplate for this series are BMHR Volts Motor Frame Size 71BM05 80BM1 90BM2 100BM4 112 132S BM8 132M 160M...

Page 50: ...230 3 12 12 12 10 8 5 7 1 2 6 4 4 2 0 2 460 3 12 12 12 12 12 7 1 2 10 6 4 3 1 0 3 230 5 12 10 10 8 6 3 460 5 12 12 12 12 10 For other voltages contact the factory or a licensed electrician 5 230 7 1 2...

Page 51: ...on where the goods were purchased NOTICE Continuing improvement and advancement of design may cause changes to this winch which are not included in this manual Manuals are periodically revised to inco...

Page 52: ...tates do not allow limitations on incidental or consequential damages or how long an implied warranty lasts so that the above limitations may not apply to you This warranty gives you specific legal ri...

Page 53: ...ond B C V7C 5C7 Phone 604 278 0459 Fax 604 278 1254 Latin America Operations Ingersoll Rand Production Equipment Group 730 N W 107 Avenue Suite 300 Miami FL 33172 3107 USA Phone 305 559 0500 Fax 305 5...

Reviews: