background image

6

MHD56490

Specifications

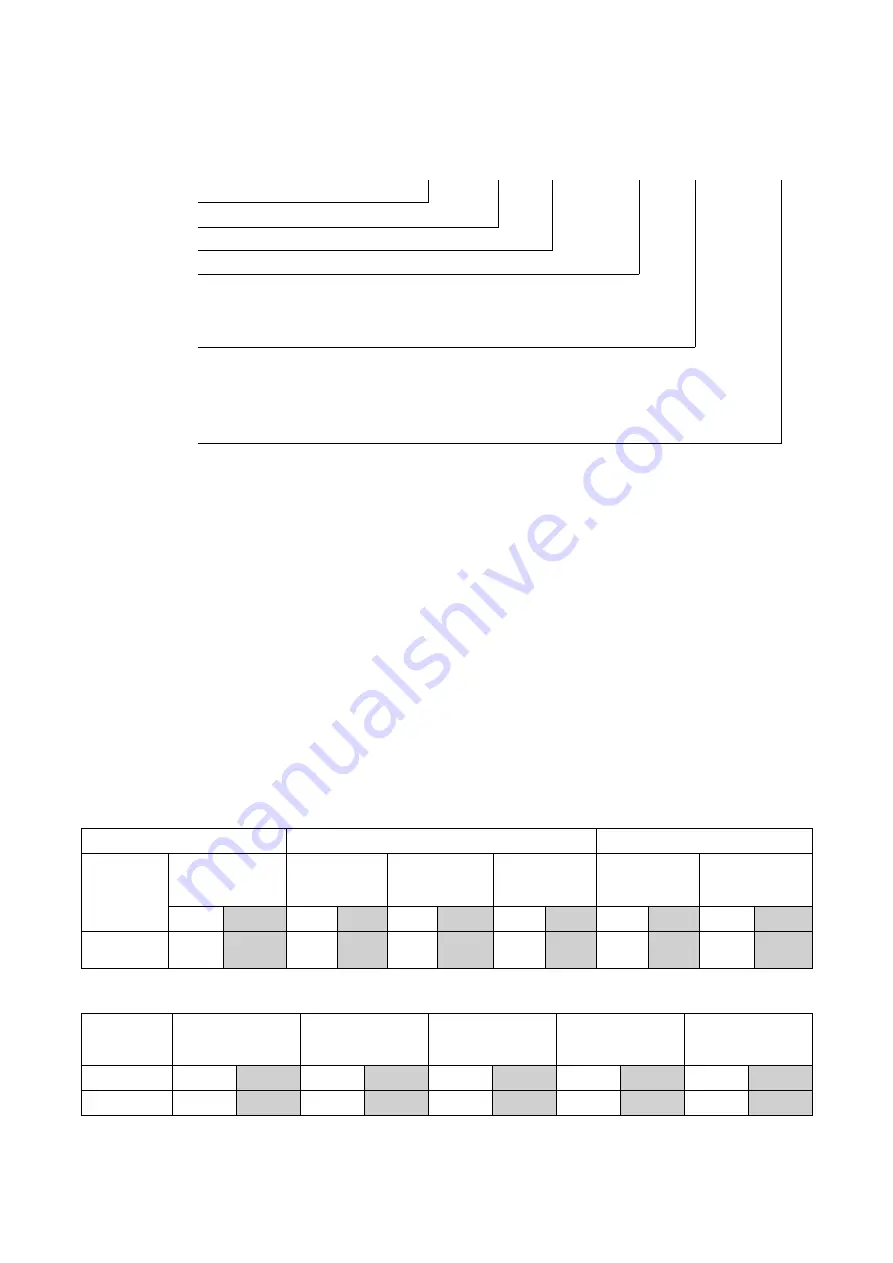
Model Code Explanation

Example: MR150KA-1CE-B

MR

150K

A

-

1

CE

-

B

MR

= Man Rider

150K

= Capacity 150 kg / 330 lbs

A

= Air Power Source

1

= Lever Throttle Control

3xx

= Remote Pilot Pendent (xx hose in m)

Certification:

CE

= Standard (European Standards)

N4
N5

= CE and ABS Certified
= CE and DNV Certified

Options (Other):

A

B

= Manual Wire Rope Guide

= Pedestal Base

K

M1

W1
W2
W4

C

= Horizontal Wire Rope Takeoff Angle
= Typical Traceability
= ABS Witness Test
= DNV Witness Test
= Client Witness Test
= Operator Orientation Cover

Standard Features:

Automatic Disc Brake and Drum Band Brake

Winch Guard

Vertical Rope Entry (underwound configuration)

Grooved Drum for 7/16 in (10 mm) Wire Rope

Main Air Emergency Stop Valve

Emergency Lowering Device

Upper and Lower Limit Switches

Overload Protection

Slack Line Device

Press Roller (assisting spooling device)

Air Line Accessories (water separator, regulator, filter, and lubricator)

Stainless Steel Hoses

Table 2. Specifications Table

Air System

Rated Performance (at rated pressure/volume)

Temperatures

Working

Inlet

Pressure

Range

Air Consumption

(at rated pressure

and load)

(Full) Rated

Working Load

Line Speed with

Rated Load

Winch Nominal

Overload

Setting

Ambient

Operating

Temperature

Supply Air

Temperature

scfm

m

3/

min

lbs

kg

fpm

m/min

lbs

kg

F

C

F

C

70 to 100 psig

(5 to 7 bar)

88

2.5

330

150

98

30

412

187

- 4º to

149º

- 20º

to 65º

32º to

149º

0º to

65º

Note:

T.D. = Design Temperature is -20° C as defined by DNV and ABS requirements.

Sound

Pressure

Level

(a) (b)

Air Supply Inlet

(NPT)

Motor

Drum Barrel

Diameter

Net Weight

(c)

Drum Flange

Diameter

dBA

inch

mm

HP

kw

inch

mm

lbs

kgs

inch

mm

87

3/4

19

1.5

1.12

13.5

342

463

210

17.5

450

(a)

Sound measurements have been made in accordance with ISO 11202, ISO 3744-3746 and ISO 4871 test specifications for sound from pneumatic
equipment. Readings shown are based on the average noise level of each winch configuration, proportionate to the utilized time in a regular cycle.

(b)

Lpc (Peak Sound Pressure) does not exceed 130 dB

(c)

Weight of standard winch without wire rope.

Summary of Contents for Man Rider MR150K Series

Page 1: ...Save These Instructions Form MHD56490 Edition K November 2021 CCN 45957115 Air Powered Man Rider Winch MR150K Series y Product Information...

Page 2: ...cement parts may result in safety hazards decreased performance and increased maintenance and will invalidate all warranties Original instructions are in English Other languages are a translation of t...

Page 3: ...ing Wire Rope 11 Safe Wire Rope Handling Procedure 11 Wire Rope Spooling 11 Safe Installation Procedures 11 Rigging 11 Rigging Harness riding belt 12 Manual Wire Rope Guide 12 Slack Line Device 12 Lim...

Page 4: ...ction Report 22 Adjustments 23 Overload Device 23 Automatic Band Drum Brake 23 Lubrication 24 Recommended Lubricants 24 General Lubrication 24 Reduction Gear Assembly 24 Seals and Bearings 24 Wire Rop...

Page 5: ...ned technician to determine the remaining service life Refer to Maintenance Intervals chart in Product Maintenance Information Manual CE and ATEX Option This product is in conformity with the most rec...

Page 6: ...Stainless Steel Hoses Table 2 Specifications Table Air System Rated Performance at rated pressure volume Temperatures Working Inlet Pressure Range Air Consumption at rated pressure and load Full Rated...

Page 7: ...Documentation may include chemical and physical properties of raw material heat treating and hardening tensile and charpy tests as required for the part Type Approval Certification N4 N5 includes the...

Page 8: ...winch to a structure Make sure that the bolts are correct size and strength to install the winch to the structure 1 Make sure the winch is positioned to allow for proper spooling of the wire rope onto...

Page 9: ...main air inlet Supply lines should be as short and straight as installation conditions will permit Long transmission lines and excessive use of fittings elbows tees globe valves etc cause a reduction...

Page 10: ...of the way of moving equipment Always stow in a slack condition Install Winch so that wire rope when at take off angle limits does not contact mounting surface or winch guard panels Install winch with...

Page 11: ...um storage Safe Installation Procedures 1 Do not use wire rope as a ground earth for welding 2 Do not attach a welding electrode to winch or wire rope 3 Never run wire rope over a sharp edge Use a cor...

Page 12: ...eration during use Do not use if wire rope guide is bent or damaged Ensure manual wire rope guide is moved the full length of the drum for even wire rope spooling Slack Line Device The slack wire devi...

Page 13: ...not twisted or crimped Refer to Figure 12 p 29 Pendent lengths up to 66 ft 20 m are available Contact the factory for pendent lengths greater than 66 ft 20 m C CA AU UT TI IO ON N To avoid damaging th...

Page 14: ...w as practical Ingersoll Rand recommends that you do not exceed 100 ft 30 m per minute Any applicable codes and standards should be followed 2 Personnel being lifted or lowered must be alert to obstac...

Page 15: ...tion the control valve Make sure the winch is not overloaded Winch Mounted Control Refer to Figure 8 p 28 Refer to the label on the winch for take off angle part number 45972643 Vertical Wire Rope Tak...

Page 16: ...linder is vented allowing the spring tension to automatically engage the brake and prevent drum rotation Emergency Lowering This device allows the person to be lowered safely in case of main air suppl...

Page 17: ...vent of slack the slack wire device arm will lower by its own weight and activate a pneumatic switch that stops the pilot air lowering signal to the motor The winch is then stopped with both brakes ap...

Page 18: ...before the condition becomes dangerous Deficiencies revealed through inspection or noted during operation must be reported to designated personnel to make sure that corrective action is taken A deter...

Page 19: ...ency Brake Release x x x x x x Automatic Band Brake a x x x x x x a Do not disassemble Auto Band Brake Air Cylinder unless brake operation or visual inspection indicates a requirement N NO OT TI IC CE...

Page 20: ...smoothly Verify spooling direction is correct for winch and application 12 Brakes Lift and lower the load a short distance to test brakes Brakes must hold load without slipping Automatic brake must r...

Page 21: ...ope f Slack Line Detector Inspect rollers for wear and grooves Make sure the rollers freely rotate g Make sure the winch and drum guarding is installed h No modifications have been performed on the wi...

Page 22: ...condition contact the nearest Ingersoll Rand Distributor or the factory for technical assistance Component Condition Corrective Action Notes Pass Fail Repair Replace Uprights and Siderails Drum Band...

Page 23: ...rew and adjusting screw in order to increase or decrease the SWL increase SWL by tightening the adjusting screw Adjustment must be made for an overload of 125 maximum of SWL 3 Tighten securing screw 4...

Page 24: ...damage to winch and or its associated components Table 10 Lubrication Intervals Component Interval Check Air Line Lubricator Daily Change Gearbox Oil 5 years or during Winch Overhaul Recommended Lubri...

Page 25: ...a normal frequency the oil in the reduction housing is suitable for one year operation without being changed However when the winch is used at a high frequency the oil may need to be changed more ofte...

Page 26: ...ure 4 MHP3378 30 10 10 5 5 20 20 60 100 60 A B C D Roller and Weight Positions W Weight Placement T Roller Placement A B Starting Rop e Ang le degree End ing Rop e Ang le degree A B C D 10 5 T T W 10...

Page 27: ...mm 17 7 LS 150 533mm 21 FA150 508mm 20 A C B B Figure 6 MHP3622 Upper Cam Haul in Lower Cam Payout Limit Switch Adjustment Adjustment Screws 7 mm A B C Figure 7 MHP3380 B Wire Rope Anchor A Dead End o...

Page 28: ...on Reset on Button Vertical Operation Payout Haul In A B C D E F Figure 9 MHP3383 For MK1 before 2017 A Figure 10 MHP3795 For MK2 before 11 19 2021 1 2 Figure 11 MHP4610 For MK3 after 11 19 2021 1 2 P...

Page 29: ...tton ON Button Function Levers Pendant Handle A B C D Figure 13 MHP3420 To Regulator Filter Water Separator Main Air Supply Remove Plug for Auxiliary Air Supply A C B P Pr ro od du uc ct t I In nf fo...

Page 30: ...30 MHD56490 Air Schematics For MK2 before 11 19 2021...

Page 31: ...PSI RELIEF VALVE 1 AUTOMATIC BAND BRAKE 2 AUTOMATIC DISC BRAKE 3 EMERGENCY STOP 4 MOTOR 5 DIRECTIONAL CONTROL VALVE 6 OVERLOAD PROTECTION VALVE 7 LIMIT SWITCH 8 FILTER REGULATOR LUBRICATOR 9 SLACK LIN...

Page 32: ...26 30 16 18 49 56 37 42 22 25 7 16 20 55 63 41 47 25 28 78 88 58 66 35 40 1 2 20 85 96 64 72 38 43 120 136 90 102 54 61 9 16 18 121 137 91 103 55 62 171 194 128 146 77 87 5 8 18 170 193 127 144 76 87...

Page 33: ...363 411 218 247 667 756 500 567 300 340 M24x2 609 690 456 517 274 310 839 951 630 713 378 428 M30x2 1227 1390 920 1043 552 626 1692 1918 1269 1438 761 863 Notes 1 Definitions DRY Cadmium plate zinc pl...

Page 34: ...DITION OR REPRESENTATION OF ANY KIND WHATSOEVER EXPRESSED OR IMPLIED STATUTORY OR OTHERWISE AND ALL IMPLIED WARRANTIES AND CONDITIONS RELATING TO MERCHANTABILITY AND FITNESS FOR A PARTICULAR PURPOSE A...

Page 35: ...MHD56490 N No ot te es s...

Page 36: ...i in ng ge er rs so ol ll lr ra an nd dp pr ro od du uc ct ts s c co om m 2021 Ingersoll Rand...

Reviews: